table of contents
- Choose location
- time
- Possible materials
- Tools & aids
- Dimensions & structure
- Chambers
- Building instructions for wood
- Instructions for stone
- Foundation & filling
- Kits
- frequently asked Questions
Building a cat-safe hedgehog house is not difficult with our instructions. Here you can find out how the structure works, which tools and which material are required, as well as the correct location.
In a nutshell
- The layout and dimensions must match
- a cat-safe hedgehog house also protects against other animals
- ready-made kits are the simplest solution
- protected location is important
natural materials are preferred
Choose location
The most important factors when choosing a location are the following:
- protected
- quiet
- little frequented
Tip: Directly next to the entrance or a playground, the hedgehog house is not likely to be accepted or the animals are disturbed during hibernation. A secluded corner in the garden is better, for example next to the compost, between the hedge and the fence or behind the shed.
time
Depending on the region, climate and current temperature, the shelter is accepted from around October. the Hedgehogs then look for quarters for the winterwhen temperatures begin to drop and the first night frosts can be expected. It is therefore ideal if one or more houses stand and serve as a shelter from September.

Possible materials
Wood and stones are particularly suitable. Plastic boxes with insulation are also possible. These are cheap to buy and easy to clean. However, they quickly become brittle and cracked due to temperature fluctuations and UV radiation, for example. In addition, they can fog up on the inside and thus create an unfavorable climate.
Untreated wood or wood that has been treated with a safe protective agent, on the other hand, can absorb and release moisture. It is therefore a wonderful base for the hedgehog house. Stones are also associated with many advantages. They heat up comparatively quickly and store the heat for a long time. As a result, the temperature in the shelter is kept relatively even.
Tools & aids
Which tool is required depends on the material. A hedgehog house made of wood requires different tools than a variant made of stone. Usually no tools are required for stones. Just stacking them can be enough. If you want to build a more durable variant yourself, however, the following utensils and aids are required:
- board
- Hay, straw, sticks
- Trowel
- Mason tubs
- mortar
- Stirring stick or stirring attachment for the drill
- water
- Bricks or natural stones
For a wooden hedgehog house, however, these aids are required:
- Cordless drill or drill
- Wooden boards
- saw
- Hinges
- Screws and screwdrivers
- Styrofoam

Dimensions & structure
These points show diversity. Please note:
- Number of sections
- Entrance size
- height
- Length of the side walls
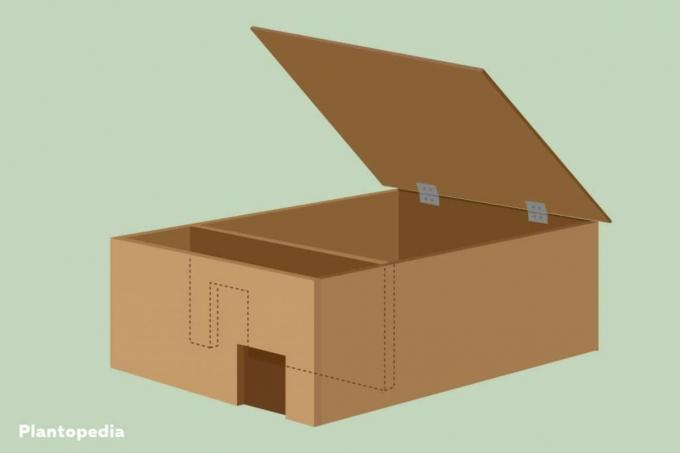
A footprint of 30 x 30 centimeters is sufficient. Hedgehogs can spend the night here individually. The advantage of this small space is that it heats up quickly. In addition, several boxes can be placed next to each other. One disadvantage, however, is that it cools down quickly. This is a potential problem, especially with very small and light animals. However, this can be resolved through isolation. Larger hedgehog houses have the advantage that they can be divided into several sections. On the one hand, this means there is space for several animals. On the other hand, the entrance can be made particularly cat-safe.
The entrances should each be ten by ten centimeters in size. The height should not exceed 30 centimeters.
Chambers
It is often recommended to divide the hedgehog house into chambers. The main purpose of this is to keep drafts away and provide additional insulation. However, it only makes a limited contribution to safety from cats. Because if the cat fits through the first entrance, it can also get through the second. A division into two chambers is only recommended from a size of at least 30 by 50 centimeters.

Building instructions for wood
Building a cat-safe wooden hedgehog house is not difficult. There are three different connection options to choose from. It refers to:
- Afford
- Screws
- angle
The advantage of the wooden strips is that the effort is very low, but drafts are avoided and the costs do not increase significantly. However, the parts can also be screwed directly to one another or connected to one another using angles. If you don't have a workbench available, you should use strips or angles.
Once the decision has been made, the following steps must be followed:
-
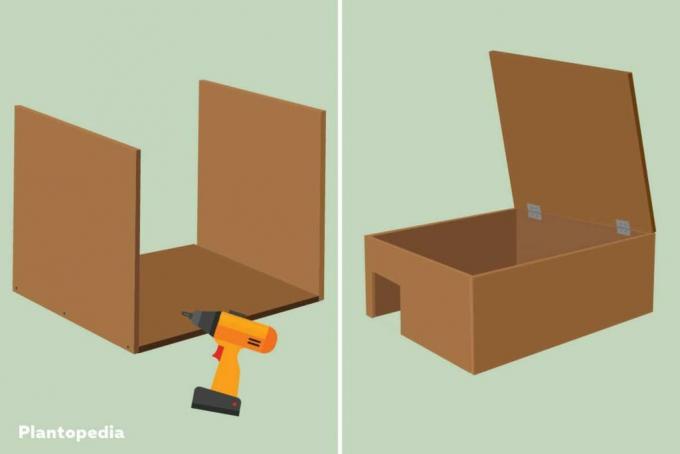
Select frame and roof: For the simplest variant, only four side walls and a roof are required. So five simple boards are enough. OSB panels, for example, are recommended.
-
Build the frame: First the four side walls are connected to one another. Care should be taken that there are no gaps or cracks. Because the penetrating drafts and moisture could pose a threat to the hedgehogs.
-
Cut out door: A door opening is cut out with a jigsaw. 10 x 10 centimeters at floor level are sufficient for this.
- Apply the roof: Another board can be placed directly on the frame for this purpose. Alternatively, it can be fixed with hinges. In this way, the interior can be easily checked and, if necessary, filled or cleaned.

Tip: A slight sloping roof is enough to allow rainwater and melted snow to drain off better. This increases the lifespan of the hedgehog house. In addition, insulation in the form of styrofoam can be introduced. This is particularly recommended in very cold regions.
Instructions for stone
Hedgehogs are not picky about their winter quarters. It should be quiet, protected and comparatively warm. Piles of wood and niches are therefore also used. If you want to build a simple and durable cat-safe hedgehog house, you can use old bricks, for example. In addition to the heat-storing effect, these have the advantage that they can be stacked quickly and easily, are durable and have a long service life.
The assembly instructions are therefore also simple:

-
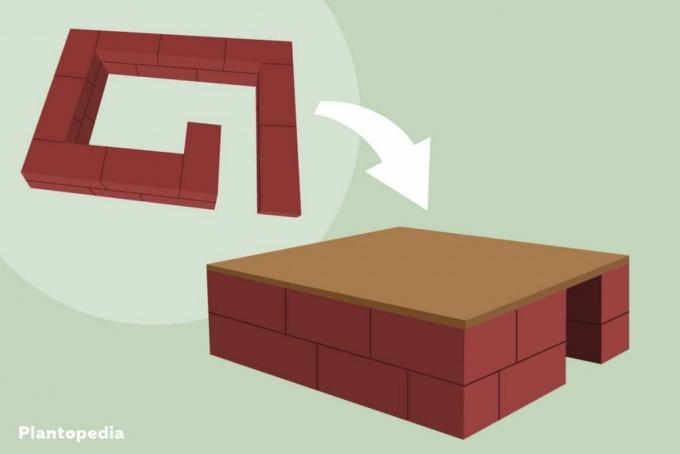
Laying the floor plan: The first row is applied. Make sure that the surface and edges are flat. If you don't want to use mortar, try to avoid gaps completely.
-
Staggered hanging up: For stability and durability, it is advisable to move the stones so that they are centered on the joints in the lower row. To do this, the bricks may have to be cut or sawed to size.
- Attach cover: After the hedgehog house has been built as high as desired, it is closed at the top with a board. This can simply be laid on and covered with brushwood, moss and straw. This creates insulation.
A hedgehog house made of natural stone is a bit more complex to build, but it looks more natural.
-
Laying the frame: The frame or outline of the house is laid with the selected stones. The stones should fit together as well as possible at the edges in order to create only small joints.
-
Close joints: The joints can be closed with mortar and a trowel and the stones can be connected to one another.
- Build rows: When the outline is ready, the next rows can be created. To do this, the sequence must first be determined. So test out which stones go well together.

Tip: Number the stones. This can be done, for example, with small pieces of painter's tape. This allows you to place the stones in the correct order.
Foundation & filling
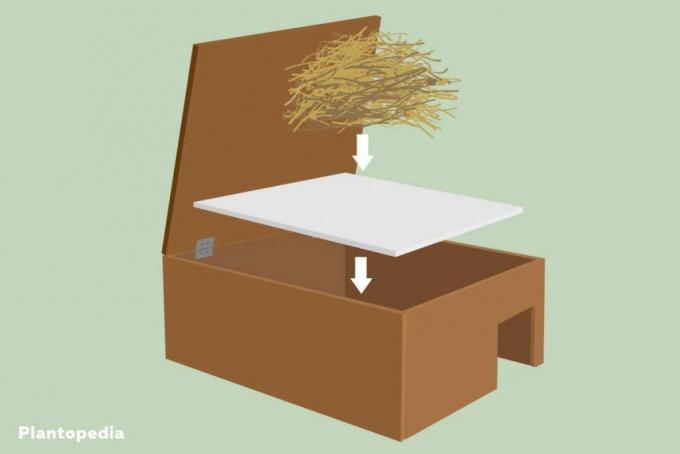
A foundation is not absolutely necessary. However, it can make sense in very cold regions. However, it doesn't have to be solid, concrete ground. A sheet of styrofoam can also be placed in the house, which can be insulated and covered from below. Suitable materials for this are:
- Hemp litter
- hay
- brushwood
- straw

Kits
The easiest way to build a cat-safe hedgehog house is to buy and assemble a finished kit. All you have to do is follow the manufacturer's instructions. If you only have little manual experience so far or want to be finished quickly, such a kit is the best choice. You only need a few tools and have both the material and the necessary accessories available in the appropriate scope.
frequently asked Questions
Because cats and dogs can pose a significant threat to the hedgehogs. However, the risk of injuries can be prevented through a small entrance and a stable structure.
The litter should be cleaned and changed at least once a year. It is important not to do this in late autumn or winter. Otherwise the animals would be disturbed.
A wooden shelter is easier to move around and quicker to set up. Variants made of stones are easier to isolate and more durable.
