The exotic flowers are not easy to care for and are happy to be replanted from time to time. We show when and how to repot orchids and which soil is best for it.
Video instructions for repotting orchids [music: www.bensound.com]
The popular Orchids (Orchidaceae) require special care compared to other houseplants. In particular, the striking aerial roots of the orchid pose a challenge, as they can rot if handled incorrectly. To prevent this, the tropical plants should be repotted at regular intervals. We'll show you why orchids need to be repotted and when is the right time to repot is what soil is best, how best to go about it, and how to care for orchids after repotting are.
contents
- Why do you have to repot orchids?
- The right time: when do you repot orchids?
- The right soil for transplanting orchids
-
Repotting orchids: this is how you proceed
- Repot and divide orchids
- Caring for orchids properly after repotting
Why do you have to repot orchids?
Orchids need to be repotted regularly when the soil is too decomposed. Or if the pot volume has become too small or the earth is infested with pests or fungi, it is important to
Orchid soil switch.The Orchidaceae family includes innumerable species, each of which can have very different demands. This article is all about epiphytic, exotic orchids of various genera. In contrast to terrestrial orchids, epiphytic orchids grow as "epiphytes" on trees and do not take root in the ground. The tropical beauties are considered to be particularly true to their location. This means that they can hardly cope with interventions and changes. So why should you put stress on the beautiful flower with its special roots by repotting it regularly? There are three good reasons for this.
The first is simple: the orchid naturally grows and gets bigger over time. At some point she just gets too tight in her pot and she wants to move to a larger home. But many orchids like it a little narrower and it doesn't have to be bad when roots grow out of the top of the pot. If the orchid is already growing more outside than inside the pot, then it is urgently time to repot.

The second reason has something to do with the particular location requirements of the orchids. The epiphytic genera and species are not used to being rooted in soil because they grow on trees. Most of the roots hang in the humid air of the jungle. That is why they are also called aerial roots. It is therefore particularly important to find the right one Substrate for orchids to choose - but more on that later. If the soil in the plant pot is a bit older and therefore badly decomposed, slumped and without air-filled spaces, the indoor plants should be repotted soon.
The third and final reason the popular plants should be repotted is because the Orchid from diseases or pests is infested. If a layer of mold or algae forms on the substrate, the roots will rot from waterlogging, then you have no choice but to quickly repot the orchid save. This also applies if unwanted vermin have nested in the earth.

3 good reasons to repot orchids:
- The aerial roots are already growing strongly out of the planter
- The substrate has already sagged and is no longer airy
- at Disease or pest infestation of the old substrate
The right time: when do you repot orchids?
In general, it can be said that an orchid should be repotted about every two years. But when in the year is the perfect time to give your orchid a new home? The best time to repot is when the plant has taken a break and is not blooming. the Variety of orchids however, it is very large and not all orchids rest at the same time. This is why spring is the best time to repot some orchid varieties. Other varieties tolerate repotting better in autumn. As a rule of thumb: never repot your orchid between November and March because the plant is about to close this time simply does not get enough light and heat to be fine after changing pots to grow. Many also ask themselves whether orchids can also be repotted during the flowering period. For flowering, the plant puts all its energy into flower formation and at the same time does not have enough strength to grow well again after repotting. Basically, orchids with flowers should not be repotted if possible. But sometimes there is simply no other way, for example when the flower is infected with diseases. Then it is better to cut off the flower with a sharp, disinfected knife before repotting.
Summary: when is the right time to repot orchids?
- Every 2 years
- In spring or autumn
- Never between November and March
- If possible not during flowering
The right soil for transplanting orchids
As already mentioned, most orchids are epiphytes that do not have roots in the ground, but have their aerial roots in the open air. It is therefore particularly important that no normal earth, but exclusively Orchid soil is used for repotting. This has special properties that orchids need in order to be able to grow and thrive. The soil should be as coarse as possible so that enough air and light can get to the roots. As an alternative to the orchid soil in stores, you can also make it yourself from pine or pine bark and other materials. Buying a professional one is particularly worthwhile for beginners Orchid soil but still, to be on the safe side.
Which substrate is best for orchids?
- Orchids are epiphytes and therefore have so-called aerial roots
- The substrate should therefore be as coarse and permeable as possible
- Special orchid soil use

Tip: Orchids are a very diverse group of plants and do not all have the same demands. Different types of orchid have different needs. This is why professional orchid soil can reach its limits with some species. In this case, only special soils with aggregates can be used or the substrate can be mixed completely yourself. The most important thing when caring for orchids is therefore to find out exactly what they need.
Repotting orchids: this is how you proceed
Before repotting, it is important to prepare the orchid well for it. To do this, you should water your orchid well a few days beforehand and immerse it in a lukewarm water bath for a maximum of one to two hours immediately before repotting. This makes it easier to remove the exotic plant from the planter for repotting.
The next question to be clarified is in which pot orchids should be repotted. The aerial roots of the orchid can develop particularly when they receive light, as does the upper part of the plant. A good way to do this is to choose a clear planter. Of course, there should be enough holes on the underside to allow excess water to drain off.
A more visually appealing solution is to repot orchids in glass pots. In principle, it is possible to use a pot that is closed from below. In this case, however, you should make sure that there is never waterlogging on the ground, otherwise rot will quickly develop. Orchids can also be repotted in a bowl, but this should also be as transparent as possible.

Tip: When the orchids are completely potted in glass, the container should on no account be left in the blazing sun for long during the day - otherwise the beautiful plant will quickly get too warm.
In order to be well prepared for repotting, you should know which materials you will need for this. So put a suitable planter and special Orchid soil ready. You also need a sharp knife, which you thoroughly disinfect with alcohol. Orchids are particularly sensitive plants, which is why they must be worked as cleanly as possible. Scissors, a spray bottle with lukewarm water and carbon powder are also helpful for repotting orchids.
What do you need for repotting orchids?
- Transparent planter with drainage holes
- Planter (ideally also transparent)
- Specific Orchid soil
- Sharp, disinfected knife
- scissors
- Spray bottle with lukewarm water
- Coal powder

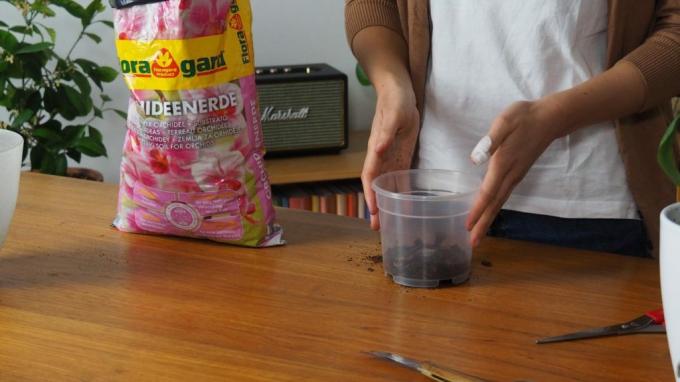
Now the actual repotting can finally begin. As a first step, fill the new planter one-fifth with it Orchid soil. Do not press it down, it should lie as loosely as possible in the pot. Then the orchid is very carefully removed from the old planter. It is best to hold it between the tuft of leaves and the root ball; it is most robust there. If the plant does not come off the old pot easily, do not try to use force to remove the plant. It is better to cut open the old pot.

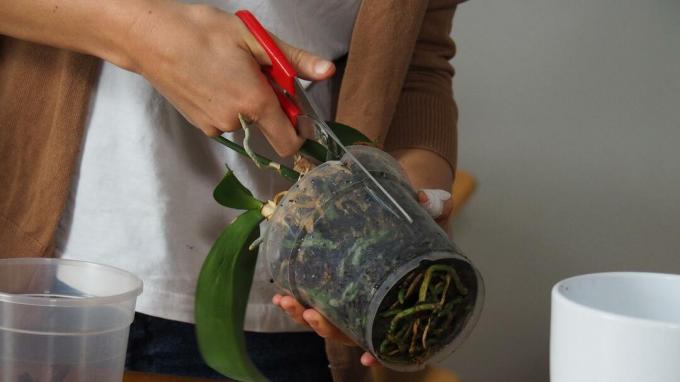
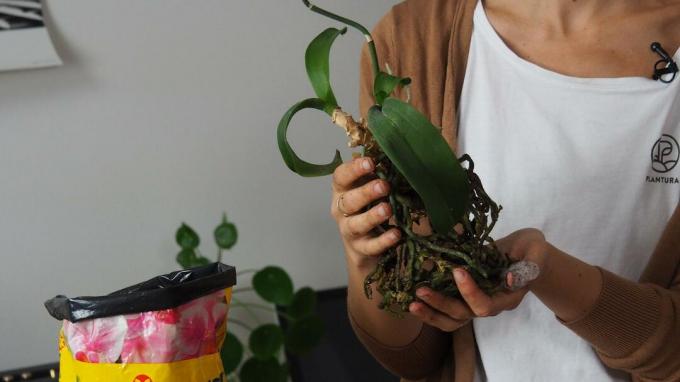
Once the orchid has been freed, you can take a closer look at the orchid's aerial roots. If you discover rotten, dried up or damaged roots, you should remove them directly with a sharp and sterile knife. For mini orchids with strong root growth such as Phalaenopsis or Zygopetalum up to a third of the healthy roots are removed from the center of the root ball. Cut wounds are coated with the charcoal powder. When only the healthy roots are left, the plant is placed in the new planter. Again, this step is done very gently and carefully. The roots are not pressed into the pot. If the plant sits well in the pot, fill it with from the sides Orchid soil. This is not pressed on either. To ensure that the substrate is well distributed, you can tap the pot vigorously several times on the table with the bottom of the pot.
Step-by-step instructions to properly repot orchids:
- Planter to a fifth with Orchid soil fill up
- Carefully remove the orchid from the old pot
- If necessary, cut open the old container so as not to damage the roots
- Cut off old, dry roots with a sharp knife
- Treat cuts with charcoal powder
- Carefully place the orchid in a new container
- Fill the pot with orchid substrate, do not press it down
- Knock the pot several times on the table so that the substrate is evenly distributed
Repot and divide orchids
The repotting and dividing of orchids can be combined well, as the plant is only exposed to the stress once. The following applies here: only orchids with two stem axes can be propagated by division. If your plant has more than six bulbs (bulges above the roots) and two new shoots, it can be divided. This method of propagation also has the advantage that older, blooming orchids are rejuvenated. Carefully remove the plant from the pot as described above. Now cut the connection between the bulbs with a sharp, deified knife. Each part should have at least three bulbs. Then the fused roots are untangled and separated from each other. You should proceed as carefully as possible so that no roots are damaged. If this does happen, cut off the break with a sharp, sterile knife and coat the wound with carbon powder. Now the two orchid parts can be planted as described above.

Overview: How can orchids be propagated by dividing them when repotting?
- Orchids with two stem axes and min. 6 bulbs can be divided
- Cut the connection between the bulbs with a sharp, deified knife
- Each part should be min. Have 3 bulbs
- Carefully detach the intertwined roots from one another
- Proceed carefully and damage as few roots as possible
- If roots break off, cut off the break with a disinfected knife
- Plant divided orchids as described above
Caring for orchids properly after repotting
Once you have successfully repotted your orchid, it would like to be left alone for the next few days. In order to be able to grow well again, it should also be as light and warm as possible. Watering for orchids is a sensitive topic anyway. The plant is not watered for the first five days after repotting. In the first few days after repotting, the above-ground parts of the plant are only moistened with a spray bottle. That too Fertilizing orchids wants to be learned. Your orchid does not need any fertilizer in the first four weeks after repotting.
How do I properly care for my orchid after repotting?
- Do not water for the first five days
- Just moisten with a spray bottle
- Do not fertilize for four weeks after repotting
- Place as light and warm as possible
Still need more tips on Caring for your orchid? We have put together expert tips for you in our special article.
Many thanks to Floragard for their support!


