The current trend from the Far East fascinates bonsai lovers all over the world. In our video we show how to cultivate the little tree in a moss ball and give tips on caring for the bonsai Kokedamas.
DIY instructions for a bonsai kokedama [music: www.bensound.com]
Kokedamas are the new trend when it comes to stylishly staging Houseplants goes. The plant idea originally comes from Japan, where the word "Kokedama" means "moss ball". And this is exactly what the heart of the matter is: in fact, the Kokedamas are large balls of moss in which indoor plants grow as if by magic and without any pots. As a window decoration on a bowl or hanging elegantly from the ceiling, the moss balls are a great eye-catcher. Kokedamas, in which bonsai are planted, are particularly popular, as the small plants are perfect for this and match the Asian flair of the Kokedamas. In our video we show you how you can easily make a bonsai Kokedama.
When is the best time to plant a Kokedama?
If you are toying with the idea of creating a bonsai kokedama yourself, you should wait for the right time. In fact, early spring is best for transforming the bonsai. The reason for this is the annual rhythm: During winter the bonsai is in a dormant period and hardly develops any new root mass. In the early spring, on the other hand, the growing season begins again, which means that the bonsai can quickly root its new realm and thus adhere particularly well to the moss ball. Therefore, early spring, just before the start of the growing season, is the perfect time to turn the bonsai into a kokedama.
What do you need for a Kokedama?
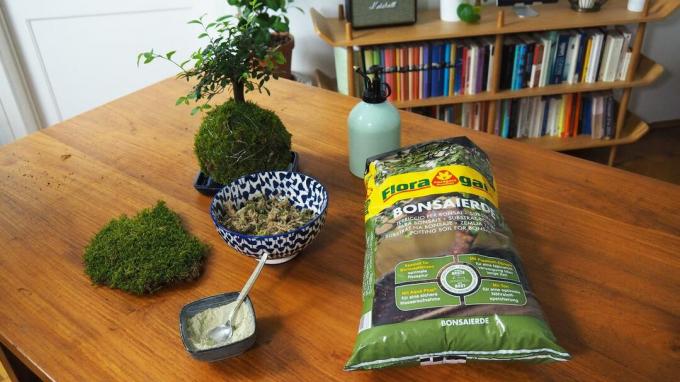
At first glance, it sounds time-consuming and complicated to plant a bonsai in a moss ball. In fact, creating a bonsai Kokedama is not as difficult as you might think. Gardeners even have a lot of things that are needed for this at home. So you need:
- Bonsai (as small as possible)
- Bonsai soil
- Bentonite
- Peat moss (Sphagnum)
- water
- key
- Moss panels
- Floral wire
- Coasters
- spray bottle
This is how you plant a moss ball with bonsai
Crafting a Kokedama is widespread in Japan, but more and more German gardeners are venturing into the unusual cultivation method. The first thing to do is to remove the bonsai from its old pot. Unfortunately, this is often not so easy: Sometimes the bonsai is tied to its shell with fixing wires, which is why the ornamental plant should never be removed from its shell by force. Instead, any fixations are loosened and the bonsai is carefully lifted out of its shell. If you moisten the soil well beforehand, the plant can often be removed from its pot even more easily. Once the bonsai is out of the pot, the remaining soil is carefully removed from the root ball. However, you should proceed carefully and rather leave some soil on the plant instead of damaging the delicate roots. Now the bonsai can be put aside while the earth is being prepared for the kokedama.
Mix the right soil for a Kokedama
To make a Kokedama, the right soil must first be mixed together. First of all, you need a large bowl in which the individual components of the Kokedama soil can be mixed. Then you need about two handfuls of bonsai soil. In contrast to normal potting soil, this is particularly structurally stable, so that it is perfect for forming a ball. In addition, bonsai soil has good water storage capacity and is perfectly adapted to the special nutrient requirements of bonsai. A heaped teaspoon of bentonite is added to the bonsai soil, which serves as an additional binding agent. In addition, two handfuls of peat moss are needed, which improves the water retention of the soil. However, depending on the size of the bonsai, it may be necessary to use a little more of all the components.
Procedure for shaping the moss ball
Now some water is poured into the earth and slowly kneaded into a mud ball. Before you start kneading, however, you should remove rings or other jewelry from your hands. It is also worth starting with a little water and adding more liquid as needed so that you don't run the risk of the mixture becoming too liquid. The consistency is optimal when the substrate can be shaped well and no longer crumbles. If a beautiful ball can be formed, it is first flattened again in the bowl so that a hollow is created in which the bonsai can be placed. The root ball of the bonsai is now enclosed with the substrate mixture. You can now carefully shape a ball around the roots of the bonsai with your hands. The best way to fix pits or other unsightly spots is to carefully press some of the remaining substrate onto these spots.
Before you start to coat the Kokedama with moss, you should wash your hands - otherwise you will quickly have unsightly mud stains on the moss. You should now have floral wire and the large sheets of moss ready. The first moss plate is carefully held to the substrate ball and wrapped with the floral wire so that it is securely attached to it. If the moss is dry, it is worth moistening it beforehand with a sprayer in order to achieve better flexibility. The remaining free areas of the sphere are covered with the other moss panels according to the same principle. Smaller pieces of moss can also be used for small, unsightly spots or the large moss sheets can be cut to a suitable size. Here, too, everything is carefully fastened with floral wire. If the bonsai Kokedama has the right shape, it can be placed in a suitable location on a bowl. But hanging Kokedamas on a wire so that they seem to float in space is extremely popular and decorative.
Bonsai Kokedama: Quick Guide
Do you want to recreate a bonsai Kokedama quickly and easily? No problem - all the steps are summarized once again in our quick guide.
1. Carefully remove the bonsai from the old pot, paying attention to possible wiring
2. Carefully remove excess soil from the root ball and put the bonsai to one side
3. In a large bowl, mix two handfuls of bonsai soil, one teaspoon of bentonite and two handfuls of peat moss
4. Add water and knead into a ball
5. Press the ball flat in the bowl and place the bonsai in the middle
6. Enclose the root ball of the bonsai with the substrate and carefully shape a ball
7. Moisten the moss sheets
8. Attach moss sheets individually to the substrate ball and secure with floral wire
9. Repeat the process until everything is covered with moss - compensate for minor errors with small pieces of moss
10. Place the Bonsai Kokedama on a bowl or hang it up in a suitable place

Proper care of a bonsai Kokedama
Properly caring for a Kokedama is not particularly difficult given a few important points. The bonsai Kokedama should get a bright and warm place, but never be exposed to direct sunlight - this would dry out the moss too quickly. You should also not water the bonsai kokedama with a watering can. Instead, the moss ball is moistened regularly with a spray bottle. If the moss is particularly dry, it is worth giving the Kokedama a dive. Put water in a large container and completely submerge the root ball in it. As soon as no more air bubbles rise, the Bonsai Kokedama is sufficiently watered. You can easily tell whether it is time for some water again by the weight of the Kokedama - if it feels particularly light, it is time to water. Similar to a conventionally grown bonsai, a bonsai kokedama should also be fertilized regularly. The best solution for this is a liquid fertilizer that is added with the irrigation water.
Are you enthusiastic about bonsai and want to find out more about this topic? Just take a look at our articles Watering the bonsai, Cutting bonsai or Fertilize bonsai past.
Many thanks to Floragard for their support!