
Raised beds are on the rise. After assembly, filling can be done quickly. But it is not easy to put the different layers on correctly.

In addition to being comfortable and back-friendly gardening, raised beds offer a number of other advantages: They are difficult for Snails reachable, they can also be found in places with less fertile soil Vegetable growing enable and they make it easier for us to keep weeds at bay. The warmth that arises from the rotting of the filling material and the exposure to sunlight from the sides means that raised beds can also be harvested earlier and more productively. Success and yield are closely related to the content of the raised bed and are therefore in your hands. We will show you what you have to consider when filling and refilling your raised bed and how you can avoid mistakes.
contents
- Filling a raised bed: an overview of the layers
- Filling a raised bed: instructions
- Expert tips on filling: Avoid mistakes
Filling a raised bed: an overview of the layers
It doesn't matter if that Raised bed consists of wood, stone or any other material, after filling it should be made of different Raised bed layers consist of certain materials. In this way, the plants optimal growth conditions are created. The bottom layer (about 30 cm) serves as drainage so that no water accumulates in the bed. Coarse materials such as branches and twigs, stones and wood chips are well suited for this. Existing cavities allow water to flow away better and provide soil organisms with enough oxygen.
On top of this drainage layer, a further 20 to 30 cm of somewhat finer material such as leaves, grass clippings, turf, green kitchen waste or, if necessary, mother earth are layered. For example, consider a Balcony raised bed want to fill and do not have the materials described yourself, you can either ask garden owners or buy ready-made "filling material" for raised beds online.
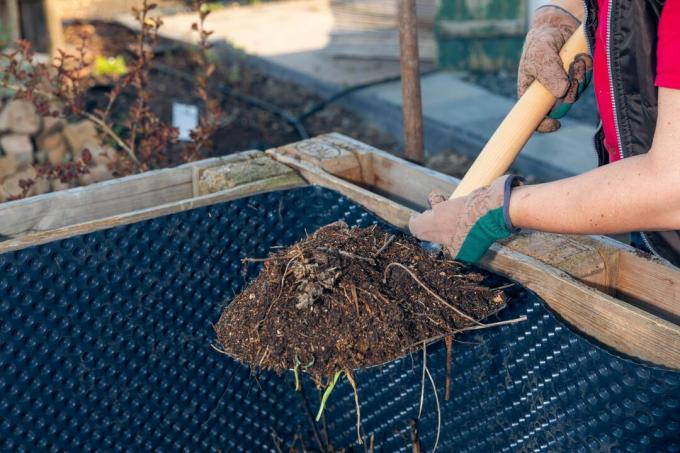
The third layer is about 20 cm high. Depending on which materials are available, leaves, coarsely decomposed compost, animal litter, grass clippings, straw or the like can be layered on top of one another in thin layers. For a quick decomposition and thus a more compact bed, ripe compost can also be added between the other materials.
The finish is a layer of at least 20 cm thick made of a mixture of good mother earth, potting soil and ripe compost. This layer of soil must by no means be too thin so that the plant roots have enough space and nutrients available.
The recommended heights of the layers are of course to be adjusted depending on the size of the existing or planned raised bed.
Summary of the layers:
- 4 layers form a raised bed
- Lower layer ~ 30 cm: drainage layer made of coarse material (branches, stones, etc.)
- Filling layer: 20-30 cm of leaves, clippings, kitchen waste
- Compost layer ~ 20 cm: Coarsely decomposed compost, animal litter, grass clippings alternating and each thin layer
- Planting layer ~ 20 cm: high-quality topsoil or commercially available plant substrate

With the lower layers you should already think about the intended use. Mediterranean herbs do not tolerate waterlogging well and should be planted in a well-drained bed. The two lowest layers should therefore consist of many coarse and poorly or non-decomposable materials such as larger branches or stones, coarse gravel or gravel. With a planned, persistent planting of the bed (for example with flowering perennials), the sinking of the filling material cannot be remedied as easily as when using it as a vegetable patch. Therefore, the bottom layer should not contain any degradable material, but only inorganic substances such as coarse crushed stone, gravel or stones. A gardener's flow is then placed on this layer, which prevents the soil of the upper layer from being washed away with the irrigation or rainwater. Even with very high raised beds (from 80 cm), for the Vegetable growing is planned, this approach may be advisable. For the following layers, the same procedure is followed as already described.
TIP: Separate the individual layers with fleece to prevent the soil from being washed through the coarser layers when watering or when it rains.
Filling a raised bed: instructions
A raised bed should at best be filled in autumn, otherwise in early spring. This leaves enough time to decompose and first sink the bed contents until the first planting. If the bed surface sags during the vegetation period, the plants virtually “collapse”. Some plants like potatoes or Kohlrabi have no problem with simply being piled up with earth again afterwards. But other plants like this less. Filling in autumn has another advantage: the raised bed can be used as a kind of composter. The lower layers can be collected from all kinds of garden waste during the winter months. Petless kitchen waste and moderate amounts of pet litter can be placed in the raised bed for months. Due to the immediate onset of mineral decomposition and the help of many small living things, the bed can swallow unbelievable amounts of organic matter. In this way, valuable, nutrient-rich material accumulates inside the bed, which is made available to the plants through decomposition over time. In the case of kitchen waste, however, care should be taken to ensure that no strongly salty food gets into the bed, because most plants do not tolerate salty soil well.

- Autumn is the best time to create a raised bed
- Organic components can already be decomposed over the winter
- First sinking of the filling material before the planting, so that it can still be filled up easily
- In autumn, the raised bed can be used as a kind of “composter” for garden waste
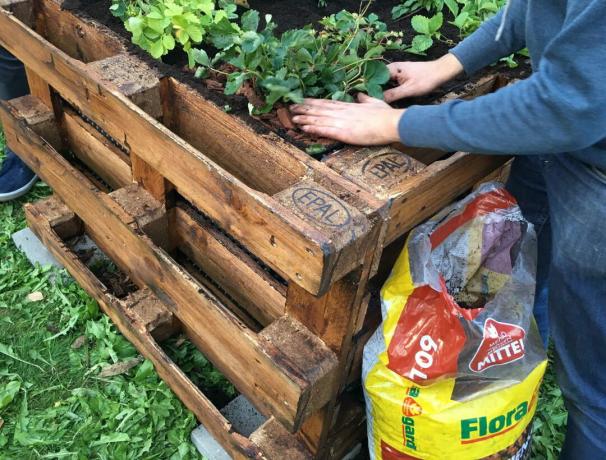
Before filling, you should think about lining the raised bed. In the case of wooden raised beds, pond or bubble wrap can extend the shelf life of the wood. Likewise, with some types of bed borders, such as raised beds made from Euro pallets, a film can be used to prevent soil and water from escaping from the side. When choosing the film, it is essential to ensure that it does not contain any plasticizers. It can be attached to the sides of the bed using a staple gun, for example. With dimpled sheeting, the dimple side should come to rest on the wood so that the wood remains "ventilated". Of course, the floor of the raised bed remains free of foil, after all, water must be able to escape from the bed.
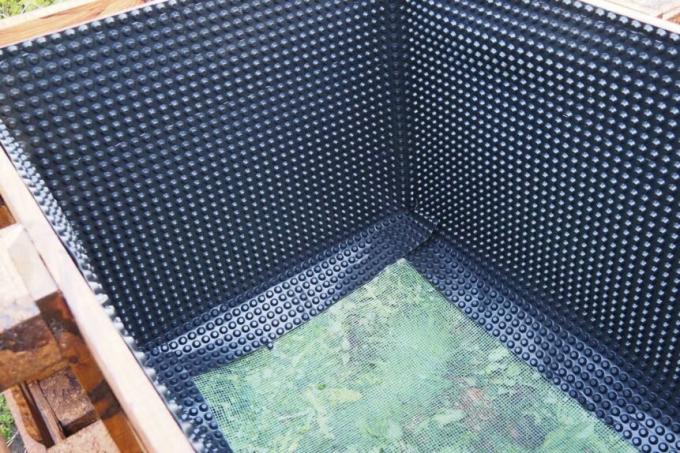
- Raised bed walls made of wood? Line the walls with foil or bubble wrap
- Dimple film allows wood to breathe even in the interior (through air spaces between the cushions)
- Do not line the floor so that excess water can escape downwards
Filling in itself isn't a big deal. Layer by layer, first coarse and then finer material is added to the bed. If the bed has not yet been built, you can start filling when the border of the bed is not yet finished. Because this way the filling material does not have to be lifted over the raised bed wall and is easier to handle. In any case, it is important to ensure that the lower layers are not too low. Otherwise, much more expensive potting soil and compost will be needed in the end than is actually necessary. In order to avoid that the lower layers become too thin or sink immediately with the first precipitation, the filling materials should ideally be moist Be: Not wet, but well moistened, because in this way the material is equal and the height of the layers can be better assessed will. Most of the remains of the garden are usually damp enough in autumn. If not, you can briefly spray over each filling layer with the watering can.
- Filling during raised bed construction makes work easier
- Lower layers should be a bit more generous and thicker than the upper layers - this is easy on the wallet
- Use moist filling materials, this reduces sagging right from the start
If the bed is filled in autumn or winter, check in spring whether the filling has sunk and if necessary refill plant substrate again. If the filling takes place shortly before planting, you should definitely wait for a few rainfalls or pour vigorously several times. So the filling material will eventually sink a little and you can refill soil and compost in good time before planting or sowing.
Expert tips on filling: Avoid mistakes
It is practically impossible to prevent the organic filler material in a raised bed from shrinking over time. The warm and humid environment of the raised bed leads to rapid rotting and very fertile soil. But rotting is always associated with a loss of organic material, which is why the bed surface naturally settles over time. Especially if the bed is not filled until spring, the following measures should be considered in order to avoid a bad harvest due to a shrinking raised bed:

-
Pile up earth afterwards
When choosing plants that can tolerate subsequent accumulation of soil, such as Potatoes, tomatoes or kohlrabi can easily be earthed when the surface of the earth is sinking be refilled. -
Grow early-ripe vegetables and replenish them after harvest
When deciding to clear vegetables early in spring, the bed can simply be refilled with plant substrate after they have been harvested. Spinach, salads or radishes ripen quickly and can then be harvested completely. The bed is refilled and then planted with pumpkins, celery or zucchini, for example, which then remain in the bed until autumn. -
Select non- or poorly decomposable materials
As a last alternative, the bed, like a raised bed with herbs, can be filled with good drainage, i.e. a lot of inorganic, non-decomposable material. If the lower two layers consist more of stones, coarse gravel, chippings, sand, gravel and expanded clay, these and consequently the entire bed will settle less strongly. However, with this alternative it should be borne in mind that this material is not a fertile and Nutrient-rich soil can be formed, as is the case with conventional layering of the filler material happens. Above all, heavily draining plants such as zucchini, pumpkins or cabbage quickly reach their limits with their nutritional requirements.
If you already have problems with a bedding during the growing season, you have a continuous bed Refilling small amounts of soil is more effective than adding a plant-stifling large soil or soil Amount of compost.
tip: Before you fill the raised bed, you should first find the right one Raised bed location determine. We will help you choose the right location.
Do you want to create a raised bed in your garden? In our article we will show you how to get one Create a raised bed in 10 minutes can.
You can find more inspiration on the topic of “raised bed” on our Pinterest page:
