
There are several ways to preserve the spiciness of chilies. We show how chillies can be preserved by pickling, freezing and the like.

Who even in winter does not care about the enjoyment of fiery chili peppers (capsicum) wants to do without, must take precautions in the summer. There are various ways of preserving and preserving chillies. We'll tell you all about pickling, freezing, dehydrating, preserving and fermenting chillies in oil.
contents
- Put chili in oil
- Freeze chili
- Dry chili
- Boil chili
- Ferment chili
Chilies belong to the genus of plants paprika (capsicum) and are so popular mainly because of their sharpness. There are five different types of chili worldwide. These types, in turn, include countless different ones chili varieties. Unlike peppers, chillies contain a substance that makes them hot. Actually intended as a defense against predators, the enjoyment of the hot pods is particularly tempting for us. There are a variety of methods for preserving chillies. So you are not dependent on the constant supply of fresh chillies, which could be difficult, especially outside the growing season.

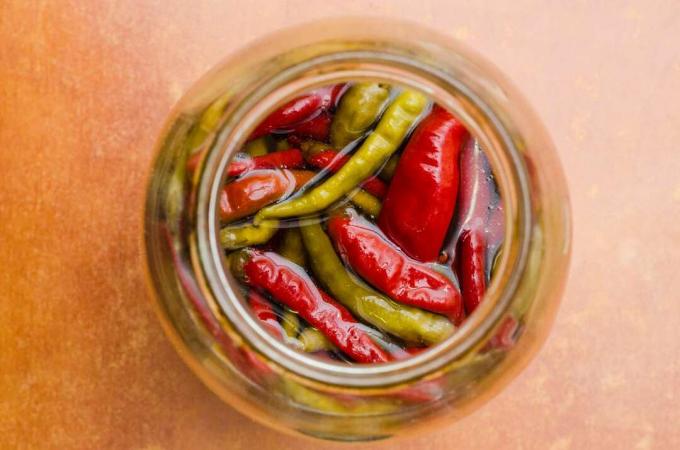
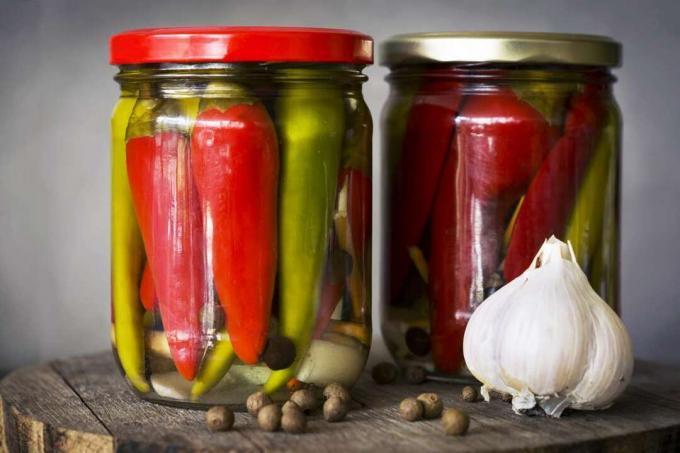
Put chili in oil
A simple and very effective way to preserve chillies is to soak them in oil. This not only makes the chillies durable, but also very aromatic. However, the oil does not conserve the chillies, but only encloses them airtight. Because the chillies in oil are no longer in contact with oxygen, they last much longer.
To pickle chillies in oil you will need:
- A big pot
- Mason jar (e.g. Weck)
- Good oil (preferably extra virgin olive oil)
- White wine vinegar (6% acidity)
- salt
- sugar
- Chilies of your choice
As a first step, wash the chillies very thoroughly with cold water and cut them lengthways. This is important to avoid air pockets. Now you can either remove the placenta (the white part of the chili) and the seeds or not. Most of the sharpness is in the kernels. Then bring water to a boil in a large saucepan and add 200 milliliters of vinegar, 10 grams of sugar and 20 grams of salt per liter of water. Now put the prepared chillies in the boiling water for three minutes.

Tip: Jalapeños should be cooked with their thick skin for a good five minutes. Habaneros, on the other hand, with their thin pericarp should only stay in the water for two minutes.
Then drain the chillies well and place them on a clean kitchen towel. The chillies should be as dry as possible before you put them in oil. The dry chilies are then placed in a mason jar. The chillies should make up around 90% of the glass so that they can be completely surrounded by oil. If you like, you can also boil whole cloves of garlic and put them in the jar. Depending on your taste, Mediterranean herbs and spices also go very well with the chillies in oil. Now fill the jar completely with oil. The chillies will keep in oil in a cool, dark place for four to six months.
Pickling chillies in oil in 7 steps:
- Wash the chillies with cold water, cut lengthways, Remove housing
- Bring water to a boil in a large saucepan
- Add 200 ml of vinegar, 10 g of sugar and 20 g of salt per liter of water
- Boil the chillies in the water for 3 minutes
- Dry the chillies well and put them in the glass
- Add herbs and garlic to taste
- Fill the jar with oil so that the chilies are completely covered
Tip: Larger types of chili, such as habaneros, can easily be filled with cream cheese and preserved in oil. Then their shelf life is only two weeks.
Alternatively, chillies can also be pickled in vinegar and not in oil. Here, the pods are boiled with water, 300 milliliters of vinegar, 70 grams of sugar and 30 grams of salt per liter, filled into glasses and then poured over with the broth used for the boil. Finally, the glasses must be sterilized: This is done either in a preserving pot (water bath) at 90 °C or in the oven, both for 15 minutes. Chillies in vinegar will keep for up to a year.
Freeze chili
Freezing chillies is even easier than soaking them in oil. Chillies can be stored in the freezer for up to ten months. For freezing, you can use the pods whole or cut them into small pieces. It is also up to you whether you want to remove the cores or not.
Freeze chillies in 4 steps:
- Wash the chillies and pat dry
- Label freezer bags or boxes with date and contents
- Optional: cut chillies/remove seeds
- Put the chillies in the freezer and freeze

Tip: Frozen chillies do not need to be thawed before processing. Just add them to the dish frozen while cooking.
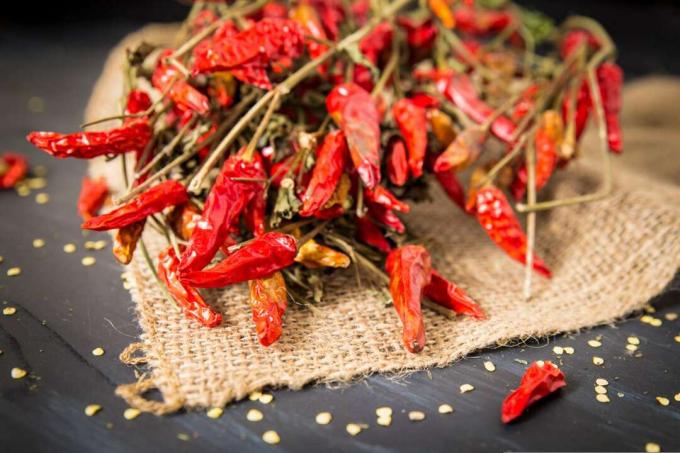
Dry chili
Drying removes the water from the fresh chillies so that they can be preserved. In Mediterranean areas, it is sufficient to lay the chillies in the sun for a few days. It takes a little more effort for us. Chilies can be dried in the oven, over the stove or heater, or in a food dehydrator.
Drying chillies in the oven:
- Wash and dry the chillies well
- Cut chillies
- Place chillies on baking sheet
- Set the oven to a maximum of 50 °C
- Put a cooking spoon between the oven door
- Chilies in the oven for approx. Leave to dry for 6 hours
You can do a similar thing in the dehydrator. To dry over the heater or the wood stove, the chillies are either whole or chopped up, strung on a string and hung over the heater or the stove. However, it takes several days for the chillies to dry completely.
You can keep the dried chillies whole or grind them into chili powder. If stored dry and dark, the dried chillies will keep for a very long time.
A dehydrator is ideal for drying chili and peppers. To do this, the stalks and calyxes are cut off, the chili is halved lengthwise and placed skin-side down on the grid of the dehydrator. If the dehydrator has a timer in addition to a stepless temperature controller, the rest is easy. The temperature is set to 50 °C and the time is set to around six hours, depending on the number of sieves used and the thickness of the chili. After that, the chillies are so dry that they can break like glass. However, the color and aroma are fully retained with this technique.
Boil chili
The simple classic of chilli processing: boil down chillies. There are no limits to your imagination: be it salsa, chutney, relish or jam – an incredible amount can be made from chillies. The type of sauce you cook depends on your taste. For a salsa, the chillies are boiled down together with tomatoes, garlic and spices.
Boil chillies in 6 steps:
- Wash and chop the chillies and tomatoes
- Place in a larger saucepan and refine with other ingredients such as garlic, bay leaves, pepper, oregano, thyme and rosemary as desired
- Simmer the mixture on a medium-high for three quarters of an hour, stirring from time to time
- If you don't like chunks in the sauce, you can puree the whole thing
- Pour hot water into the clean mason jars, tip out and pour in the salsa
- Close the jars, turn them upside down and let them cool down slowly.

For chutneys, the chillies are sautéed with a fruit of your choice (e.g. apples, mangoes or quinces) and onions and then caramelized with sugar. Then the whole thing is deglazed with vinegar and seasoned to taste. After the chutney has been simmered for an hour, it should have a thick consistency. Chutneys go very well as a refined refinement of meat and cheese.
Ferment chili
Fermenting vegetables is back in fashion. Rightly so, because fermentation not only makes it more durable but also easier to digest - thanks to the probiotic bacteria that are produced during fermentation. In addition, the vegetables are not heated during fermentation, so that all important nutrients are retained. Chilies are great for fermenting. During fermentation, the chillies are preserved in a natural fermentation process by "friendly" lactic acid bacteria. All you need is plenty of fresh chillies and a suitable fermentation vessel, for example a fermentation pot or a mason jar.
Ferment chillies in 5 steps:
- Wash the chillies well
- Possibly. chop and remove cores
- Put the chillies in the fermentation vessel
- Add garlic, onions, herbs, mustard seeds, cumin or pepper to taste
- Pour water over chillies
- Add salt as needed
Then it's just a matter of waiting. The fermentation vessels should best be stored in a dark place at room temperature. After a few weeks, the chillies should be sufficiently fermented with lactic acid. Here you are welcome to go according to your taste. Some like their chillies more fermented, some less. After just one week you can try the chillies to see how you like them. If they aren't angry enough for you, just leave them alone. Once you are happy with the acidity, you can store your fermented chillies in the fridge from then on. At the low temperatures, the chillies do not ferment any further. Of course, before you can preserve your chillies, they first have to be harvested. All about the professional Harvest of chillies find out here.
Tip: After the harvest is before the sowing: With our Plantura Chili Cultivation Set you can easily grow chillies yourself. The seeds of five types of chili and all other materials you need are included in the set.
As The best way to grow and care for chillies, you can read here.


