table of contents
- Utils
- Preparation: cut the reed mat
- cable ties
- Fastening wire
- Wall: attach reed mat
- frequently asked Questions
If you want to attach a reed mat to a balcony, fence, or wall, there are several options available to you for this project. You can find detailed information and instructions in this article.
In a nutshell
- Before fixing, the mats must be adjusted to the desired size
- Balcony and terrace railings can be attached using mat or cable children
- Depending on the shape, you can equip fences with reed mats using wire or mat ties
- Walls need drill holes for screws to attach the wire for the mats
Utils
Regardless of whether you want to equip walls or a fence with a reed mat, you need the right utensils for all methods. This does not only mean the materials and tools that are specifically used for the fastening methods, but are used for preparation, measurement and attachment. These are essential and will help you implement the options below:
- Roll measure or folding rule
- Pen
- Combination pliers
- Cut-off grinder, circular saw or hand saw (fine teeth)
- Protective clothing
- safety goggles
With these, the mats can be easily cut, measured and attached. Cut-off machines or hand-held circular saws are essential if you want to make your work easier. Alternatively, you can use a hand saw, but this is much more strenuous because you have to saw through every single stalk.

Tip: Before you install the mats, you should get help from someone else. Depending on the size of the mats, it can be difficult to get them straight when you're alone.
Preparation: cut the reed mat
Before you can use any of the methods presented below to attach your mat, you'll need to cut it to the size you need. Ideally, you can order the reed mat in the size you want. Otherwise, follow these instructions to shorten the mat in height:
- Roll out the mat completely
- Measure the required height with a folding rule or roll measure
- Subtract 2 cm from the height (ground clearance)
- Mark the height with a pen
- Shorten the mat along the marking
- use the appropriate tool for this
However, do not forget to add the ground clearance to the measurement. The mat must not sit directly on the floor, otherwise the stalks will soften due to the moisture and, in the worst case, start to go moldy. If you have a height of 150 centimeters in mind, the reed mat must end up being 148 centimeters high. When shortening, it is important to cut straight. In this way, you can reduce the height of even very long mats much faster. Fold the layers on top of each other, fix the line and shorten everything at once. Now it's the turn of the length:
- Measure the desired length
- Add 3 cm (addition for degrees)
- Mark the length
- Loosen binding threads or wire from top to bottom at the marking
- simply cut through with the pliers
- don't cut off too much
- after shortening, knot the wire or thread again

Fortunately, you do not need any devices to adjust the length, as you close the connections again at the end. In order for this to work, you should cut close to the stalks that do not belong to the length. That way you will still have enough wire and thread to seal the mat. As soon as the reed mat has been adjusted to the appropriate size, you can use the options below to attach it.
Tip: Always keep an eye on the maximum height of a privacy screen from the landlord or municipality, as the mat must not exceed this. In most federal states, the limit is 180 centimeters, but this can vary widely.
cable ties
The classic for attaching a reed mat to balcony railings and fences is the cable tie. With this you hardly need any tools if you have cut the mat to the right size beforehand. They also ensure a good hold, even if the railing or fence is made of a smooth metal. The length of the cable ties, but also the number, is important for the application. Choose mat ties that fit loosely around the largest diameter elements plus the stalks. You need six to 15 cable ties per square meter, depending on the weight of the mat. With a high wind load, you should use at least ten cable ties per square meter. An example:
- Dimensions of the mat: 1 mx 3 m
- Square meters: 3
- Cable ties required: 18 to 45
- Cable ties required (increased wind load): 30 to 45
Fortunately, cable ties come in large quantities and in different colors. The mat is then attached as follows:
- Place the mat on the railing or fence
- align straight
- Note ground clearance
- start on one side
- do not start at the last stalk
- Attach cable ties at regular intervals
- The distance can be varied and depends on the railing struts
- Tighten the cable ties
- cut off
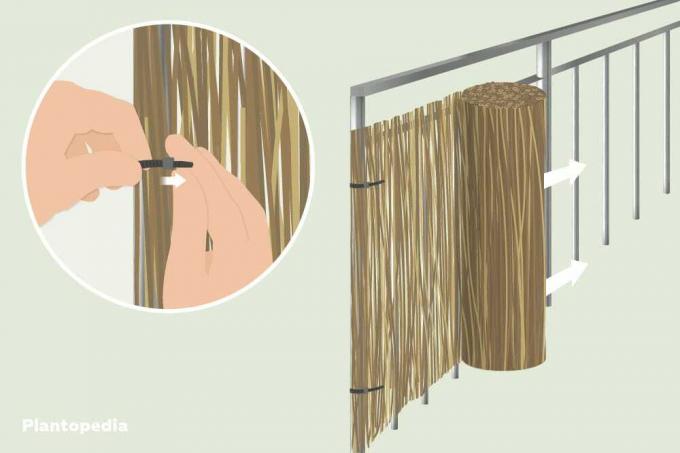
Nothing more is needed for this method. Make sure that the cable ties are cut well so that the interfaces are not too sharp. You don't want to hurt yourself.
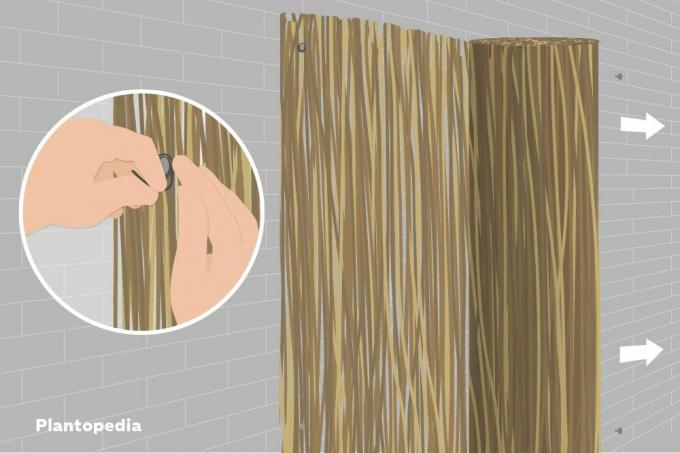
Fastening wire
Weather-resistant binding wire is also one of the options for attaching the reed mat to fences and balconies. In contrast to the cable ties, you don't have to calculate the number of pieces here, but the required wire length. On average, ten centimeters of wire are sufficient per connection, which corresponds to a total length of 60 to 150 centimeters for one square meter. Based on the example above, you would need 180 to 450 centimeters of wire. It is applied in the following way:
- Cut the wire in 10 cm pieces
- Put on mat
- relay a message
- Note ground clearance
- start again on one side
- Place pieces of wire around the struts
- do not leave the ends of the wire protruding from the mat
- Knot the ends with the combination pliers
- bend over
Complete. Fastening a reed mat over wire is quick and easy once you get into the rhythm. Just be careful not to hurt yourself. The ends can be painful due to their sharpness. Flower binding wire or something similar can be used.
Tip: In the case of fences made of insensitive wood, you can use another method to attach the cane mats. Use stainless steel staples of the appropriate size for the stalks and staple the mats thoroughly to the wood.
Wall: attach reed mat
If you are not on a balcony, but on one Wall If you want to attach the reed mat, you need to drill a number of holes beforehand. Stainless screws are then placed in these, to which you can fix the mat with wire as already described. In addition to the utensils for fastening, you also need:
- Screws: 6 - 10 per m²
- Dowels: 6 - 10 per m²
- Washers: 6 - 10 per m²
- Drilling machine (depending on wall material)
- suitable drill bit (depending on the wall material)
- screwdriver
Be sure to choose stainless washers. Likewise, you should not use screws with a diameter that is too large, as this is not necessary. Distribute the drill holes at regular intervals over one square meter and screw the screws into the wall after the dowels have been set. However, these should protrude about 0.5 centimeters from the wall to support air circulation. Now use the screws as an attachment point for the wire. Also knot and bend.
Note: A great advantage of this method is the good ventilation of the mats, as they do not lie directly on the wall. Thanks to the ventilation, the mats do not start to get moldy as they dry without any problems.
frequently asked Questions
Walls are one of the most complex substrates for a reed mat and always require boreholes or similar devices. For this reason, you must pay attention to what is allowed, especially in a tenement house. Basically, small boreholes are not a problem, but landlords can forbid them in the lease. If you are not sure whether you can drill into the walls on the rented property, contact your landlord as a precaution.
Sometimes it is advisable to attach the mats to fences or walls with hot glue. The reasons for this are the simple application and the look, as the adhesive cannot be seen from the front. However, you should refrain from this variant if the reed is to be installed outdoors. The mats are mercilessly exposed to the weather and hot glue is not weatherproof. Moisture, heat, cold and permanent UV radiation make short work of the adhesive.
If you do not want to use reed mats due to the appearance or the acquisition costs, there are suitable alternatives. If you are looking for something exotic, bamboo mats are ideal because they are weatherproof and just as easy to attach. If you want to use variants from home, you can rely on willow mats. In terms of appearance, they are reminiscent of classic willow fences. It gets a little more rustic with bark mats in different colors and designs.
Yes, you don't need a railing or a section of fence to use reed mats as privacy or wind protection. In this case, use posts made of metal or wood, which you place in the ground where you want and which act as supports for the mats. Depending on the weather, you can attach a frame to the posts, which provides more stability. You can now fix the mats to the posts.