

table of contents
- 1. Choosing the right substrate
- 2. The ideal repotting date
- 3. Preparation and potting
- 4. Cut
- 5. Apply drainage
- 6. Repot green and flowering plants
- 7. Repot cacti
- 8. Further care
- 9. Switching to hydroponics
In order for indoor plants to stay healthy and grow for a long time, you need to repot them from time to time. We'll explain the best way to do this in nine basic steps - for wonderfully green and abundantly blooming plants.
1. Choosing the right substrate
The plant gets its nutrients from the substrate. It also serves to hold your roots and should be such that they are always surrounded by a slight amount of moisture. At the same time, however, enough air has to get in, otherwise it will rot. This means that a good substrate stores moisture and is air-permeable at the same time. You can mix these potting soils yourself according to a recipe or use ready-made soils from specialist dealers. Many indoor plants grow optimally in special soils that are tailored to their needs. Only use high quality substrates for your crops. In the case of cheap offers from the discounter, points are as relevant for plant health as

- Water storage capacity
- Air permeability
- Nutritional content
- PH value
- hygienic condition
- and humus content
often unsatisfactory.
Suitable substrates for indoor plants include:
- Potting soil: Classically consists of peat, clay and nutrients. Most plants grow very well here, which you will notice after transplanting from the rapid development of roots and new shoots.
- Unit earth: is of consistently good quality and consists of 60% white peat and 40% loam or clay. Type P is only slightly fertilized (suitable for low-consuming plants), type T more.
- Special soil for cacti, azaleas or palm trees: are perfectly matched to the special needs of these groups of plants
- Expanded clay: The water-absorbent expanded clay balls hold the roots in place. The plants draw their food from the water and the added nutrient solution.
- Epiphyte substrate: suitable for tree dwellers and aerial roots such as ferns, bromeliads or orchids.
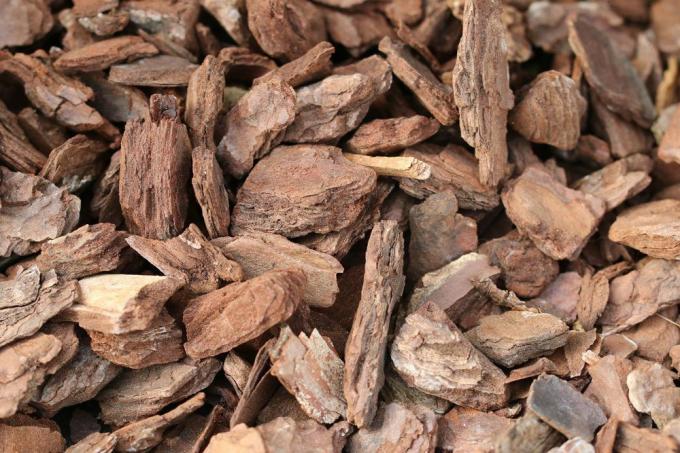
Tip: Our peatlands are rapidly being degraded, with unique ecosystems being irretrievably lost. You should therefore replace soils containing peat with alternative substrates, for example with clay granules. Sphagnum, Osmunda and tree fern are also under nature protection and may not be taken from nature. Good alternatives are rock wool or bark, and styrofoam chips are also suitable (even if they are not particularly environmentally friendly themselves).
2. The ideal repotting date
Usually houseplants should be transplanted about every two to three years, some fast-growing species even annually when they are young. You can tell when it is time to repot the plant again by these signs:
- The earth is almost completely rooted
- Earth smells musty
- The plant is root-diseased or has pests in the substrate (fungus gnats, mealybugs)
- Grow roots out of the pot
- Plant has already blown the pot
The ideal repotting date for most plants is spring between late February and early to mid-April. Otherwise: Always repot plants after flowering. The new vessel should be two centimeters larger all around than the old one.
3. Preparation and potting

You should water the plant vigorously a few hours before transplanting; this will make potting easier for you. This step is particularly important with clay pots, as the substrate adheres to the coarse material. When potting the plant, proceed as follows:
- remove old pot
- to do this, knock the pot all around on the edge of the table
- this will loosen the substrate from the edge of the pot
- Smash the pot if it is very tight
- Cut open the plastic pot if necessary
- Crumble the top layer of soil
- Carefully loosen the root felt with chopsticks
Be careful not to damage the roots as much as possible.
4. Cut
A root pruning is only necessary if the roots are brown-black and rotten. Even with very old houseplants that you no longer want to put in larger pots, it can be useful to cut back the root network. Then, however, you have to take back the above-ground parts of the plant accordingly in order to maintain the balance. It is also advisable to cut back the shoots if older plants are threatened with balding. This is the case with the popular one, for example Weeping fig (Ficus benjamina) necessary, but also with Window leaf (Monstera) and other large indoor plants. Proceed as follows when cutting:

- The interface runs about half a centimeter above a bud.
- Do not cut the shoot tips, but snap them off.
- Do this especially with young plants so that they branch better.
- Prune older plants more vigorously, up to two thirds if necessary.
- Recommended for strong growth, baldness or long shoots with wide gaps between the leaves.
- If the house plants are very bushy, remove one of two branches that are close together.
- Powder interfaces with charcoal to protect against pathogens.
Caution: Not all houseplants can tolerate pruning!
5. Apply drainage
Very few houseplants can tolerate waterlogging, which is why drainage in the pot is so important as a preventive measure. To do this, place a pottery shard on the drain hole of the new planter (prevents silting up of the same) and then fill in a finger-thick layer of expanded clay, clay granules or gravel a. For large pots or In pots, this drainage layer can be a good five to ten centimeters thick. Then pot the plant in. We'll explain the best way to do this in the next two sections. Then pour them vigorously and place them in a light and warm place. Soil heat promotes new root formation.
6. Repot green and flowering plants
When transplanting foliage and flowering plants, proceed as follows:

- Hold your palm on the potting soil, turn the pot over
- Carefully remove the root ball
- Loosen the root felt
- crumble soil that is not rooted
- Cut off diseased roots, shorten too long
- Pour drainage into the new pot as described
- then fill in some substrate
- Insert the plant in the middle at the same height as before
- hold on to it
- Fill in the soil and press firmly
Form a watering rim about one centimeter deep, this will make it easier for you to water your indoor plants later.
Tip: Orchids and other epiphytic plants do not necessarily have to be planted in soil. You can also tie them to a piece of bark and thus reproduce the natural living conditions. To do this, wrap the aerial roots all around with plant material and tie the plant firmly to the wood with cut-up stockings.
7. Repot cacti
Many species of cacti are difficult to repot because of their hard thorns. The best way to do this is:

- Carefully lift the cactus out of the pot using pieces of styrofoam as protection.
- Loosen the root ball with chopsticks.
- Remove sick and dry roots.
- Drain the bottom of the pot as described above.
- Place the cactus in the pot at the same height as before.
- Fill in substrate and press on.
Then water the plant well, this promotes the formation of new roots.
8. Further care
After repotting, water the plants only enough so that the soil does not dry out. Only when new shoots appear do you care for the plants again according to their individual requirements. This is important to prevent waterlogging and subsequent root rot from forming. You also do without fertilization for the time being, as most plant substrates for indoor plants are pre-fertilized anyway. The first time you need to fertilize again six to eight weeks after transplanting.
Tip: Renewing the top layer of soil is recommended for large indoor plants that you have grown Do not want to repot for reasons of space and plants that are sensitive to such a measure react. Palm trees, for example, often do not tolerate transplanting very well.
9. Switching to hydroponics
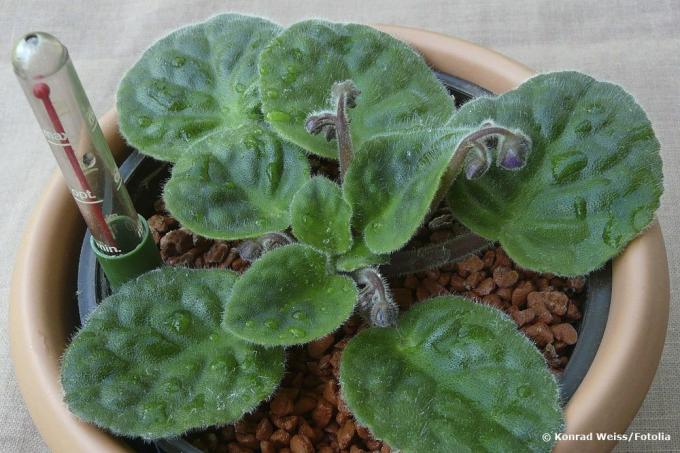
You can use any necessary repotting to keep your plants up Hydroponics to move. This requires a very careful washing out of the roots, as no earth residues should be left. There are special planters and substrates made from expanded clay for hydroponics. These are clay granules, which are available in different sizes for different groups of plants. Expanded clay stores water, allows sufficient air to reach the roots, at the same time gives them support and is also structurally stable, which means that the material does not rot.
Hydroponics is ideal for those who often over-water or under-water. The clay lumps soak up water like a sponge, but only release it gradually according to the needs of the plants. For the conversion you need a basket pot (mostly made of plastic, available from specialist retailers) and a matching planter. And this is how you do it:
- Rinse the soil out of the root ball completely.
- Shorten roots that are too long, cut away brown (rotten) ones
- Place the plant on washed expanded clay
- Fill the plant basket with expanded clay
- Place the basket pot in the cachepot
- show lukewarm water
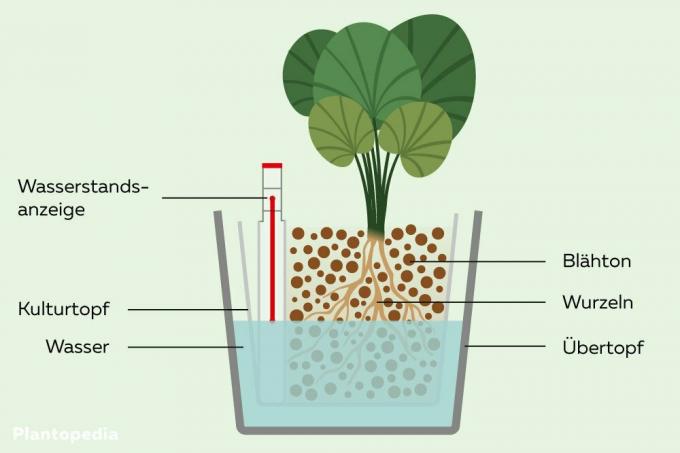
A special hydro indicator helps you to find the right level when pouring. Clay granules usually do not have to be replaced. However, it may be necessary to clean it from time to time - for example, because limescale deposits on it when you water it. Repotting from one clay granulate to new one is not stressful for the plant because the root ball remains completely intact and is only embedded in the new substrate.


