table of contents
- Basic cleaning
- Grout brush
- Grout scraper
- Flame burners
- Special cleaners
- Sensitive stones
- Seal the pavement joints
- frequently asked Questions
Paving stones only look good over a long period of time if you keep cleaning the paving joints between them. To keep them that way, they can be sealed. You can find out how to do this here.
In a nutshell
- Before cleaning the pavement joints, the stones should be clean
- various options for cleaning joints
- Be careful with sensitive stones
- use grout for permanently sealed joints
Basic cleaning
In order for the pavement joints to be really clean, it is necessary to first clean the entire pavement. To do this, sweep away the coarse dirt with a broom. Then, if available, clean the surface with a high-pressure cleaner. With a bit of luck, the joints will already be clean, if not, it will be time for the detailed work. There are various aids for this.
Note: The high-pressure cleaner does clean joints, but it has so much power that even sand can be washed out of the joints.
Grout brush
Brushes are made of different materials. The softer the bristles, the gentler they are on the plaster, but the more difficult it is to clean them. In most cases, however, superficial moss can be removed successfully. Joint brushes are only suitable for wider joints.

Grout scraper
Metal joint scrapers are very suitable for cleaning even very narrow joints. They are available with or without a long handle. Some can be attached to a long broomstick. Then the stooped posture is no longer necessary when working.
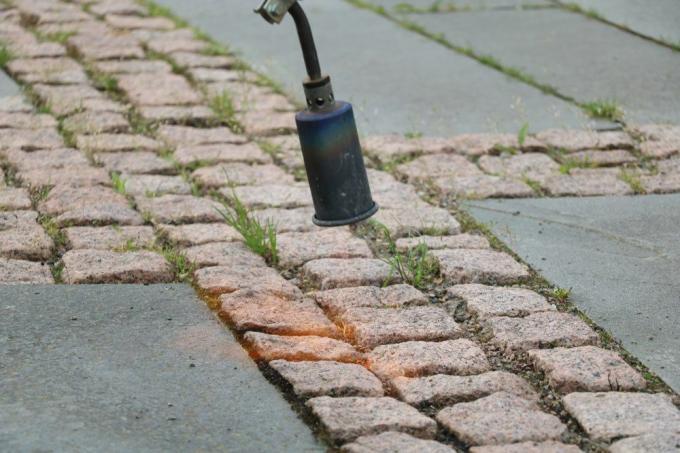
Flame burners
Another way to clean pavement joints is to use a gas burner. This will burn the weeds to their roots. Then the leftovers can simply be swept away. Gas burners are easy to use, but they also pose a risk of fire. Especially if you use them near flammable materials. This also includes, for example, hedge plants if they have been very dry for a long time. In addition, the weeds may sprout again under certain circumstances.
Special cleaners
Cleaning agents for paving stones remove algae, moss and stains of various origins. Depending on the type of stone, only the appropriate cleaner should be used. Incorrect cleaning agents attack or discolor the surface of the stones. Color stains and the like can also be removed with special cleaning agents.
Note: Weed killers are not allowed on paved areas.
Sensitive stones
Softer types of stone are sensitive to scratches. The joint scraper must therefore be handled with particular care. A small hand-held joint scraper is then more suitable than a device with a telescopic handle. Wire brushes should also not be used on soft natural stones. Cleaning agents are only tested in an inconspicuous place. Some lead to discoloration on the stones.
Seal the pavement joints
sand
Sand is the easiest and cheapest. However, a permanent seal can hardly be achieved with this. However, if done correctly, weeds will be successfully suppressed for some time.

Instructions:
- Thoroughly scrape out the joints
- Completely remove soil and weeds
- The depth of the joint should be 2 to 3 cm
- Spread fine sand on the surface
- Sweep the joints thoroughly with a broom
- the sand deprives weeds of their livelihood
Grout
Joint strengtheners are only suitable for sealing in conjunction with sand. After you have refilled the pavement joints with sand, spray grout on the surface. It solidifies the sand in the joints and makes it more durable. Weeds then take significantly longer to reappear.
Synthetic resin base
Resin grout has many advantages. It is flexible and resilient. In addition, it can also be easily added later to seal old joints. The composition can vary depending on the manufacturer.

Instructions:
- Clean the paved area
- Clean and clear the joints
- The depth of the joint must be around 3 cm, the width of the joint at least 5 mm
- Mix the grout, possibly use a cement mixer as an aid
- Pre-wet the area according to the manufacturer's instructions
- Apply grout on the surface
- Press into the joints with a rubber squeegee
- work thoroughly
- Note the setting time
- Remove excess material with a broom
- Then protect the surface from rain and do not walk on it until the joints have solidified
frequently asked Questions
That depends on the type of sealing and the load on the surface. Depending on the situation, the seal can last a season or significantly longer.
Loose sand will be washed out of the joints over time. So it has to be replenished at some point. However, old sand is not exchanged.
Basically, a paved area should be sealed right after the patch is laid. If that is not possible, you can always do it afterwards, only the weather should be right. The seal must stay dry for a while.