table of contents
- Materials and tools
- Building a Euro pallet raised bed: Instructions
- preparation
- Connect pallets together
- Lining the interior
- Painting with weather protection paint
- Equipping a raised bed with rollers: Instructions
Raised beds are popular bedding variants to relocate gardening in small spaces or to protect your back. Numerous herbs and flowers can be planted without the need for a garden, which is what makes the small beds so attractive. However, due to the materials required, raised beds can be quite expensive. For this reason, the use of Euro pallets is a good method to build a raised bed yourself at low cost.
Materials and tools
To create a raised bed from Euro pallets, you need fewer materials than you might think. Since you do not rely on solid wood, expensive plastics or even raised beds made of stone, your costs are in the low range, which makes this variant so attractive to many people. It is also possible to get all the materials from the hardware store, which of course suits you as a do-it-yourselfer. The following list gives you an overview of the utensils you need for a square raised bed with a side length of 1,344 millimeters:
- 4 Euro pallets for the frame of the raised bed
- 12 angle connectors made of rustproof stainless steel, preferably in the dimensions 50 mm x 50 mm x 40 mm
- Sufficient rustproof screws, the amount depends on the number of holes in the angle, in length between 60 mm and 90 mm
- Weather protection paint in the color of your choice
- Vole grid
- durable pond liner
- Cordless screwdriver
- Drill with suitable bits if you do not use self-tapping screws
- Stapler
- Staples
- 1 euro pallet for the outer cladding (optional)
- Plywood panels for the outer cladding (optional)
- 4 stainless steel transport rollers, if you want to move the raised bed over the year (optional)
- Abrasive material (optional)
When choosing the screws, you can decide whether you want to use classic or self-tapping. If you do not have a drill, self-tapping screws are recommended, as these will drill into the wood by themselves. The weather protection paint is not only required to protect the wood from the weather, but also to give your raised bed the finishing touch. With regard to the cladding, you can either use additional Euro pallets or cut plywood panels. Alternatively, you can leave out the cladding entirely, which allows more storage space for plants. On the other hand, a cladding looks more appealing in many cases. The choice is yours here.
Tip: Of course, you can vary the size of the raised bed by using more pallets. All you have to do is buy flat connectors that can be used to connect other pallets.
Building a Euro pallet raised bed: Instructions
If you have decided to build a raised bed from Euro pallets, you will be amazed at how effectively this variant works. A big advantage of this project is the low expenditure of work and time, because with a helping hand you can assemble the raised bed within a few hours and then fill it. It can even be set up on its own, as the angle connectors can be screwed together without any problems. The following instructions explain in detail how you can connect the Euro pallets together so that you can look forward to a functioning raised bed at the end:
preparation
1. Step:
Pick a time of year when it's not too wet. Moisture can still severely affect the untreated Euro pallets. Since the pallets are not light, one alone weighs 25 kilograms, they must be stored during assembly in such a way that they are not exposed to too much moisture. Therefore, the construction is recommended from spring to autumn on dry days. Alternatively, you can of course make the raised bed in your workshop, garage or other dry, roofed place.
2. Step:
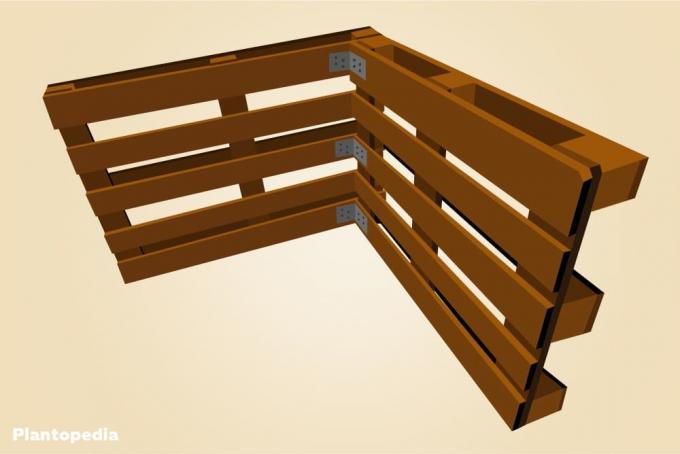
Now place the Euro pallets lengthways on their side. The entire length is used for the raised bed and don't worry, you don't have to saw anything here. Choose a level surface, because then the Euro pallets will not fall and you can work relaxed. The pallets are placed so that they form a square. To do this, one pallet is connected to the other on the underside so that the wide side of the pallet is visible at every corner. In the end, each side will be 1,344 millimeters long and the raised bed 800 millimeters high.

Connect pallets together
1. Step:
Connect the first two pallets with one another using the angle connectors. To do this, take three angle connectors for the corner in the interior and mount them at the top, in the middle and at the bottom. Make sure that you do not mount the angle connectors directly on the edge of the pallets, as this can easily damage them or even bend them. If you are not using self-tapping screws, you must prepare appropriate drill holes before this step. Place the angle connector and screw at least two screws into the wood on each side, this ensures sufficient hold. Another pair of hands can come in handy here.

2. Step:
Connect the remaining Euro pallets in the same way. Now you should have a square raised bed in front of you, which is held together by the angle connectors.

3. Step:
Check if spots are crooked. In this case you would have to undo the work again and reassemble the corresponding pallet. This is important because this is the only way to avoid any weak points in the construction that would later yield under the earth load. Take enough time to do this, because the more closely you check the frame, the more durable the bed will be.
Lining the interior
1. Step:
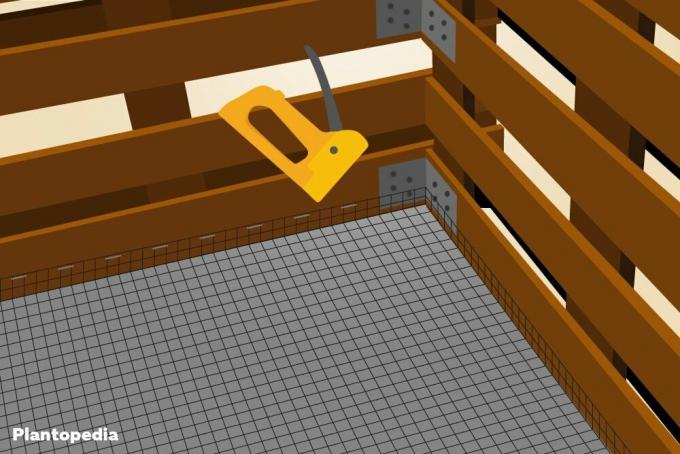
Now you can move forward with the interior of the bed. To do this, cut a sufficient amount of the vole mesh so that at least two inches of the edges can be bent inward. More than two inches is recommended as this provides more support. Now staple the grid with sufficient staples. Then use gentle pressure to check whether the grille is firmly in place and correct any weak points.
2. Step:
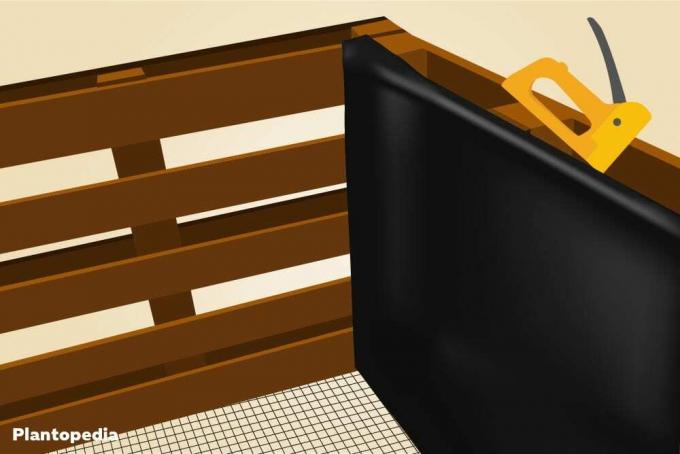
Now line the inner walls of the bed with the pond liner. Since the bed will be on the ground, you don't need any foil there. The pond liner must sit over the grid and cover all of the wood so that it does not swell due to the moisture in the earth. Fold the foil over the edge of the pallet and staple it in place. This is necessary so that too much soil does not get onto the wood when gardening.
3. Step:
If you are afraid of injuring yourself on the panels, you should work on sharp edges and surfaces with sandpaper or other abrasives. This reduces a possible risk of injury. However, this step is not a must.
Painting with weather protection paint
Now paint the sides of the pallets that will later be facing outwards. Use the weather protection paint for this. Let them dry for as long as specified by the manufacturer. Please note that colors on pallets can come out very differently, especially if you purchase pallets made from different types of wood. If you want a uniform look, the pallets should be made of the same wood. Here it is worthwhile if you purchase the pallets from a manufacturer or dealer. Used pallets are cheaper, but can vary greatly in the type of wood.

You are now finished building the raised bed. If you want, you can close the upper edge either with separated strips from another Euro pallet or with plywood. You could also use the resulting compartments for flower boxes, garden tools or otherwise. When you lock the compartments, the look is uniform, but it can be appealing if you also cover them with pond liner and thus provide space for more plants. Here you can let your imagination run wild.

Equipping a raised bed with rollers: Instructions
If you want to transport your Euro pallet raised bed without any problems, you should definitely provide it with transport rollers. Even without soil and plants, the raised bed weighs a whopping 100 kilograms, which is impossible to transport, especially in old age or with physical impairments. If the raised bed is provided with transport rollers, you can move it around on the property with little effort. The attachment of the rollers works as follows:
- turn the raised bed on its side after completion
- mount the rollers in each corner using screws
- make sure that you mount the rollers in the middle of the corners
- this means that one side is not stressed too much
- then, with the help of a second person, turn the bed onto the rollers
If you choose this variant, you have to design the interior cladding a little differently, as the bed is raised and not directly on the ground. If you were to fill it with soil now, part of the bottom would fall out again, which is not wanted. The following solution is recommended:
- After you have installed the vole mesh, cover the entire interior, even the floor, with pond liner
- attach them as described above
- Now carefully perforate the film on the floor to create drainage holes
- then fill the soil with gravel or stones to aid drainage
- the stones or gravel should be larger in diameter than the holes
This way, no soil falls through the grid, because the drainage layer acts as an additional buffer for the soil. Alternatively, you could just position the stones on the grid, but the weight without the pond liner could be too much for the grid. As a precaution, play it safe with the foil.