table of contents
- The material
- Tools and aids
- The instructions - step by step
- Step 1 - determine the location
- Step 2 - The excavation
- Step 3 - measure the sleeves
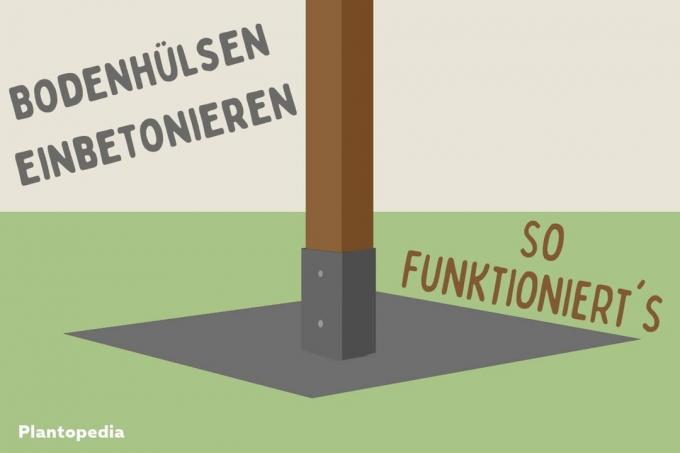
- Step 4 - concrete ground sockets
- frequently asked Questions
Whether carport, patio cover or Privacy screen - Drive-in sleeves ensure a secure hold in the subsurface and at the same time distance to soil moisture and dirt. With our instructions you can also set the ground sockets in concrete.
In a nutshell
- adjust several ground sockets using a common auxiliary construction for greater accuracy
- the foundations should be at least 30, better 40 centimeters wide
- Be careful not to change the position of the sleeves when concreting
The material
Before starting the actual work, have everything you need ready so that you can move forward quickly without further interruptions:
- Ground sockets in the required size and number
- Dry concrete as a ready-mix for mixing with water without additional additives
- Water (bucket or garden hose)
Tools and aids
Also, make sure you have all the tools you need:
- Spade and shovel
- Possibly. Pickaxe
- Bucket or concrete tub for concrete
- trowel
- Metal or wooden stick for compacting
- Spirit level
- Folding rule or Tape measure
In addition to the absolutely necessary tools, however, you should not forget the aids that simply make your work easier:
- Guide line with pegs
- straight wooden board or plank in the length of the planned structure
- Wood for building under
- Hammer and nails
The instructions - step by step
After everything has been prepared, you can set the ground sockets in concrete:
Step 1 - determine the location
First you determine where exactly the ground sockets are to be concreted in. The decisive factor for this is of course both the dimensions of the planned property and its location on your property.
- Roughly define the location in the property
- Position of the ground socket at a starting point, e.g. B. Fix the corner or end point of the object with a rod, peg or other marking
- Measure further layers from the fixed point according to the planning
- for carports, canopies, etc. Check perpendicularity using diagonal dimensions with two-dimensional alignment (both diagonals have the same length = right-angled)
- Mark all other ground sockets as well
Note: Think of a cross above the center of the sleeve and stake its ends outside the foundation area. In this way, you can use the end points to determine the center point and thus the exact position. Otherwise you will lose the center of the sleeve marked on the ground with the excavation.
Step 2 - The excavation
Now, by excavating the foundations, lay the foundation for the permanent hold of your ground socket. On the one hand, the loads of the structure are transferred into the ground via the foundation concrete; on the other hand, there is a Securing the position against tipping or even lifting, which should not be underestimated, for example, on roofs in strong winds allowed.
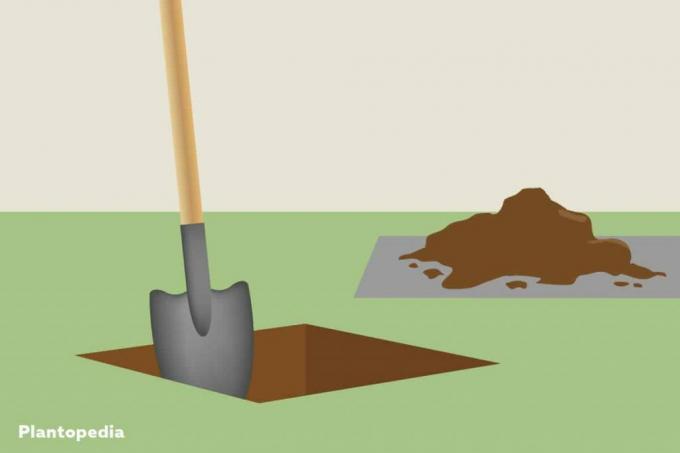
- around each sleeve position foundation outline with at least 40 x 40 centimeters or set around 40 centimeters in diameter
- Cut the sward (if present) with a spade and set aside
- Cut the soil vertically and dig it out
- Excavation depth at least 60, better 80 centimeters
- Remove loose soil from foundation holes
Note: Even with a small ground socket with little construction, the foundation should not be smaller than 40, but at least 30 centimeters wide. If the size is too small, the concrete will break out around the sleeve and the entire structure will tip over.
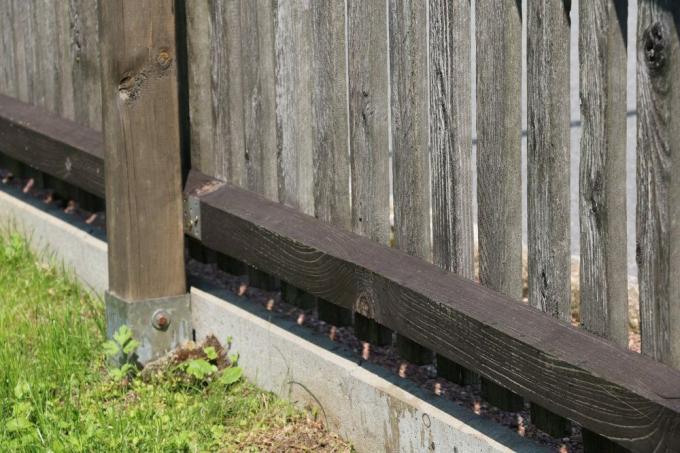
Step 3 - measure the sleeves
Now it is important to position each ground socket in such a way that the subsequent assembly works. Since the sleeves do not just stay in the air until you have concreted the foundations, you have to use a suitable auxiliary construction.
- check the exact center point of the ground sockets again
- Place a wooden board or lath over the foundation hole and support it with boards, wedges or other pieces of wood
- Align the lower edge of the board with the upper edge of the ground socket
- Fix the ground socket to the board with nails from below
Note: Align ground sockets lying in a row either with a guide line for an actual linear alignment. Or instead of individual boards, use a long plank to position several sleeves. So you can align all sleeves together both horizontally and vertically.

Step 4 - concrete ground sockets
The apparently central step - setting in concrete - is ultimately the simplest matter of the entire project.
- Mix concrete according to the manufacturer's instructions
- Fill the foundation holes in layers in 20 to 30 centimeter increments
- tamp down each layer with a stick or wooden slat to remove trapped air
- Fill concrete up to the top of the ground
- Check the position of the ground sockets after setting in concrete and, if necessary, adjust
Complete. After you have waited the time required for hardening according to the information provided by the concrete manufacturer, you can continue with the further development of your project. In warm weather and sunshine, always keep the surface of the concrete well wet to prevent it from drying out prematurely before it fully cures.
frequently asked Questions
Again and again one reads about using sewage pipes made of plastic to limit the foundations. Avoid this approach at all costs. The smooth pipe walls mean that the foundation can simply be pulled out upwards. A real interlocking with the ground, however, is prevented.
Concrete hardens when the contents of the cement react with water. So it does not dry in the chemical sense, although the process is often referred to as that. If there is a lack of moisture, hardening comes to a standstill and the desired strength is not achieved.
Theoretically, it is possible to first create the foundations and then press the sleeves into the still soft texture of the concrete. However, exactly the right curing phase must be achieved for this, so that the material can again tightly around the metal of the sleeve, but the sleeve itself does not sink in and its position changes. In practice this is hardly feasible, so that the alignment and fixation are usually followed by setting in concrete.