Table of contents
- Suitable building material
- construction preparations
- Laying up the drywall
- The most beautiful plants for the dry wall
- Drywall maintenance
- Worth knowing about dry stone walls shortly
- Building instructions
Dry stone walls are not only used to secure slopes, but also set attractive accents in the terrain and at the same time contribute to biodiversity. With careful planning and preparation, it is also easily possible for hobby gardeners to build a stable and visually appealing dry stone wall.
Suitable building material
Dry stone walls usually consist of quarry stones or only roughly hewn stone blocks that are layered on top of each other without mortar. In order to ensure a long service life, the stones used should not be damaged or riddled with cracks. You should also make sure that the material is not too susceptible to weathering or has cavities. Apart from that, there are no limits to personal taste. Types of stone that are particularly popular for dry stone walls are:
- granite
- basalt
- limestone
- sandstone
- greywacke
When choosing, however, it is advisable to use material from regional quarries. On the one hand, the dry stone walls built from them fit particularly harmoniously into the traditional landscape and, on the other hand, the costs are usually considerably lower.
construction preparations
In order to erect a stable dry stone wall, an equally stable foundation is necessary. This should have a width that is about one third of the planned height. In the case of a 1.50 m high wall, that would be a width of at least 50 cm, which is why terracing should be considered for larger slopes. This is also supported by the fact that for walls that exceed a height of 2 m, proof of stability must be provided by a certified structural engineer. Only a few materials and tools are required to build the foundation:
- gravel or gravel
- sand
- grit
- pegs and twine
- folding rule
- spade
- rubber mallet or vibrating plate
First, the planned course of the wall is staked out with the help of pegs and string. In order to facilitate the construction of the wall, some distance should be planned to the existing slope, which will be filled with earth after completion of the dry stone wall. Then you lift the soil to the desired width about 40 to 50 cm deep. The resulting ditch is filled about two-thirds with gravel or crushed stone and compacted thoroughly. Finally, the rest is filled up with sand, which also needs to be carefully compacted. Chippings can be used as a top layer, which gives the drywall additional stability.
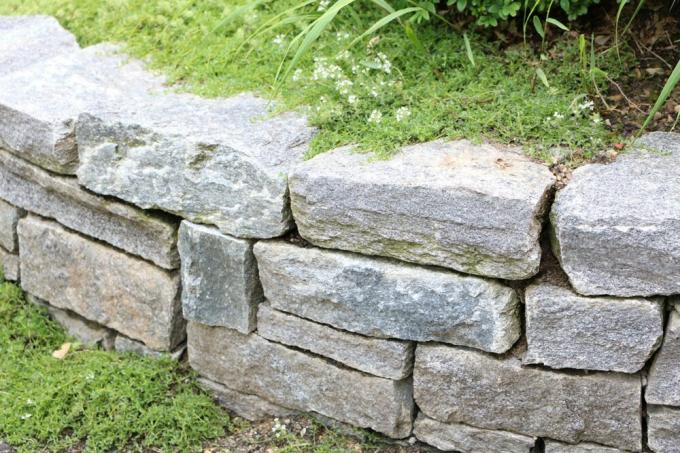
Laying up the drywall
Before building the actual wall begins, you should pre-sort the existing stones. The largest and heaviest stones are suitable for the first row of stones, as they can support the slope particularly well. You should also choose slightly larger stones for the corners, which give the masonry additional stability. The smoothest and most beautiful stones, on the other hand, can be saved for the wall crown to form an attractive finish. After the first row has been laid as the foundation of the wall, the following rows are staggered piled up so that there are no cross joints that could affect the durability of the wall. Care must be taken to ensure that the stones lie firmly on top of each other and do not wobble. You may be able to tap them down with a rubber mallet.
It is also important that the stones are stacked in such a way that they are wider than they are high. At regular intervals, a stone should also be laid across the direction of the wall and the free space behind the wall should be filled up to this height. These stones serve as additional anchoring in the slope. If the terrain is very damp, it is advisable to lay a drainage pipe behind the wall. In this way, the water can later drain away in a targeted manner and does not endanger the stability of the dry stone wall. The resulting joints are filled with sand or grit or with topsoil and planted directly during wall construction. The top of the wall can also be provided with a layer of soil and planted directly. Alternatively, you can choose particularly flat stones as a finish.
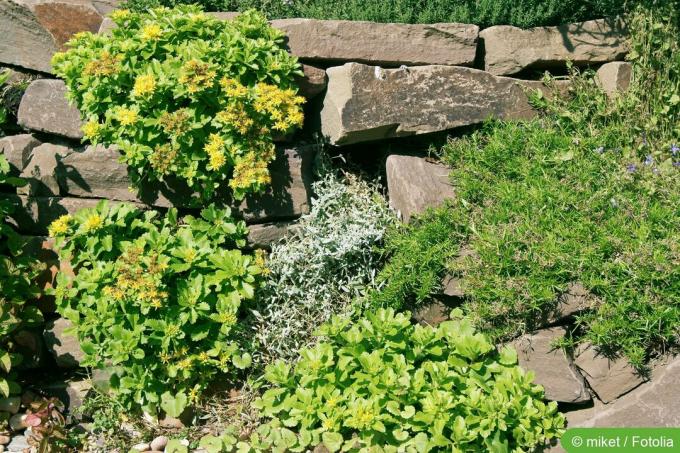
The most beautiful plants for the dry wall
A large part of the appeal of dry stone walls is the lush vegetation, which is not only for unusual spots of color in the garden, but also many different animal species offers living space. If you don't want to wait for nature to do this work, you can plant plants on the wall during construction. This means that even slightly larger plants can be inserted into the walls without damaging their roots. Of course it is also possible to green an existing dry stone wall. However, great care must be taken and, in addition to normal soil, a plant substrate must also be used to ensure that the plants thrive.
Which plants can be used to green a dry wall depends on the region and location. In general, one can distinguish between sunny, semi-shady and shady locations. The following plants particularly like it sunny:
- Pentecost
- Carpet Silver Diamond
- stonecrop
- Creeping Gold Sheaf
- hanging pad bell
The following are particularly suitable for semi-shady to shady locations:
- White alpine aster
- Blue alpine aster
- gold droplets
- midget woman coat
- spring sedge
The top of the wall itself can also be planted. Lush flowers hanging over the edge of the wall are particularly appealing. Of course, the location must also be taken into account. In warm, sunny locations, the following plants can be used:
- blue pillow
- summer stonecrop
- stonecrop
- stone purse
- Serbian sheaf
- Creeping Gold Sheaf
If the wall crown is more in the shade to semi-shade, the following plants can thrive on it:
- alpine silver coat
- Pink cat paws
- Caucasian goose cress
- kidney vetch
- Blue-stemmed spleenwort
Drywall maintenance
If the dry stone wall has been carefully erected and planted, no further maintenance is usually necessary. At best, you should check the stability after extreme weather conditions with heavy rain. However, a stable wall usually holds and maintains itself, so that the hobby gardener can enjoy it for many decades.
As early as the Middle Ages, steep vineyards in the wine-growing regions of south-west Germany were terraced with the help of dry stone walls and prevented from slipping. Today, however, many of these valuable habitats for plants, insects, and lizards disappeared. A good reason to use them as a useful and decorative design element in the garden.
Worth knowing about dry stone walls shortly
- for one drywall the stones are loosely stacked dry (without mortar).
- Natural stones such as limestone or sandstone, travertine, shell limestone, gneiss and limestone are suitable.
- To be stable, the wall must slope inward about 15 percent from base to crown.
- Modeled bricks can be built vertically one on top of the other.
- Up to a height of 40 cm, the wall does not need a foundation.
When planting, you must pay attention to the cardinal direction of the wall sides. Plants that love warmth are best on the south side, while those that tolerate shade thrive on the north side.
Building instructions
- The finished modeled blocks of tuff are about 37 x 27 x 11 cm in size. This porous stone is easy to cut to the required dimensions with a diamond saw.
- The stones must be constructed in such a way that the vertical joints do not overlap. For smaller gaps, saw the appropriate stones to size.
- The planting area becomes larger if the stones of the upper layer are chipped off at the edges with a chisel. The interior of the wall is filled with crushed stone, small stones and earth.
- Already during the construction of the wall, you can easily cut out the side surfaces. First fill some soil into these, then insert the thoroughly watered plants and fill in the gaps with soil.
- There is plenty of space for plants on the top of the wall. If the wall is built wider, you can also plant dwarf shrubs on the (larger) planting area. Important: water well. The modeled volcanic tuff comes from Italy. This stone is available from natural stone companies or from landscape gardeners.
- The gneiss is worked with a setter (chisel) and mallet, for a wall made of quarry stones, the stones must be selected and adjusted if necessary. The vertical wall joints should not be on top of each other if possible.
- The mural crown is included perennials, grasses and small shrubs planted. Stones of different sizes are put together like a puzzle.
- Earth is filled in between the walls. In addition, plenty of gravel and stones are added, which ensure good permeability of the soil. To ensure that the individual bricks are firmly in place, they are wedged with suitable fragments.
- The joints are filled with soil and planted while the wall is being built. The plants must be watered before and after planting and during long periods of drought.
 garden editorial
 I write about everything that interests me in my garden.
Learn more about rock gardens
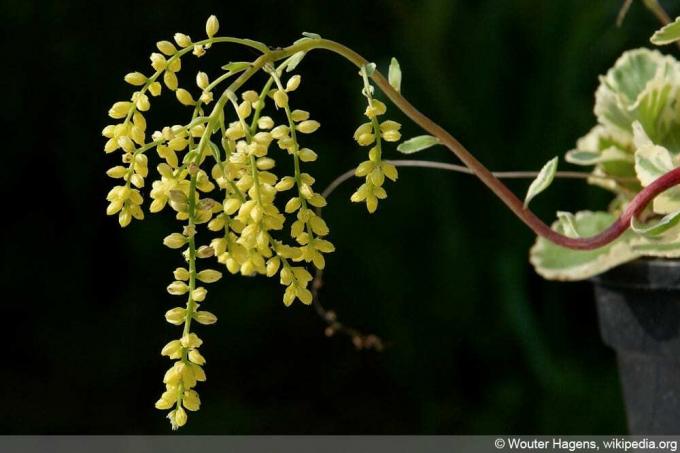
Gold droplets, Chiastophyllum oppositifolium - care information
The filigree groundcover plant comes from the Caucasus and is particularly striking due to its elegant, overhanging flower clusters. The name Goldtröpfchen gives an indication of the arrangement of the yellow individual flowers, which shine in the sun like golden droplets on the flower stalk. Chiastophyllum oppositifolium is not very demanding and gets by in the right location with almost no care.
Creating a stone bed - ideas for design and plants
A stone bed is a great idea for designing small gardens, as part of a large garden or even for the front yard. In places where other flowers find it difficult to grow, for example where they get strong sun are exposed or in the shade, a rock garden still leaves the bed clean and decorative look.
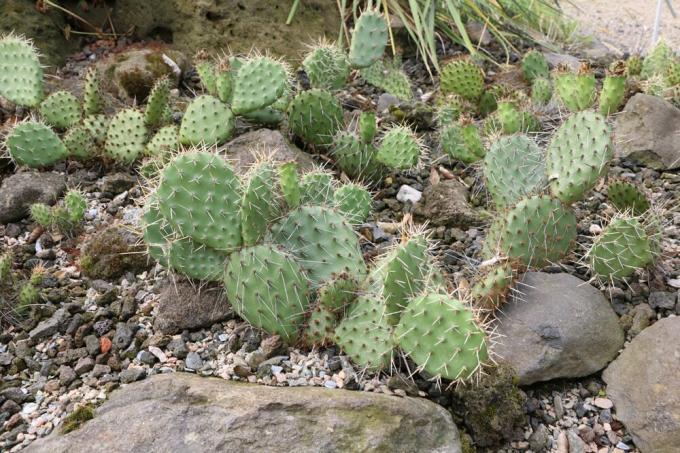
Rock Garden: Hardy cacti and succulents in the garden
So that the garden does not look deserted and deserted even in winter, it is a good idea to find a place in a corner that can also be seen from the house. A rock garden with hardy cacti and succulents can be created, which embellishes the transition from autumn to spring with color.

Rock garden plants - ideas for shrubs, perennials and grasses
A rock garden is much more than just a few stones thrown together and plants growing in between. Only with the right types of plants and stones, which are arranged according to their size, can a visually appealing and natural-looking overall picture come together. The top priority is a very loose planting in the rock garden.

Wonderful plants for the rock garden - list from A-Z
If a rock garden is created, it should have a sunny location so that the stones do not collect moss. Therefore, plants that also want a sunny location are also suitable for the rock garden. It is also advisable to choose hardy varieties, then you only have to plant once for several years. However, many more plants are suitable for a rock garden than you might think.
Plant rock garden plants and perennials
Perennials are non-woody, hardy herbs that are usually planted because of their shape or their floral decoration. How long perennials thrive and feel comfortable in one and the same place depends on the type and variety.