


Table of contents
- repair clay
- Instructions
- foaming
- Proceed
- putty
Holes in a plastic window are easy to drill and are often unavoidable. The repair is more complex, but is also easily possible with our instructions.
repair clay
The easiest and quickest way to repair a plastic window is to use repair putty. Are needed:
- rag and pulp
- cleaning supplies
- repair clay
- spatula or cutter knife
Instructions

1. cleaning
In order for the repair putty to stick to the material, the window frame must first be thoroughly cleaned. Fats, oils, dust and other dirt could adversely affect the hold. After a basic cleaning with detergent and water, the area can be wiped again with alcohol. This allows residues to be safely removed.
2. Prepare repair putty
Before repairing, the putty must be worked with the fingers so that it heats up slightly and becomes more malleable. Forming a rope between your hands is advisable for holes in order to also seal the area behind the opening.
3. insert strand
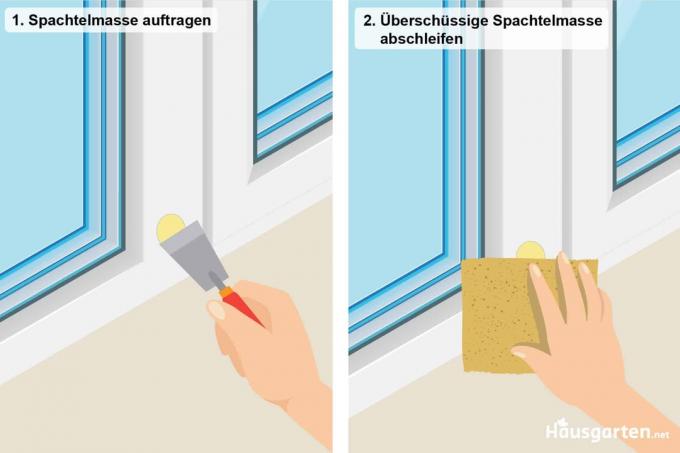
The putty should be shaped in such a way that it can be inserted into the drill hole and has a protrusion of about one centimeter. This overhang is pressed wide outside the hole so that it is circular like a nail head and securely seals the opening.
4. smooth surface
So that no raised areas remain, the excess can now be removed with a spatula or a flat cutter knife. After it has dried completely, sanding and painting over may be necessary.
A notice:
This variant is particularly recommended for smaller holes. Larger drill holes cannot be sealed sufficiently with this. In any case, it is important to follow the manufacturer's instructions. Because the products can differ in their application.
foaming
This is not a complete repair, but preparation for the use of filler or, if necessary, repair putty. The effort is greater, but the results are often more convincing.
Are needed:
- construction foam
- masking tape
- rag or pulp
- cleaning supplies
- grommet
Proceed

1. cleaning
The frame of the window must be thoroughly cleaned before the further steps can take place. Otherwise, the masking tape will not hold properly and the foam may spread and become stuck in unwanted areas. Coarse dirt can be easily removed with washing-up liquid. Any residues can be dissolved with alcohol and wiped off.
2. masking
The construction foam is used for foaming and thus as the basis for another layer for sealing. The drill hole should still be taped so that the material does not stick to the window frame. Because even with a suitable grommet, the foam can escape beyond the edges of the drill hole.
3. Fill up
When the preparatory work is completed, the foam is poured into the well with an appropriately sized spout. The grommet should be moved clockwise so that there is as much mass as possible behind the hole.
4. Adjust
After filling, a small dent should be made with your finger directly behind the drill hole. This serves as a starting point for putty or repair putty.
5. let harden
Before further processing is possible, the foam must harden properly. The information provided by the manufacturer should be taken into account.
Tip:
The drill hole should be taped as tightly as possible. Otherwise, the residues of the foam should be removed with sandpaper. That increases the effort again.
putty
After the drill hole has been prepared by foaming, the filling can begin. Only a small amount is required per hole. However, it is important that the mass is suitable for the type of plastic. Fine or plastic filler is optimal.
Are needed:
- sandpaper
- putty
- spatula
The procedure is as follows:
- After the foam has hardened, the filler is applied.
- The mass must be able to harden completely. The duration for this depends on the temperature, humidity and type of filler.
- To level the surface, the excess filler must be removed. The best way to do this is with very fine sandpaper.
As adjustment by sanding is required, it may be necessary to completely repaint the window frame. Otherwise, the transitions may still be visible. This may already be due to the different shades of colour.
 Home editorial office
Learn more about window / balcony

Balcony power plant 800, 1000, 1200 watts: what is allowed?
In times of energy crisis and energy transition, solar panels on the balcony offer an easy way to generate and use sustainable electricity. We explain what is behind the so-called balcony power plants and how many watts are allowed during operation.

Insect protection for skylights with and without drilling
An insect screen for the roof window ensures that you can enjoy the summer and autumn time without annoying visitors such as mosquitoes, wasps and moths. Depending on your living situation, an insect screen with or without drilling is available for you.

Pleated too long: you can shorten it like this
When looking for a suitable pleated blind, the desired length is not always available. There are hardly any suitable models to be found, especially for windows or glass doors without standard dimensions. The simple solution: a pleated blind with individual dimensions. But what to do if a pleated blind already exists? We will explain to you in detail how you can […]

Attach pleated blinds: the type of window is decisive for the type of installation
There are various assemblies for screwing, clamping and gluing for the attachment of pleated blinds. When deciding on the appropriate form of attachment, however, it is advisable to take a look at the respective window model in order to avoid unpleasant surprises.

Load capacity balcony: standard load per m²
When the weather is good, many people enjoy life on the balcony or terrace. However, if you have a balcony construction in your house, you should think about the load capacity. After all, if there are numerous guests, a paddling pool or a set of furniture, it can add up to quite a bit of weight.

Measure pleated correctly | Determine height and width
Pleated blinds are a popular alternative to curtains and curtains. In order for a pleated blind to darken a window properly, it must fit well into the window. We show how to determine the height and width of different windows for different pleated blinds.