Table of contents
- Utensils needed
- Preparation
- loosen plaster
- Instructions: Hammer and chisel
- Instructions: mechanical plaster removal
- rotary hammer
- concrete grinder
- Plaster and renovation milling machine
- Remove decorative plaster and rolled plaster
- Low proportion of synthetic resin
- grinding machine
- After plaster removal
If plaster is to be removed from bricks, you have two different procedures to choose from: manually or by machine. Below is a professional guide for plaster removal on brick walls.
Utensils needed
The be-all and end-all for removing plaster from a brick wall is the right tools and protective clothing:
- hammer and chisel
- Mechanical alternatives: plaster cutter, rotary hammer or concrete grinder
- For roller or decorative plaster grinding machine
- A fine and a coarse wire brush
- foil
- If necessary masking tape
- safety goggles
- Dust mask for mouth and nose
- working gloves
- Hearing protection when using noisy devices
Preparation
Before you get to work, you should consider that there will be a lot of dust and dirt. A certain preparation is therefore recommended. Here's how you should do it:
- Remove furniture, flowers and other movable objects from the room or move them far enough away outdoors
- Seal room passages with foil (also doors because of fine dust)
- Cover non-removable objects and plants with foil
loosen plaster
You can choose between machine removal and manual work. While electrical equipment can save a lot of time and effort, it takes practice and extra care Procedure because improper guidance/operation can cause the device to "get out of control" and cause damage to the bricks can cause. In addition, some people feel safer with a classic hammer and chisel because there is a better, more intensive one here There is a feeling for the appropriate intensity - especially if you are new to using hand tools.
Instructions: Hammer and chisel
A hammer and chisel are usually sufficient for removing loose plaster and/or smaller areas. When using it on larger areas, you should expect a lot of effort and time. Plaster that is stuck to the wall in particular requires a lot of effort and patience.
How to properly use a hammer and chisel:
- Always work from the center of the surface towards the corners
- Position the chisel as parallel to the brick wall as possible
- Start with light hammer blows and slowly increase if necessary (serves to find out how easily or with difficulty plaster comes off)
- If the plaster has come loose, place the chisel at an angle under the remaining plaster edges and continue hammering (edges usually come off more easily)
- After removing plaster, brush off large residual particles with a coarse wire brush
- Rework with a fine wire brush (prevents lumps forming with new plaster)
Tip:
It is advisable, especially for inexperienced hobby craftsmen, to carry out a "test" in an inconspicuous place before starting the actual work. In this way, a feeling for the use of a chisel and hammer can be obtained.
Instructions: mechanical plaster removal
Three different devices with motors can remove plaster from bricks. There are small differences, mainly related to how the plaster is removed.
Tip:
Anyone who prefers mechanical plaster removal on a brick wall does not have to own or buy their own device. These can often be rented in hardware stores or hardware stores at hourly, daily or monthly rates.
rotary hammer
A hammer drill is the mechanical answer to the classic hammer-chisel combination, which is reflected here in one device. You work with a wide chisel, which should have a width of 40 to 80 millimeters. It should be noted here that the device is extremely powerful compared to the manual version. Therefore, you should work at a well-measured speed. The procedure is identical to that described under "Instructions: Hammer and chisel".
concrete grinder
A concrete grinder is used to remove plaster from the surface down to the bricks. While this is the dustiest thing, it's also the safest if you don't want to damage the brick. When working with a concrete grinder, the following should be considered:
- For thick layers of plaster, start with 80 or 120 grit
- Use fine 40 or 60 grit near the bricks
- Rule of thumb for consumption: one grinding wheel per square meter
- Reduce the grinding speed towards the brick to avoid accidentally grinding stones
- Remove plaster residues with a coarse and fine wire brush
Plaster and renovation milling machine
With a plaster and renovation milling machine, small milling wheels are driven over the plaster. In this way, the plaster on the brick wall is perforated and thus loosened. Plaster removal is faster with the plaster and renovation milling machine than with the concrete grinder. The following is what to look out for and how to proceed:
- Pay attention to the milling depth: if the plaster thickness is unknown, start with a shallow depth to protect the bricks
- The substrate must be absolutely dry
- Start from a corner
- Chess pattern guide: first from top to bottom - then across from one side to the other
- Remove residual particles either with sandpaper or wire brush
- Finish with a fine wire brush to remove the smallest residue of plaster
Remove decorative plaster and rolled plaster

A special feature is decorative plaster and rolled plaster, which consist of a mix of mineral plaster and synthetic resin. The latter is much more difficult to remove than normal wall plaster. This cannot be countered with a hammer and chisel. Depending on the proportion of synthetic resin, there are only two methods of removal:
Low proportion of synthetic resin
- Wet the plaster generously and let it soak
- Apply a spatula or metal scraper at an angle to the wall and push the tool vigorously
- Work from the center of the area in all directions
- If plaster has dried, moisten again and allow to soak in
- Remove the last thin residue with sandpaper
grinding machine
- Suitable for low and above all high proportion of synthetic resin
- Plaster is sanded off while wet, so moisten the surface beforehand and let it soak briefly
- Grain: depending on the thickness of the plaster between 40 and 120
- Work from the center of the area in all directions
- If plaster has dried, moisten again and allow to soak in
A NOTICE:
In the case of coarse-grain decorative plaster, the wall must not be moistened beforehand. Here you start directly with a coarse grit on a dry substrate.
After plaster removal
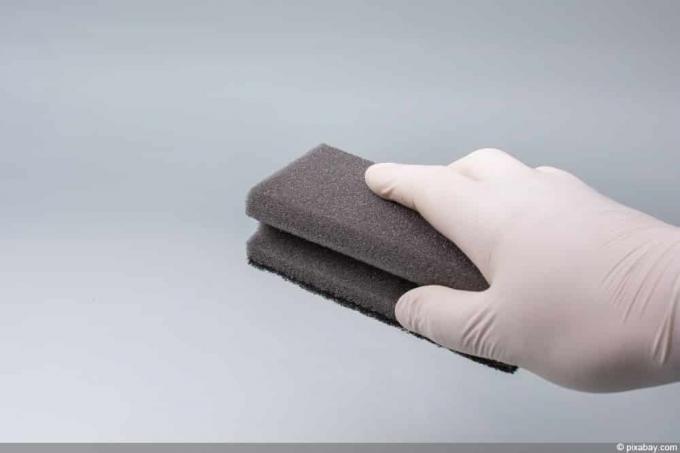
The dust also remains on the brick wall exposed by the plaster. Regardless of whether it is to remain natural or be re-plastered, the dust has to go. The best way to do this on a house facade is to hose it down with a water hose. Indoors, this would flood entire rooms. Here it is advisable to wipe the unplastered wall with a damp sponge. You should refrain from using a high-pressure cleaner, because the massive pressure could damage the bricks and especially the joints.
 Home editorial office
Learn more about wall / wall

Fogging: what to do against black dust on walls?
Fogging is still a foreign concept to many, although black dust on walls, ceilings and carpets has been a widespread problem since the 1990s. We give all the important information about the tiresome topic from the emergence to the fight.
Have L-bricks placed: overview of prices / costs
Making slope fortifications or edging from L-stones is one of the more challenging real estate projects. While you can certainly build smaller fortifications yourself, large amounts of earth should be supported by specialist companies. We explain what to look out for and what costs to expect.

Nails for concrete walls: this is to be considered
In addition to screws and adhesives, the do-it-yourself repertoire also includes nails for the solid assembly and attachment of materials. Not every nail is suitable for every purpose. Choosing the right nail depends on various factors, such as the construction material of the support wall.

Interior plaster: how much plaster do you need per square meter?
If interior plaster is to be applied, one question above all arises: how much plaster do you need per square meter? Because too much material causes unnecessary costs. Too little plaster is annoying because it takes time and money to buy again.

Drain house & masonry | Cost & Duration
Anyone who needs to have their house and masonry drained has a choice of different methods. We offer here how the costs can be, how long it can take and other important facts.

Calculate dew point on the wall | 5 information on dew point calculation
The dew point is an important tool, especially when insulating buildings. It indicates where the temperature is so low that water vapor condenses as moisture. For help with calculating how this value is determined, see the guide.