

Table of contents
- time
- wait for flowering time
- substrate
- Mix orchid soil yourself
- Steam orchid soil
- Step by step guide
- Divide older orchids
You should move your orchids to fresh substrate about every two to three years. Read our guide to find out why orchid soil is the best choice and how best to proceed when repotting.
time
Orchids - no matter what type and variety - should be transplanted into fresh substrate and a new, larger pot every two to three years. At this point, the previous orchid soil has decomposed to such an extent that it must be replaced. In addition, the fleshy roots grow out of the pot and can cause an imbalance, where either the planter falls over with the orchid or the plant is pushed out of the pot becomes.
wait for flowering time
Therefore, when repotting, you should take the opportunity to cut back the orchid roots. The best time to do this is when the plant has just finished flowering and you cut off the flowering stem. Never repot a flowering orchid as it puts all its energy into the flower and therefore no Apply more energy for the formation of new roots and thus for rooting in the fresh substrate can. The best time of year is spring, but the plants can still be transplanted well in autumn. At this point it is light enough, but neither too warm (like in summer) nor too cold (like in winter).
Tip:
In the case of perpetually flowering species such as the popular Phalaenopsis, you should cut off the flowering shoots before repotting so that the plant can put its strength into rooting.
substrate
With the exception of the so-called terrestrial orchids, which include the lady's slipper (Cypripedium) belongs, the tropical orchids grow as epiphytes on trees or stones. Here they draw the few nutrients they need from raw humus deposits, which are found in the forks of the branches. Accordingly, you must not place orchids in conventional potting soil, but need a special orchid substrate. You can get orchid soil in any garden store, DIY store or on the Internet. It is marked by
- a very coarse, airy structure
- woody components
- many (also larger) pieces of bark
- often pine bark, wood fiber, sphagnum moss and perlite
Make sure there is no peat in the mixture. This is unsuitable for orchids, and the material has also fallen into disrepute due to the environmentally harmful degradation. Instead, a small amount of compost should be included so that your orchids are supplied with nutrients.

Tip:
Orchids develop aerial roots that draw moisture and nutrients from the air and should therefore not be covered with soil. In addition, they develop leaf green themselves, which is beneficial for the growth and health of the plants.
Mix orchid soil yourself
If you have a lot of orchids and want to repot them, a self-mixed substrate can be worthwhile. There are numerous recipes for this, and we would like to present one that has already been tried and tested at this point. The substrate is designed for medium-sized to large orchids and is therefore well suited for many Phalaenopsis and Dendrobium species. You need:
- 5 parts medium pine soil
- 2 parts coconut soil (for swelling)
- 1 part each of lava granules and perlite
- 1 part nut shells
- 1 piece of crumbled charcoal
Mix the ingredients in the specified ratio. The self-mixed orchid soil is ready! For small or For mini orchids, you should use the finest possible material (e.g. B. fine pine bark), for large species such as vanda or cymbidium orchids use extra large pine bark and lava mulch instead of lava granules.
Tip:
Some orchids such as B. the Vanda orchids do not need soil at all. You can either tie them to a piece of wood or cultivate them hanging in special pots or baskets.
Steam orchid soil
Regardless of whether you bought it or mixed it yourself: orchid soil should first be steamed before repotting. This step kills any pathogens and also prevents the substrate from becoming moldy later on. That's how it works:
- Line the baking sheet with parchment paper
- Spread the substrate loosely on top
- moisten with water
- Clamp a wooden spoon between the oven and the oven door
- Set the oven to 100 degrees Celsius
- Steam substrate for 30 minutes
Then let the orchid soil cool down. Don't forget the wooden spoon, as the escaping moisture cannot escape with the oven door closed.
Step by step guide
If the season is right and you have prepared the orchid substrate accordingly, you can now get to work and repot the orchids. In addition to the right soil, you also need suitable, translucent plant pots. These should always be one size larger than the old ones to give your plants more room to grow.

1. Fill pot with substrate
- Fill the new pot halfway with fresh substrate
- Clean the planter before use
- dishwater is suitable for this
- wipe against fungal spores with vinegar
- dry thoroughly
2. pot the orchid
- Lift the orchid out of the old planter
- Thoroughly remove substrate residue
- Rinse roots under lukewarm water if necessary
- Cut off dried and damaged roots directly at the base
- Use sharp and disinfected scissors for this
3. insert orchid
- Grasp the orchid between the tuft of leaves and the root ball
- hold in the middle of the new planter
- The root neck should be at the height of the pot rim
- Fill in the substrate all around
- occasionally tap the bottom of the pot lightly on the table
- so the substrate also fills the gaps
4. moisten orchid
- The pot is filled when the substrate no longer sags
- Do not press down on the substrate
- Moisten the leaves and substrate with a spray bottle
- Put plant in pot
Tip:
Once the roots have anchored themselves in the new substrate, you should immerse the orchids in a water bath once a week. Excess water should always be removed from the cachepot so that the plant and substrate do not become moldy.
Divide older orchids
Do you have an older, multi-branched orchid? Then you can use the repotting that is necessary anyway to make two plants out of one. Orchids with at least two stems can be easily propagated by division.
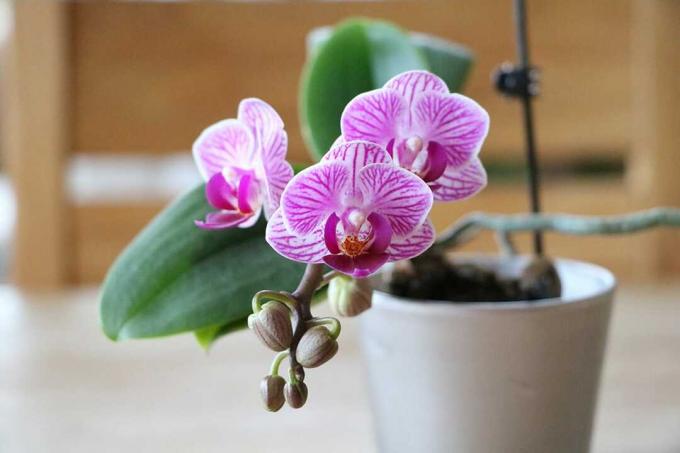
And this is how you do it:
- Lift the plant out of the pot as described
- Remove substrate residue
- pruning roots
- Count bulbs: there should be at least six
- Bulbs = thickenings above the roots
- at least three bulbs per part
- Cut through the orchid at a suitable point
- use a sharp, disinfected knife
- Untangle and separate roots
Avoid injuring the roots unnecessarily, as orchids are quite sensitive to this. However, root damage cannot always be avoided. In this case, dust the injured area with some charcoal powder to disinfect it. Then plant the divided orchids separately in pots as described.
 garden editorial
 I write about everything that interests me in my garden.
Learn more about caring for plants
Plant hangs leaves despite water
If plants let their leaves hang despite water, this can have various causes. In order to prevent it from dying off by taking rapid countermeasures, you should find out about the possible causes and effective countermeasures here.
Plants hang their heads: what to do?
If the ornamental plants are cultivated in the garden or in pots and suddenly let their heads droop, then the question quickly arises as to why this can be. However, this is usually due to maintenance errors that need to be checked. If a remedy is found, most plants usually recover quickly.

pull tree out of core | 7 tips for growing a tree yourself
Trees can be grown from cores without much effort. There are a variety of plants that have seeds and can be easily cultivated in your own garden. Special classic fruit trees should be mentioned, which are suitable for such a project.
How do hydrangeas stay white? | That way it won't turn pink
How do hydrangeas stay white - this is the question many hobby gardeners ask themselves when the hydrangea changes color. The white often turns into a pink, which is usually comparatively pale or can appear "dirty". Here we reveal how it works.
Cutting privet: when is the best time?
Privet is becoming increasingly popular and is often used as a privacy screen in the form of a privet hedge. This is not surprising, because the plant is easy to care for and fast-growing. However, it is crucial to cut the plant regularly at the right time.
planting ivy | 13 tips on soil, setting & planting
Whether as a privacy screen, climbing wall or terrain greening or ground cover - ivy always works. With species-appropriate care, this evergreen classic will delight gardeners for years with its numerous advantages. In order for the plant to thrive particularly well, the gardener should take these tips into account.
