
Table of contents
- The principle of irrigation
- Clay pots as a base
- hole sealing
- Glue
- DIY instructions
- "Installation"
- Ollas are not hardy
Gardeners who enjoy handicrafts can save themselves expensive Ollas from the hardware store with a clear conscience. Because watering with a DIY variant actually offers all the advantages of the original. Detailed instructions for building an Olla yourself follow, rounded off with a few valuable tips.
The principle of irrigation
The Olla is not a modern invention. Just as little as the natural material from which it is made: clay. In South America, clay vessels have been used for water storage for centuries. Since clay is porous, it constantly releases small amounts of water into its surroundings. Buried in the ground and regularly filled with water, Ollas ensure an even supply of moisture to the root area of the plants. They are now also available in Germany and do their job in garden beds and tubs. Building it yourself saves money, but beware: Here, too, it absolutely has to be clay!
A notice:
The name Olla comes from Spanish. Therefore, the correct pronunciation is "Oja"
Clay pots as a base
Hardly any gardener can make pottery or always has the opportunity to do so. Ready-made plant pots made of clay, each with a hole in the bottom, are therefore used for self-construction.
The following applies to size and quality:
- two pots are required per Olla
- whether new or used
- Pots must not be glazed
- Capacity depends on the area to be irrigated
- Rule of thumb: 5-6 l per square meter (both pots together)
- Build multiple Ollas if needed
- switch to smaller pots for potted plants (space problem)
Tip:
Choose two pots that differ in diameter by about 1 cm. This small difference makes it possible for the pots to be put together particularly easily to form an Olla.
hole sealing
If both pots have holes in the bottom, which is usually the case with terracotta pots, the hole in one pot must be closed. For this you can use a potsherd or a flat stone.
Glue
The two pots must form a solid unit so that the water only escapes through the porous clay surface as intended. Here you have several options:
- cement
- epoxy resin
- Tile adhesive for outdoors
Tip:
Sometimes an irrigation system is only needed for a foreseeable period of time. Then it makes sense to glue the pots with real or alternatively a vegetable beeswax. The pots can be easily detached again and reused for their intended purpose.

DIY instructions
- Plan your irrigation system, i. H. Number and size of the ollas. Larger areas are better watered with several small, evenly spaced specimens, rather than a single large one.
- Gather the materials you need. If necessary, hold look out for used clay pots in good time to minimize costs, for example at a flea market.
- Lay out an old blanket, newspaper or foil as a base.
- Have pots and other materials within easy reach.
- Stir cement or Tile adhesive according to the instructions. If you are working with wax, melt it until it is viscous.
- Start taping the bottom hole, but only on one pot. The hole in the other pot remains open so that you can later fill in water with a watering can or hose. If the pots are of different sizes, the hole in the larger pot is closed.
- Glue the stone the piece of pottery so firmly that the hole is completely sealed. To be on the safe side, check this by pouring in some water after drying.
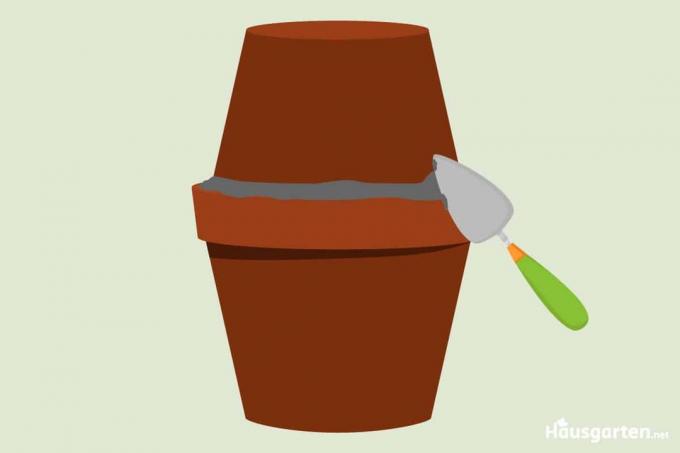
- Place the pot with the bottom hole closed so that the large opening is facing up.
- Place the second pot upside down on top.
- Put enough cement or an alternative glue where the two pots touch. With two pots of different sizes, the slightly deepened groove is filled with the "adhesive material".
- Allow the connecting material to harden thoroughly.
- If necessary, test the seal by pouring water and observing the pot for a couple of hours.
"Installation"
The self-construction of this irrigation system is only complete when the clay construction has been dug into the bed to be irrigated. Incidentally, this can also be a raised bed. Only the top 4 cm of the Olla should be visible. After the first filling, it makes sense to check after how many days the filled water is used up. You can shine a flashlight inside or use a dipstick. The determined value can serve as a guideline for timely refilling. However, remember that consumption can vary over the growing season due to the weather and the size of the plants.

Tip:
To prevent dirt and insects from getting inside the irrigation system through the filling hole, you should loosely cover it with a piece of broken glass or a stone.
Ollas are not hardy
Clay soaks up water, water expands when it freezes. The result: clay pots burst. This irrigation system is therefore not made for local winters. Incidentally, this not only applies to the DIY version, but also to Ollas bought in stores.
Tip:
Since watering outdoors in winter is seldom or never announced anyway, dig the irrigation system in good time before the first frost and store it in a frost-free room until the temperatures allow it to be used again allow.
 Home editorial office
Learn more about irrigation

Test: what can solar irrigation systems do?
Solar energy for irrigation is an interesting alternative for many gardeners and plant lovers, as electricity costs can be saved in the long term. Our test should help you to decide. We will tell you how solar irrigation systems perform in comparison.

Drip irrigation - make drip hose yourself
Drip irrigation is undoubtedly the most convenient and efficient form of garden watering. It also saves a lot on water charges. The core element is a drip hose that releases the water. How you can build it yourself and what is important is here.

Build automatic irrigation yourself irrigation system
Plants need water and they need it regularly. There are various watering systems to give your plants the water they need during a short vacation.

Build your own lettuce tree Tips for the salad tube
If you only have little space, you will quickly reach your limits when it comes to self-sufficiency. Creative solutions, such as the lettuce tree, promise a remedy. We explain how vertical lettuce cultivation succeeds and reveal helpful and useful information about self-cultivation.

Build holiday watering: Water flowers with woolen thread/string
The holiday is approaching and with it the question: How can the plants survive this time without being damaged? Because you don't always want to give your neighbors the house key. You don't have to! Even a wool thread can reliably water the plants.

Watering system for potted plants: flower pot watering
Summer time is vacation time. But how do you water the potted plants in the apartment and on the balcony when you're away? The easiest way to do this is with an automatic irrigation system. You can buy it ready made or build it yourself. More about this is here.

