
Table of contents
- lay foundation
- Skillfully build
- Special case cyclopean wall
- The perfect mural crown
- Grout correctly
- impregnation
- Conclusion
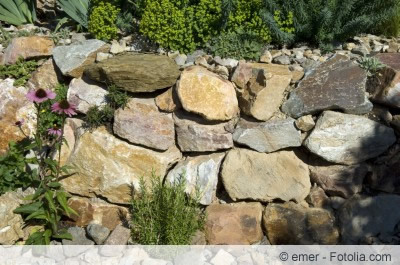
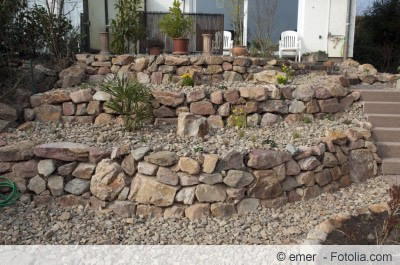
The classic quarry stone wall consists of natural stones that are put together more or less regularly with the help of mortar. In this way, an attractive appearance is created in ornamental and kitchen gardens, while at the same time useful tasks are fulfilled. A natural stone wall serves as a stable slope reinforcement, decorative bed edging, supports Terraces elegantly or, as a free-standing variant, loosens up the overall picture of the garden in a creative way way on. The following instructions explain clearly what is really important when you build a quarry stone wall yourself and grout it correctly.
lay foundation
A professional concrete foundation is essential for the quarry stone wall. The rule of thumb for the base of the wall is that the width is about one third of the height. The height of the 2 meter mark should not be exceeded, as in this case a Proof of stability is required by law, which can only be obtained from a certified structural engineer provide is. How to lay the foundation correctly:
- Dig out an 80 cm deep strip of the measured width
- Fill it with concrete and additionally reinforce it with steel mesh
- Integrate the steel grid into the concrete and not just lay it on top
- Compact the concrete at the end by gently tapping it with a spade
- Repeated checking with the spirit level is mandatory so that the wall base is completely level
The foundation should harden completely before the next step. This waiting time of 2 to 3 weeks can be used to select the right natural stones. In order to avoid high transport costs and to create a natural look, the stones should come from a regional quarry. The squarer the shape, the easier it is to wall up the stones, even for an inexperienced hand.
Tip:
A ready-cast foundation is protected from the weather with a plastic sheet while it hardens. In high heat, the material should be watered every 2 days to prevent cracks caused by drying too quickly.
Skillfully build

Once the foundation has hardened and the stones have been delivered, work can begin. Trass lime mortar has proven itself particularly well as a mortar for a quarry stone wall, as it adheres excellently and does not bloom, i.e. does not drive white flags out of the joints. If the quarry stone wall serves as slope reinforcement, it gains more stability by tapering 5-10 percent on one side towards the embankment. To build a free-standing natural stone wall, two rows of stones are placed, with the gap being filled with mortar or concrete. Follow these steps:
- Stretch a cord between two pegs for orientation
- Wet the foundation well with a brush to spread the mortar over it
- An optimal mortar bed is 3-5 centimeters high
- Lay the first row of stones with the largest specimens
- After aligning and tapping, fill the gap with concrete or gravel
- Then wall the second row of stones slightly offset for more stability
- Transverse joints are as straight as possible, while cross joints are to be avoided
Thoroughly clean dirt off each stone with water before installing it. It should be slightly damp but not soaking wet. The next layer is much easier to set up if the quarry stones end with a horizontal side at the top. They give a quarry stone wall additional stability if every sixth or eighth stone is laid in a transverse position. This measure makes particular sense for a slope reinforcement, since the binder stones act as additional anchoring. In a free-standing natural stone wall, these stones form a practical connection between the two rows of walls.
Tip:
The connection between mortar and foundation is significantly improved if you first apply a layer of tile adhesive and only then distribute the first layer of mortar.
Special case cyclopean wall
If you are one of the do-it-yourselfers with experience, the creation of a cyclopean wall as a rustic variant of the quarry stone wall should be of interest. The term derives from the Greek word 'kyklos' for circle and has less connection with the one-eyed giants from mythology. The natural stones used here are extra large, sometimes round and almost unprocessed. Smaller natural stones are arranged around these cyclops, so that each wall is unique. Since there are no continuous transverse joints when stacking, special care is required.
For the construction of a cyclopean wall, hard rocks are primarily considered, as they guarantee a particularly long service life. These stone types are suitable for a cyclopean wall:
- granite
- gneiss
- migmatites
- basalt
- quartzite
- diabase
In contrast to soft rock, such as marble or sand-lime brick, hard rock is difficult to work with, which is not necessary for a cyclopean wall.
The perfect mural crown

So that the backfilling of a quarry stone wall cannot be seen from above, flat natural stones are used as the last layer. If you want to protect the masonry even better against weather influences from above and at the same time value it focuses on a decorative appearance, gives the design of the wall crown something special Attention. For this purpose, the dried wall is treated with sealing slurry by applying the material in two passes. In this way, the upper end of the quarry stone wall is additionally sealed and receives a perfect base for the cover. There is a wide range available in specialist shops, ranging from modern variants made of copper or aluminum to ceramic covers in the form of roof tiles. It is important to note that the selected wall crown protrudes at least 4 centimeters over the wall so that rainwater can drain off well.
Grout correctly
The final step in building a quarry stone wall is grouting. Since more mortar is always used when building irregularly shaped natural stones than with the classic brick wall, there is more room for maneuver for the do-it-yourselfer when designing the Put. Proceed with these steps:
- Scrape the joints to a depth of 1.5-2 centimeters with a chisel
- Use a strong brush to crumb and dust off the loose mortar
- Fill smaller holes with mortar to the desired joint depth
- Mix the air-lime mortar according to the manufacturer's instructions
- Moisten the quarry stone wall with a sponge or a water hose
- Use the jointing trowel to press and smooth the mortar into the joints
With an optimal joint, the filling jumps back a maximum of 1 mm behind the natural stones. Always smooth out the vertical butt joints first and then the horizontal bed joints.
You can save yourself the effort of subsequent pointing if pointing is already done during the bricklaying. At the same time, this process opens up the possibility of working with sausage joints that are as decorative as they are extra stable. The mortar that oozes out is shaped into a round shape using a template. This not only looks nicer, but also gives a joint more stability, so that it is nowhere near as quickly washed out by the rain as conventional wall joints. If you don't like the sausage joints, choose the wide joints, which are ideally suited to leveling out the unevenness between the untreated natural stones.
impregnation

With an impregnation you give your self-built quarry stone wall the finishing touch. Recommended products consist of organic silicone resins, are solvent-free, frost-resistant and colorless. Applied with a brush or a garden sprayer, they penetrate deep into the pores of the natural stones and seal them against the weather. After the first coat is applied and dried, water should bead off it. If not, repeat the process.
If you want to be on the safe side for a permanently beautiful quarry stone wall, add additives against fungi and algae to the impregnation.
Conclusion
In order to build a quarry stone wall in the garden yourself and to grout it correctly, no extensive previous knowledge is required. As long as the size does not reach dimensions of 2 meters in height and more, neither a structural engineer nor a master mason are required to erect a decorative garden wall. With a stable foundation, reinforced with steel mesh, you create the best conditions for years of durability. If you avoid cross joints when building walls and use good quality mortar, you are on the right track. If you pay attention to a sealed and shapely wall crown, the natural stone wall gains additional aesthetic value. Last but not least, skillful grouting gives the hand-made garden wall longevity and a harmonious look. Take care of the joints directly when laying the walls, save yourself the subsequent work.
 garden editorial
 I write about everything that interests me in my garden.
Learn more about building instructions & blueprints

Build Turtle House | Instructions for self-construction from wood
Turtles are fascinating animals. Holding them, however, requires a few basic requirements. Very important: A turtle house including an enclosure for the garden. Building both yourself is not a problem. Here are the instructions for making your own out of wood.

Build a Ladybug House: Instructions | Location for the ladybug hotel
Ladybugs help to control unwanted pests in the garden and are therefore welcome visitors. In order for the cute insects to feel comfortable and settle down permanently, a ladybug house can be set up, which you can build yourself very quickly.

Build a butterfly box yourself – instructions | Slot width information
Butterflies are absolutely fascinating creatures. Unfortunately, you can find them less and less often in our gardens because the living conditions for the animals there are simply no longer right. This can be changed with a butterfly box. Here's how to build it yourself.

Build a hot tub yourself – building instructions for a hot tub
Hot tubs are becoming increasingly popular. More and more people are opting for the option of bathing in the fresh air in the garden. But building such a hot tub is not easy. With a kit or detailed assembly instructions, however, implementation is not a problem. It only requires a little manual skill to build a hot tub yourself.

Have a well drilled: costs per meter + information on approval
A fountain in the garden is not only convenient, it also saves a lot on water charges. But first you have to invest. Here's how much it costs to have a well drilled and how to register it.

Build your own Swedish fire – building instructions for tree torches
Swedish fires or tree torches, as they are also called, are a great eye-catcher in the garden and are a tradition for many in summer and autumn. With the following assembly instructions, these can even be easily made yourself and make wonderful gifts or a great use of felled trees.


