

table of contents
- Pile connection
- instructions
- fitness
- Tripod
- instructions
- fitness
- Inclined post
- instructions
- fitness
- Binding technology
- frequently asked Questions
If a new one Planted a tree or shrub it can be provided with one or more supporting piles. So you can connect it easily and securely. You can find out how to do this and what options there are here.
In a nutshell
- tying up protects against wind breakage
- ensures straight growth
- different methods for different plants
- Tying technique always the same
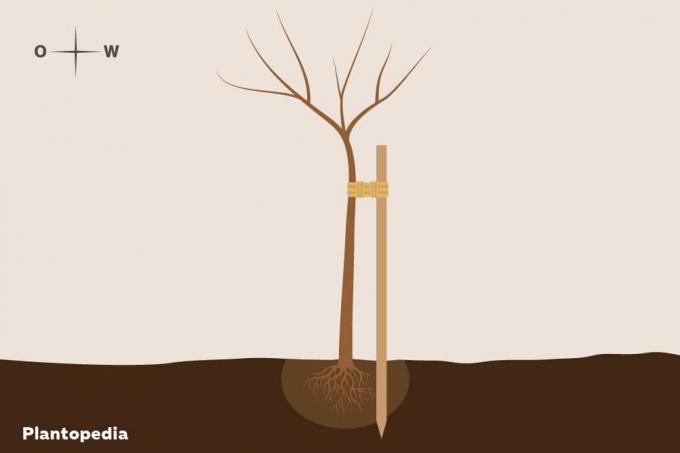
Pile connection
The simplest option is to tie the tree to a single support post as shown in the first graphic. The stake should be strong enough to support the tree well. Having one end sharpened will make it easier for the stake to hit the ground. Its length should match the plant.
Note: As a rule, if the stake is driven so deep that it is stable, it should end a little below the crown of the tree.
instructions
- The planting hole is dug.
- The tree is fitted into the hole together with the support. The stake shouldn't be more than a hand's breadth away. It is important that it stands on the west side of the tree.
- Hit the stake. To protect the young tree from damage, it is temporarily removed from the hole.
- The plant is put back in and the planting hole is closed. If the stake is too long, it can be shortened a little with the saw.
- You can tie the tree.
fitness
A single support post is suitable for young trees that still do not have extensive roots. Only then can the stake be driven in close enough to the tree. A single support is sufficient in places with little risk of storms. High stems benefit from this tying technique because they have a very long stem before the crown begins.
Tripod
This method consists of three interconnected stakes that stand around the tree and form an equilateral triangle when viewed from above. In addition to posts and cords, small battens are also required to connect the posts to one another. This can be seen in the second graphic.

instructions
- The planting hole is dug.
- The tree is fitted into the hole.
- The posts are driven in around the tree so that they are outside the root system.
- The piles are connected with battens that stabilize them.
- The planting hole is filled in.
- Tie the trunk of the tree to one of the pegs with the rope.
fitness
This variant is suitable, on the one hand, to tie trees afterwards and to drive stakes without the roots of the young one To damage sapling and on the other hand for plants with large root balls, where too close support is not possible is.
Note: A special alignment of the tripod is not necessary. The young tree can be tied to all pegs for more stability.
Further advantages of the tripod
For trees that are endangered by game browsing, a connection with three stakes can be useful, as it is easy to attach a game fence around the stakes. The same applies if animals, such as sheep, are kept in the garden in which the young tree is located. These also tend to eat the bark or shoots of young trees. A tripod with a wild fence keeps them from doing so. If the game fence is installed deep enough, it also protects against rabbits or chickens, which otherwise could freely scratch the roots.
Inclined post
In the method shown in the third graphic, the stake is driven in diagonally next to the plant. It should stand west of the tree and only slightly protrude from the trunk.

instructions
- Dig the planting hole.
- Put the plant in the hole.
- Align the stake at a 45 degree angle to the trunk. It should be about 10 cm from the trunk, outside the root ball.
- Drive in the support post with a hammer. Protect the plant from damage.
- Close the planting hole.
- Tie the tree to the stake.
fitness
This variant is less suitable for tall plants. For this it is often used on low trees or shrubs.
Caution: If the plant gets bigger and the grass is high all around, the inclined support can become a trip hazard.
Binding technology
The rope used must not be too thin, it is then less resistant and cuts faster. Do not wrap or tie too tightly around the trunk. The windings around the loops ensure that the connection is so stable that the young tree does not hit the stake even in stronger winds.

- Better to plan knitting too long than too short
- Wrap the rope around the trunk and take it twice
- put the double rope around the peg
- lead back to the tree in a figure eight
- run several loops back and forth
- end at the young tree and leave two fingers' widths of space
- Wrap the rope around the loops
- wrap from the young tree to the stake
- Separate the ropes on the peg and tie them tightly
frequently asked Questions
In principle, trees do not have to be tied up in order for them to grow well. A support pole may be superfluous in locations that are sheltered from the wind or where plants remain small. However, it must then be accepted that the plant may grow at an angle.
The stakes should be made of sturdy, treated wood. Coconut fiber or a similar natural material is suitable as a rope. It should be noted that no ropes are used that constrict the tree too much. The natural material weathers over time, is intentional.
If the stakes to which a young tree is tied break off, they should be replaced. Something else applies if the stake weathers over time or the rope falls apart. The tree is then old enough to stand alone and no longer needs to be tied up. Usually it is enough to tie a young tree for about 3 years.
