


Table of contents
- planning
- Location
- shape
- piles
- materials and tools
- Preparation
- Building a pond jetty: instructions
The pond is one of the most popular forms of garden design. Depending on its size, it can be decorated with a variety of wooden structures, such as a bridge or a pavilion. A dock is a great idea for creating a little extra space by the pond or a unique piece of decor that exudes charm. You can easily implement this idea yourself.
planning
Preliminary planning is very important so that your pond bridge fits and is walkable in the end. The shape and location of the jetty in particular must be carefully planned in order to avoid possible problems with placement and implementation. For this reason, you should think about the following points beforehand:
Location
it is best to choose a location that has enough space for the wooden structure. There are two options for the foundation:
- point foundation
- concrete foundation
Spot foundations are very suitable for jetties of all sizes, especially for smaller variants. For a short footbridge you only need four point foundations on which the substructure is fixed. The larger the bridge gets, the more spot foundations you need for the entire construction. A big advantage of these is the possibility of using them even on steep slopes if your jetty is to be elevated over the bank. Accordingly, longer piles are required. A concrete or slab foundation, on the other hand, is effective for larger jetties. Because each jetty requires a wooden structure on the shore to balance the weight, concrete foundations are a better choice for large or long jetties. The substructure can be built on these without the help of piles, but is not suitable for sloping banks.
shape

The shape of the bridge is also important. If you want a jetty that runs straight from the shore terrace, it takes a lot less work than a sloping shape. The smaller your pond is, the more uncomplicated your pond bridge should be, as more space is usually required for sloping shapes. Likewise, shorter jetties can often be placed without a terrace, as they work well on their own and do not require a counterweight.
piles
You have to be careful with the piles. Stakes intended to support the jetty far above the water are not easy to place as they cannot be driven into the ground due to the need to use a pond liner. This is only possible if you have a natural pond that does not require a pond liner. Otherwise you need a composite mat, through which you can then place a foundation in the pond.
These elements allow you to determine exactly how your bridge is built. This saves you a lot of headaches and you can start building the wooden walkway immediately after you have planned and implemented the foundation. Here even footbridges are possible that run through the entire garden and lead to the pond, inspired by dune paths. Note that the free-floating portion of the jetty cannot be longer than halfway if you do not want pilings in the water.
Tip:
Alternatively, you can build the jetty without laying a foundation if you already have a paved concrete surface. Then you can easily place and fasten the beginning of the bridge on this.
materials and tools
For your own pond bridge you need the following materials and tools:
- Decking boards for the jetty
- Construction or squared timber for the substructure
- cordless screwdriver
- allowances
- Force
- mounting bracket
- level
- angle connector
- Circular saw (can be rented from hardware stores for around 18 euros per day)
- angle measure
- Ruler or tape measure
- matching screws made of stainless steel with self-drilling point for wood
- matching stainless steel screws with self-drilling point for concrete; alternatively dowels, concrete drill, drill and screws
- Weather and winter protection: wood oil, glaze or wood protection gel
- chisel
- rubber mallet
- PU/PUR glue
- Wood, concrete or stainless steel pilings if you choose a dock that requires support
- Pencil
- Pond liner as protection against weeds
As you can see, building your own wooden pier is no small task. When choosing the wood, you must make sure that you use a suitable wood that can be used for a pond bridge. These include the following types of wood:
- Jaw
- larch
- douglas fir
- Black Locust
- teak
- Bankirai
A big advantage of all these types of wood is their resistance to moisture, which is of course important for a pond bridge. You can of course use cheaper wood for the substructure, but it always looks better if it is made of the same material. The cheapest are usually the local softwoods, which are offered for around 15 euros per square meter in the form of a decking board. Bankirai or teak, on the other hand, can easily exceed the 60 euro mark. When choosing decking, you should opt for a ribbed surface, as these have an anti-slip effect. When choosing posts for the overhang, the heavier the decking, the thicker the posts need to be. The material requirements for the substructure and the decking are calculated as follows:
- Decking boards: Length in m x width in m = surface area of the web in m² + 10% for waste
- Example: 3 m x 1 m = 3 m² (3.3 m² with waste)
You will need the following materials for the substructure:
- 2 pieces of wood in the length of the bridge (longitudinal beam)
- several crossbars
The number of crossbeams is determined by the length of the web. The distance between the crossbars must be about 50 centimeters. This means that for a 3 meter long and 1 meter wide jetty you need five or six crossbeams. It doesn't matter if you buy more material than you need. This is recommended for this project, because excess wood is simply removed with the saw at the end.
Tip:
Even bamboo can be used as a possible wood for the decking. These have a high weather resistance and can be used for the jetty without any problems.
Preparation
The preparation is necessary so that you can easily start the construction of the jetty. The most important part of the preparation is the completion of the foundation, without which the construction of the pond bridge is not possible. Equally important is, of course, the purchase of the material. Depending on the material requirements, it may take some time for certain quantities to reach you when you order the wood online. In the hardware store, the problem can be that there is not enough wood available. One step not to forget is emptying the pond if you are using stakes. Proceed as follows:
- Store pond dwellers in suitable containers before emptying
- then drain the pond
- now you have to wait for the pond to dry
- then you can set up the point foundations
- do not refill with water until the dock has been completed
If you have a natural pond without a liner, you don't have to take this step as the posts are driven straight into the bottom. Of course, you should pay attention to aquatic plants and inhabitants. Last but not least, you have to determine the right time. This is important for the winter protection that is applied after construction. Although you can easily set up the dock in the rain due to the weather-resistant wood, the wood then takes a long time to dry. The winter protection must not be applied on a rainy day, otherwise it will be washed away immediately by the rain. It is therefore advisable to carry out the construction in dry weather.
Building a pond jetty: instructions
After gathering the long list of materials and tools, completing the foundation, and having nice weather, you're ready to start building the jetty. The following instructions will guide you through the individual steps until you can relax on your own pond jetty:
1. Start building the substructure. If you have not yet cut the individual pieces of wood, measure them now and cut them to the required size with the saw. When trimming the joists, make sure they are measured to fit squarely between the joists without exceeding the intended width. Be sure to use a spirit level and square for this.
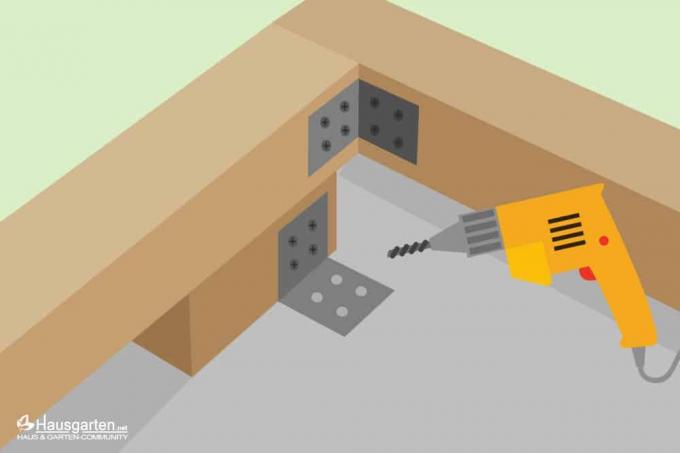
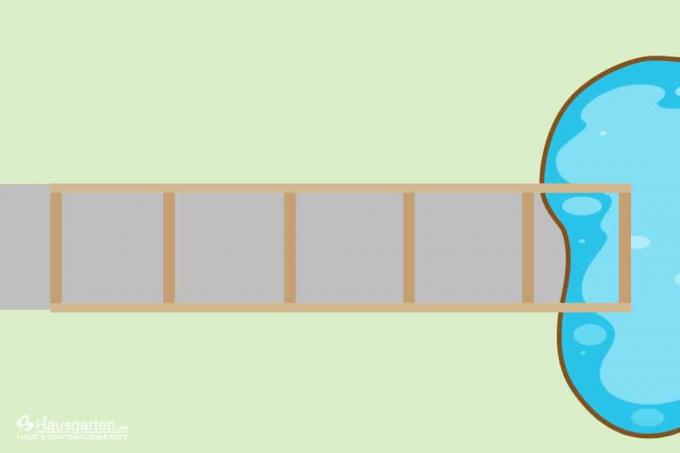
2. Now place the longitudinal beams parallel to each other and attach the first crossbeam to one of the longitudinal beams using an angle connector. To do this, use the clamps and allowances so that the wood does not shift while screwing. Continue doing this until you have connected the two longitudinal beams with two transoms at the beginning and end. You should now have a rectangle or square in front of you as a substructure, depending on the dimensions of your bridge. Use the screws for wood for this step.
3. Now place the frame on the foundation. If you are not using spot foundations, you should shim the frame with wood at the corners and where the joists will be placed. As a result, the foundation does not lie directly on the concrete. Now, using the mounting brackets and screws for concrete, fasten the frame directly to the foundation at the corners and where the crossbeams will be placed. As a result, the bar does not move at the end.
4. Proceed with the remaining crossbeams as described in step 1.
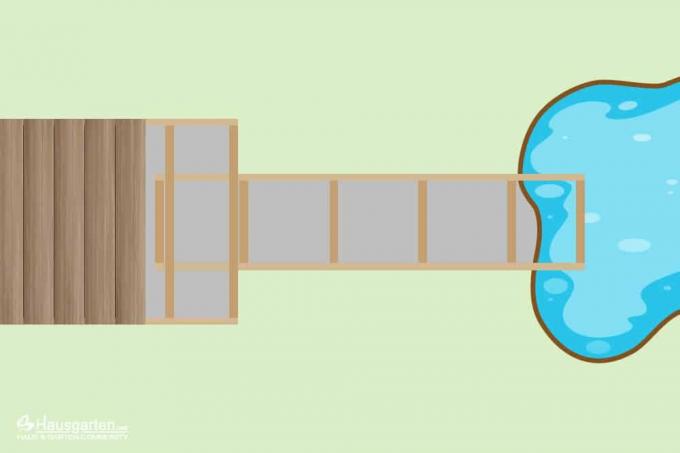
5. If you want to connect the footbridge to an existing terrace, first remove the decking boards that point towards the pond. To do this, you should remove about half a meter of the floorboards so that you have two cross braces of the supporting structure of the terrace.
6. Now place the already completed sub-frame of the bridge over the two exposed cross braces of the terrace and mark the contact point on the frame and the terrace with a pen. After that, there should be 2 marks on each of the following cross braces:
- 2 exposed crossbars of the terrace
- 2 crossbars of the jetty that do not face the water
These are necessary for the notches that connect the bridge to the terrace.
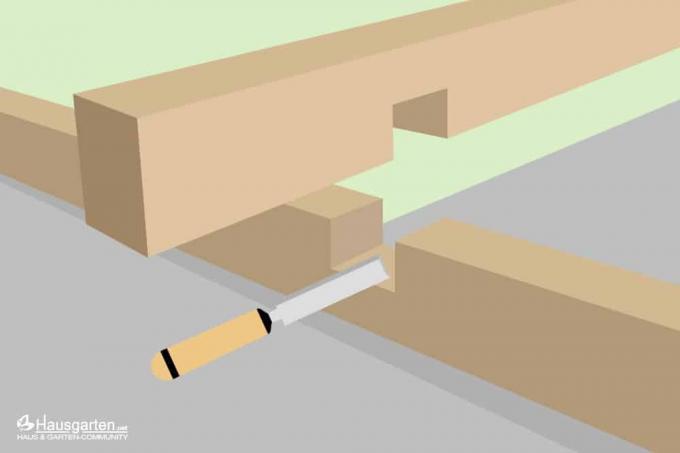
7. Cut these marks about halfway down the wood and use the chisel and hammer to carefully remove the marked area. But never cut the wood all the way through. Work the area as cleanly as possible with the chisel. Then connect the bridge to the terrace using the notches and fasten it with the glue and one screw each.
8. After you have connected the footbridge to the terrace or placed the subframe on the foundation, weed protection should now take place. This is only necessary if you don't want to have weeds under your dock or if you are using a point foundation. To do this, simply take the pond liner, spread it out under the subframe and fix the liner in place as usual.
9. If you want to use veneers, they must now be attached. Position this on the frame top bracket with a clamp and screw tight.
10. Now you can plank the bridge with the floorboards. To do this, lay the decking boards on the frame and allow them to protrude by 30 to 40 mm. The distance between the planks should be about 5 mm. You can use small pieces of wood and place them in the joints to keep the planks from shifting.
11. Screw the planks to each cross and longitudinal brace. Two screws per interface are sufficient for this. Auxiliary lines can be used so that the screws are all in one line.
12. Then check whether the planks are sitting correctly and not drifting in one direction. If the bridge is well aligned, the overhangs are removed with the saw.
13. Last but not least, treat the floorboards with the weather and winter protection. Although these woods do not necessarily need winter protection, this protects the wood even more intensively. Two layers are enough here.
14. The drying time varies depending on the product used. Afterwards you can relax on your own new jetty, because you could even add a railing at the end.
 garden editorial
 I write about everything that interests me in my garden.
Learn more about creating a pond

Build your own stream out of concrete 6 tips for investing
If you have a natural stream in your garden, you can count yourself lucky. Such an idyllic facility can also be built from concrete. This guide contains tips for building your own.

Laminate pond | 6 tips for working with GRP
Ponds were and are eye-catchers, animation and variety in many garden designs. They are particularly durable when made of plastic reinforced with glass fiber. However, if you want to process GRP yourself, you should know a few helpful tips in order to skilfully avoid recurring errors and problems.

Designing the edge of the pond | 10 ideas for pond borders and pond edge design
If you want to design your pond edge, there are numerous ideas for hiding it. Especially after using pond liner, gardeners rely on a pond border, as this covers the liner and the pond is attractively integrated into the garden.

water basin in the garden | An alternative to the pond?
A refreshing highlight in the creative garden design is a magical water world that invites you to linger with its gentle splashing. Creative home gardeners with a penchant for modern solutions rightly ask: are water basins in the garden a sensible alternative to the traditional pond? With practical reflections, this guide would like to help you decide between a water basin or a pond in the garden.

Instructions: Planting the garden pond + 8 beautiful plants for the pond
A garden pond is a very special jewel in every garden. However, in order for it to have an effect, it must be planted. How to do that and which plant grows best where on or in a pond is explained here.

Garden pond: required size + depth for fish - goldfish
A garden pond gives your own green a lively component - especially if goldfish are kept in it. But how big and deep does it have to be so that the fish are safe in it and can get through the winter without any problems? There are answers here.
