Table of contents
- The alternative to concrete
- substructure
- Preparation for the transfer
- The edge security
- The edge angle
- The Mortar Wedge
- curbs
- The Planum
- The relocation
- Why joints at all?
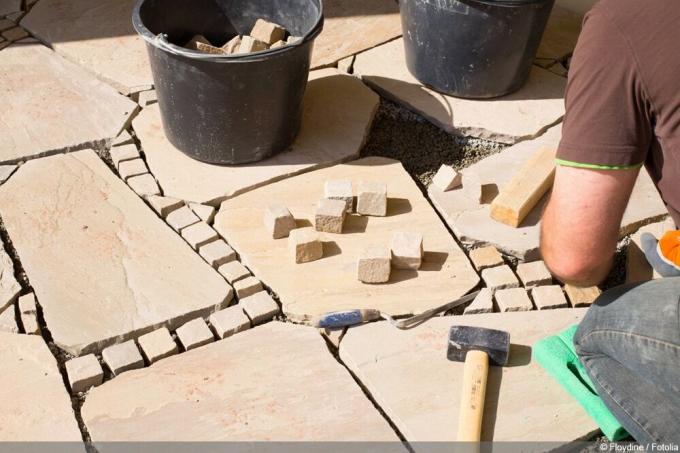
In most cases, slabs are laid wet, i.e. in a bed of concrete or mortar. In the case of terraces and other outdoor applications, however, this can be disadvantageous and is usually not necessary at all in terms of effort. Here you will learn how to lay natural stone slabs, such as polygonal slabs or slabs of slate, and do without the expensive and complex cementitious building materials.
The alternative to concrete
Laying quarry stone slabs without mortar - is that even possible? Yes it works! After all, the concrete only serves to hold the panels in place. This is at least as easy, cheaper and in many cases even more permanent by placing the natural stone slabs in a bed of grit. If the edge of the laid area is fixed in its position, the panels secure each other against unintentional shifting. And not just for polygonal panels, but also for rectangular or square panels. How the work is implemented can be easily understood using the following steps.
A NOTICE:
In general, the instructions can also be used without any problems to lay slabs of slate. Overall, however, you should work particularly carefully, since slate tends to to break under tension, to splinter or "slate", i.e. into their individual layers to split up.
substructure

While laying in mortar usually takes place on solid concrete floor slabs, laying in gravel does not require this solid but expensive substructure. Instead, it is sufficient to strengthen the subsoil in such a way that it is load-bearing Exposure to water and frost does not move and last course is level enough to allow the laying to take place make possible.
The steps mentioned here are only necessary if a stable substructure is not already available through a new building or something similar.
Materials and tools required
- Mini excavator, alternatively spade, pickaxe and shovel
- buckets, wheelbarrows, etc.
- level
- Ruler, leveling batten or other straight batten with approx. 2m length
- plate shaker
Proceed
- Excavate the existing subsoil to a depth of 80 cm
- Dispose of excavated material properly, e.g. B. on excavated landfill, alternatively disposal via landscape gardener, earthworks company or similar
- Excavation on all sides approx. Create 40 centimeters beyond the edge of the covering
- Insert a frost-proof, i.e. water-draining and at the same time stable substructure, material e.g. B. KFT ("combined frost protection and base layer"), or mineral concrete
- Installed material after approx. Compact a layer thickness of 30 centimeters with a plate vibrator, then apply further layers up to the desired height
- Specify the upper edge of the substructure as follows: Planned surface of the quarry stone slabs minus slab thickness, minus five centimeters for the laying bed of the natural stone slabs
A NOTICE:
Mineral concrete is mentioned as a possible substructure. Despite the name, this is not a classic, cement-bound concrete. Instead, mineral concrete is a mixture of different gravel grain sizes, which can be compacted very well due to its composition and can therefore be designed to be load-bearing.
Preparation for the transfer
Once the substructure has been created, frost, rising soil moisture and, at the same time, collecting rainwater can no longer harm the subsequent covering of natural stone slabs. Now it's time to create the right conditions for the subsequent laying of the panels. These requirements include securing the edge of the covering against shifting, as well as the production an exact planum on which the slabs are then laid on one level and without thresholds and tripping hazards lay.
Materials and tools required
- Bucket
- hammer
- rake / ruler
- level
- guideline
- Carpenter's nails or other pegs
- Possibly a trowel
- tape measure / ruler
The edge security

There are various options for securing the edge of the terrace against movements that then affect the entire area:
The edge angle
A perimeter bracket can be used without any mortar. Mostly made of plastic, it is an angle profile whose protruding leg serves as a stop for the panels. The horizontal leg allows for attachment to the ground using long carpenter's nails or special pegs via a perforation:
- Measure the exact position of the terrace edge
- Lay out the angle profiles and align according to the measurement result
- Tools: Stretch a guideline over two pegs for a straight line
- Drive in the safety elements carefully and check the position of the profiles
The Mortar Wedge
If you don't want to choose a mortar bed for the panel surface, but can definitely use this material for details, you can alternatively use a mortar edge. Although this is only created after the tiles have been laid, this variant is already explained here for a better overview:
- Mix suitable mortar for outdoor work according to the manufacturer's instructions
- Check the outer row of panels again for exact positioning
- Apply mortar to a frost-proof substructure next to edge panels and spread in a wedge shape towards the panel
- Ideally keep the upper edge of the wedge just below the upper edge of the panel
curbs
The setting of curbs requires a particularly high level of effort. On the other hand, in addition to creating a very good hold, you also enable a visual edge limitation of the surface equipped with polygonal plates. Border stones of low height are sufficient, since they only have to absorb a small amount of lateral pressure if the work is carried out correctly:
- Tension a guideline over pegs, taking into account the orientation of the terrace edge and the desired upper edge of the borders and slab covering
- Create a suitable exterior mortar according to the manufacturer's instructions
- Apply bits of mortar to the frost-proof substructure in the area of the panel ends
- Place border stones loosely on pieces of mortar, align and lightly press down
- Align the rebates with a rubber mallet, hammer lightly into the mortar bed until the desired position is reached
A NOTICE:
After reading the information about edge protection, one may rightly ask whether these methods are visually appealing to the outside world. It should be noted at this point that after the work has been completed, the excess of the frost-proof substructure can be backfilled with soil. After renewed greening, the overhang of the substructure is just as invisible as the securing of the terrace edge.
The Planum

Once the edge of the terrace area has been secured, the final level is created on which the slabs are then placed. Fine split is used for this, so-called noble split. If the surface is created without defects and bumps, all common Lay panel materials right down to slabs of slate without later unevenness or the risk of stumbling to fear.
A NOTICE:
Again and again one reads that terraces should be inclined at a gradient of around two to three percent for functioning drainage. If this is desired, the guideline must be inclined in the direction of the desired gradient in the following description. When laying in a gravel bed, rainwater can also seep through the panel joints, so that the inclination is less important, especially in the case of polygonal panels and other panels with a large joint width is. Smaller terraces can also be aligned quite well without a slope, since less water can collect overall.
Materials and tools required
- ruler
- level
- rake
- Bucket
- shovel
- Guideline with pegs
Proceed
- Apply Edelsplit, grain size ideally up to a maximum of 3-5 millimeters, to the substructure between the edges and distribute roughly
- Set up the exact target height with a guide line on the edge of the plate
Tip:
Set up the plumb line so that the string marks the top of the plumb line when the split pavement is at the design height
- Place a spirit level on a straightedge and align the height in the area of the terrace edge with the guideline
- Pull off the split horizontally with a straightedge or following the created gradient of the cord
- Remove excessive amounts of split, add to gaps and pull off area again
- Draw straight edge crosswise from deck sides to eliminate waves when working in one direction
The relocation
The last step is to insert the desired slabs on the planum that has been created and between the existing edge boundaries. For the sake of simplicity, we assume that panels can be inserted without breakage or saw cuts.
Materials and tools required
- ruler
- level
- Guideline with pegs
- rubber mallet
Proceed
- Lay the selected slabs carefully into the bed of splits from one side of the terrace and press down lightly
- In the event of slight unevenness in the split, carefully tap the slabs with a rubber mallet into a horizontal position
- Regularly check the position using a straight edge and spirit level using a guide line
- Desired joint width between panels using a suitable spacer, e.g. B. Ensure wooden strip or specific plastic molding, remove temporary spacers later
- In the edge area, if the surface does not run out in full slabs, cut stones to size using a cut-off grinder and a suitable stone disc, do not forget to bevel the edges
- After laying all the quarry stone slabs, fill the joints with suitable joint sand, add sand to the Give the terrace surface and sweep in all directions with a broom, process after a few days due to settlement of the Repeat sands
Tip:
When laying slabs of slate, trimming the edge slabs can be easier with a pointed hammer than with technical aids! But you should definitely familiarize yourself with the technique on a leftover piece beforehand! Special spacers can be used to create equivalent joints, which are only apply to the lower half of the board thickness and is therefore not visible after the joints have been filled step. They remain permanently in the joints and stabilize the surface against shifting of the panels against each other, especially during construction and until the joints are completed.
Why joints at all?

Inexperienced readers may now ask themselves why the stone slabs are laid with joints at all. Closely butted they would have been much more secure and at the same time even more harmonious in the appearance of the stone surface.
The joints between the panels perform several functions:
- Drainage option for rainwater
- Decoupling of the slabs from one another, otherwise if one slab moves (tilting) then neighboring slabs will also move
- Compensation possibility for dimensional tolerances of the panels to each other
In addition, joints are also quite capable of concealing one or the other inaccuracy in the execution. Although we assume that every do-it-yourselfer does conscientious and precise work, even professionals are not immune to mistakes and are happy to use the advantages of board joints for themselves.
 garden editorial
 I write about everything that interests me in my garden.
Learn more about building garden paths - guide

Substructure for polygonal panels: 17 important tips
Polygonal tiles are a popular choice, especially for garden walkways. But how are they to be laid and what substructure is required? Our guide will show you step by step.

30 tips for laying & grouting polygonal panels
The term polygon comes from the Greek and means many corners. With regard to slabs for the terrace or sidewalk, fragments of natural stone are meant that have an uneven shape. The laying is therefore a little more difficult than that of rectangular stones.

Washed concrete as a garden path | Instructions in 7 steps
Garden paths are essential, especially in larger gardens. Practically, they are also relatively easy to put on and lay yourself - for example with optically appealing aggregate concrete. You can read here how to build a garden path from exposed aggregate concrete slabs in seven individual steps.
Paving: ideas for the terrace and garden
In creative garden design, paved areas take on functional and style-defining tasks at the same time. The options range from a high-heeled access path to an ornamental stone garden picture. This colorful potpourri of ideas would like to inspire you to tastefully stage your terrace and garden with imaginative paving.

Pointing paving stones - filling joints in garden paths
A garden path made of paving stones not only looks good, it also ensures that you can walk through the garden with dry feet in bad weather.
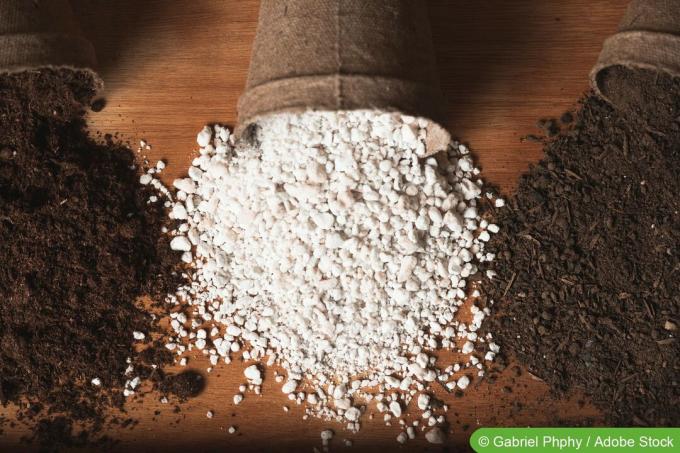
Perlite for plants and soil improvement
Anyone who also thinks about the effects on the environment when doing their own thing will no longer want to see peat in their garden soil, since peat extraction destroys the moors, which are immensely important for climate protection.