Table of contents
- plants and light
- LED principle
- led bar
- materials and tools
- LEDs
- power adapter
- Cable
- mounting materials
- construction
- Assembly instructions frame
- Building instructions rails
- Equipped with LEDs
- Advantages of the LED bar
LED-based plant lighting is a valuable and very useful accessory for many hobby gardeners. It's just stupid that such a plant light isn't exactly cheap in the shops. Depending on the size and design, several hundred euros can quickly add up. It is significantly cheaper if you build the LED lighting yourself. It's work and requires some knowledge, but it's definitely worth it.
plants and light
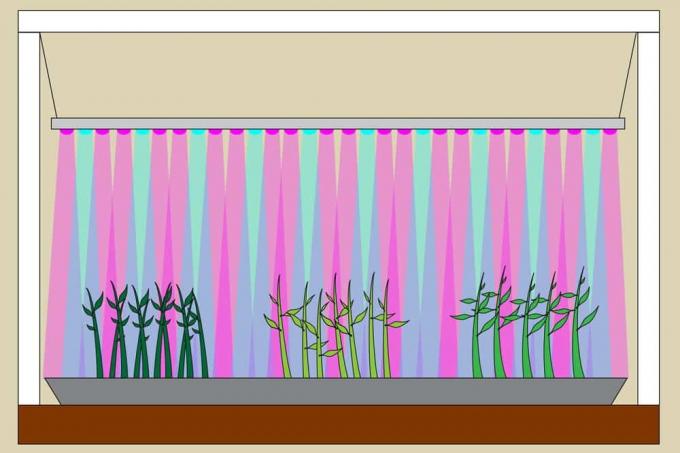
Light is essential for plants to survive. Without light, no photosynthesis and therefore no growth can take place. Of course, light is not just light. Sunlight, for example, covers a wide spectrum of colors that we cannot normally perceive but are of great importance to plants. When building an artificial light source from LEDs, this color spectrum must therefore be reproduced. The building light and the red light are of particular importance here. Blue light helps the plant sprout and generally grow. Red light, on the other hand, plays a major role in the formation of flowers and fruits. The respective wavelength range in which they radiate is decisive for these so-called color spectra.
LED principle

LEDs have been completely transforming the lighting market for a few years. No wonder: the small light-emitting diodes are not only significantly more efficient than the good old light bulb and require much less electricity, they can also be combined in a variety of forms. It goes without saying that they are made for effective plant lighting under these conditions. If you build your LED grow light yourself, individual solutions that are precisely tailored to your own needs are possible. However, for this to work, LEDs have to be specially wired, which requires at least some basic electronics knowledge. You also need a power supply unit that converts the alternating current from the socket into direct current.
led bar
The simplest construction of an LED plant lighting is certainly that of the light strip or bar. Its shape is reminiscent of fluorescent tubes. Like these, it hangs freely in the room - as a plant light, of course, directly above the plants that it is intended to illuminate. The LEDs are arranged in one or more lines. In principle, the light-emitting diodes can be arranged according to very different principles, for example in the form of concentric circles. However, we want to concentrate exclusively on the linear arrangement here, because an LED bar can be built relatively easily even by relatively inexperienced people. The end result should be an LED bar with two parallel lines and a length of one meter.
materials and tools
All of the materials that we need for our self-made LED bar are easily and inexpensively available at the hardware store or available in electronics stores. We distinguish between the electronic components (LEDs, power supply, resistors, cables) and the construction elements such as the carrier strips and the suspension. You will also need common tools that you normally already have.
LEDs
LEDs are the core elements of our LED Bar. We use seven royal blue and 15 deep red LEDs, each already mounted on a circuit board. You must meet the following requirements:
- Design: High Power LED
- Power: 3 watts
- Blue wavelength range: 490 to 450 nm
- Wavelength range red: 700 to 630 nm
The number of built-in LEDs can of course be changed individually. It is only important that significantly more red than blue are used.
Tip:
The easiest way is to buy pre-constructed LED chains or DIY kits and thus saves the very complicated wiring, which can hardly be done without in-depth knowledge of electronics. We will therefore not go into detail about the interconnection.
power adapter
The LEDs are supplied with power via the power pack. It converts the alternating current from the socket into the required direct current. When choosing the right power supply, the most important thing is the amperage. For our purposes, it should be at least 700 mA. The voltage must be 24 volts or 48 volts.
Tip:
Used power supplies can be found in practically every household in this country. If such a used part is still functional and supplies the required current, it can of course be used. This saves considerable costs and is good for the environment.
Cable
Cables are required to connect the LEDs to each other and to the power supply. Speaker cables, the so-called twin strands, are recommended here, for example. They should be 0.5 or 0.75 square millimeters thick.
mounting materials
The following is required for the support structure of our LED Bar:
- Wooden top or old table more than 100 cm wide
- two aluminum U profile strips measuring 100 x 3 x 3 cm
- three square profiles made of plastic with a length of 100 cm
- two matching plug-in angles
- two matching mounting feet
- four chains with a length of 50 cm each
- thermally conductive adhesive pads
- two spacers Spacer screws with a length of about 15 cm
- Screws and nuts of different sizes
- Tool
A drill with a metal drill bit is absolutely necessary for the construction of our LED bar. Alternatively, a cordless screwdriver with a metal drill attachment can also be used. You also need a screwdriver and possibly also a metal or plastic saw.
construction

The construction of our LED bar is very simple. It consists of a plastic frame that is mounted on a wooden panel or an old table. The two aluminum profiles, to which the LEDs are attached, hang on chains from this frame. The profiles are guided parallel to each other and kept at a distance by means of the spacers. The power supply is external and not attached directly to the structure. For example, it can be mounted on the wooden panel. Of course you can also do without the frame and hang the aluminum profiles directly on the ceiling. Then, however, significantly longer chains are required. The advantage of the frame is that you can create a special place for the entire construction practically anywhere in the house or apartment. In addition, there is no need to drill holes in the ceiling.
Assembly instructions frame
First we build the frame from the plastic square profiles:
- Screw the two matching mounting feet to the left and right of the wooden panel at a distance of one meter
- Put a square profile in each of the feet
- Attach an angle piece to the other end of each profile
- Insert the third square profile into the angle pieces and thus create a connection
- Drill two holes in this profile near the ends
- Insert two bolts with nuts into these holes, to which the chains will later be attached
Building instructions rails
The second step is to build the actual bar and equip it with the LEDs. You should know that LEDs should be cooled. This cooling is achieved by the U-shape of the two aluminum profile strips. The legs dissipate the heat to a certain extent. The open side of the strips must therefore also point upwards. The LEDs are simply glued to the closed underside. It is best to use heat-conducting adhesive pads, which also promote heat dissipation. This is how you proceed step by step.
- First drill two holes in each of the two profile strips for the spacers or Drill spacer screws
- Equip the holes with the spacers and screw them together
- The distance between the two profiles should be about ten centimeters
A notice:
In principle, any number of profiles can be combined with one another in this way. The rule of thumb is: The more profiles, the larger the area that can be irradiated by the LEDs.
Equipped with LEDs

If the aluminum rails have been prepared in this way, it is now time to equip the underside of the profile with the LEDs. These are simply glued on using adhesive pads. Care should be taken to ensure that the distribution is as even as possible and that the blue and red LEDs are mixed. The connecting cables are simply routed along the underside in the direction of the sides and then routed upwards or downwards from there. Since we have a fully switched LED chain or If we use a DIY kit, we don't have to worry about the correct wiring. The cables then simply have to be routed in the direction of the power supply unit and extended if necessary.
Tip:
When installing on a wooden panel, it is advisable to also attach the power pack to the wooden panel.
The last step is to attach the chains and hang up the finished bar. The chains are simply mounted by attaching the last chain link to the screws on the top of the frame and the aluminum profiles. It makes sense to secure them with a nut on both sides. The height can also be easily adjusted via the chain links as soon as the plants below the lighting get bigger.
Advantages of the LED bar
The LED bar that we have presented here offers an enormously high degree of flexibility. Above all, it can grow with you, so to speak. LED lighting is particularly suitable for growing or overwintering plants of all kinds in the apartment or house. Depending on the plant, it is also possible in this way to expose it to artificial light all year round - right up to the harvest of fruit and vegetables. Of course, the costs for our self-made LED bar vary. However, you can assume that you have to invest between 50 and 100 euros. In comparison to other plant lighting, this definitely pays off. LEDs consume very little electricity, which of course means that you can save significantly on electricity costs.
 garden editorial
 I write about everything that interests me in my garden.
Learn more about grooming

send plants | 7 tips for sending flowers
Sending plants requires good preparation. Not only the type of packaging is of great importance, so that the goods arrive safely at their destination. The season is also important. It depends on how well the plants survive the transport.

30 office plants for a better indoor climate
A bit of green in the office not only looks pretty, but can also significantly improve the indoor climate. For example, indoor plants increase humidity, can clean the air and, if they are large enough, even dampen noise.
21 edible flowers | What flowers can you eat?
Edible flowers can be used for many dishes in the kitchen, not just as decoration. The flavors range from sugary-sweet to peppery-spicy and give food and drinks a very special touch.

Shade plants: 17 green and flowering plants for the shade
Shady garden areas are a challenge for every hobby gardener, although shade does not mean that it is completely dark. Partial shadow and light shadow are also a type of shadow. The range of suitable plants is growing steadily and offers a variety of design options.
Forest flowers: 55 flowering species in the forest sorted by color
When the local forests dress in picturesque shades of color throughout the year, the numerous forest flowers in Germany present themselves and inspire with their blaze of colour. From purple to red to white and yellow, the German forests have a lot to offer.

Scented plants: list from A-Z for garden, apartment and balcony
Flowers, bushes and trees not only set color accents in the garden or inspire with their magnificent growth, they spoil the nose with their scent. Humans have always been attracted to fragrant plants and kept them close by.