

Table of contents
- What are wooden pallets?
- Herb raised bed made of pallets - entry-level model
- material and tool requirements
- building instructions
- Tip for fine tuning
- Raised bed made from 4 Euro pallets
- material and tool requirements
- building instructions
- Tips for filling
- Mobile raised bed for terrace and balcony
- building instructions
- Cover for an early start to the season - ideas collection
If an aching back makes gardening a pain, a raised bed solves the problem. Resourceful home gardeners have discovered Euro pallets for practical wooden construction. Sowing, weeding and harvesting are conveniently done here at table height. The options range from mini herb beds for the balcony to mobile raised beds and large-scale vegetable beds for the whole family. Browse through the 3 best building instructions for a raised bed made of wooden pallets.
What are wooden pallets?
Wooden pallets are an important part of the Europe-wide transport of goods. Constructed as a standardized four-way pallet, the wooden platforms can be loaded from either side and picked up by forklifts. As a rule, they are made of pressure-treated pine wood, less often hardwood or softwood.
The standard Euro pallet – known in technical jargon as the Euro pool pallet – has a base area of 0.96 m². This corresponds to the dimensions of 1,200 mm length x 800 mm width x 144 mm height. Depending on the moisture content of the wood, the weight is between 20 and 24 kg. A classic wooden pallet consists of 11 planks and 9 blocks assembled with 54 screw nails and 24 hammer nails.
The boards have chamfers to make maneuvering and threading in the forks easier. The larger industrial pallets are 200 mm wider and weigh up to 35 kg. At 10.5 kg, the Düsseldorf pallet is the lightweight among wooden pallets and measures 800 mm x 600 mm. A cross-border exchange system ensures that the transport pallets can be used efficiently throughout Europe. Since pallets regularly fall out of the exchange system, they attracted the interest of do-it-yourselfers for building furniture, flower boxes and raised beds. Discarded wooden pallets can be obtained from transport companies for little money. Hardware stores and garden centers now offer unused, new pallets.
Herb raised bed made of pallets - entry-level model

In the trendy wooden look, the herb bed made of pallets is a great eye-catcher in the front garden and on the balcony. A positive side effect is that the herbal plants are at a safe distance from leg-raising dogs, nibbling cats and gluttonous snails. The following assembly instructions offer home gardeners the best opportunity to successfully try out a beginner model.
material and tool requirements
- 1 * Wooden Pallet
- 6 x Mini Plastic Flower Box (300mm x 110mm x 110mm)
- 1 x wooden slat (4,000 mm x 48 mm x 24 mm)
- 1 x screen-printed plywood panel (2,500 mm x 1,200 mm x 21 mm)
- 24 x Screws (3.5mm x 35mm)
- 4 x Screws (4.5mm x 60mm)
- Impregnation with the “Blue Angel” seal of quality
The tools required are limited to 1 drill with bit and wood drill as well as a chisel and brush.
building instructions
Before you start assembling the herb raised bed, put the wooden panels and the slat in the Cut: screen-printed plywood panel: 6 pieces each 400 mm x 100 mm x 21 mm and the wooden slat: 2 pieces per 600 mm. Proceed as follows:
- Remove the second and fourth board from the wooden pallet with the pry bar
- A total of 6 plant compartments are created
- Pre-drill the 6 screen-printed plywoods and attach them from below as shelves for the compartments with the 3.5 x 35 mm screws
- Screw on the two 600 mm long slats with 4.5 x 60 mm screws as feet on the right and left
- Screw the slats together so that they protrude equally on both sides
- Paint all wooden parts with impregnation
Place the flower boxes in the plant compartments and fill them with herbal soil. As an alternative to the plastic boxes, you can cover the compartments with pond liner, which you staple to the wooden edges.
Tip for fine tuning
Even hobby gardeners with many years of experience puzzle over the name of some herbs. Put an end to the botanical guesswork by decorating the raised bed with stylish chalkboard name tags. Specifically, it is a liquid paint that hardens within 24 hours. Similar to a school blackboard, each sign can be wiped clean with a damp cloth and written on with chalk over and over again. That is how it goes:
- Sand the wood smooth in the designated areas
- Mark the surface to be coated with masking tape to prevent fuzzy edges
- Apply chalkboard paint undiluted with a brush or paint roller and allow to dry
You can optimize the decorative effect by framing the blackboard signs with rustic hemp ropes. Once the chalkboard paint has dried, attach the ropes using all-purpose glue.
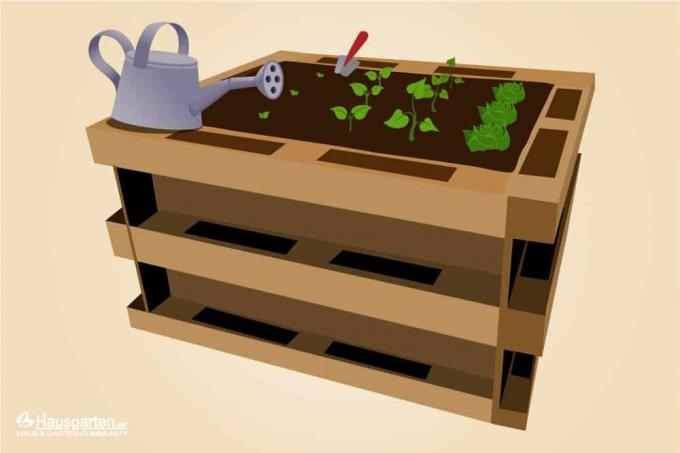
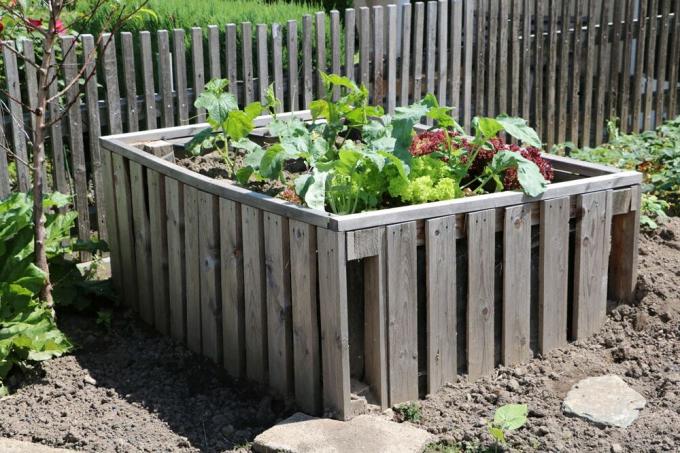
Raised bed made from 4 Euro pallets

The following assembly instructions made it into the top 3 because they can be easily implemented even by those with limited motor skills. The result is a raised bed worth seeing that you can plant to your heart's content, not only indoors. In the outer frame, herbs, flowers and small vegetable plants also find the ideal conditions for vital growth. How to proceed correctly step by step:
material and tool requirements
- 4 x wooden pallets
- 12 x Brackets with Screws
- screen-printed plywood panels
- 96 screws (3.5mm x 35mm)
- pond liner
- vole wire
- Staple gun with staples
- jigsaw
- folding rule
- Carpenter pencil
- scissors or cutters
- drilling machine
- Wood impregnation without solvents (Blue Angel)
- Paint brush
We recommend buying new wooden pallets that have received an IPPC treatment. These products have been heat treated in a drying chamber to protect them from wood pests. In the case of used Euro pallets, it is no longer possible to determine whether they came into contact with pollutants that could be transferred to the plants in the raised bed.
building instructions

The ground is prepared in advance at the intended location. Please dig out an existing turf to a depth of 10 cm. Then lay out the soil with vole wire so that the wire extends about 10 cm beyond the edge of the finished raised bed. How to proceed:
- Assemble the 4 pallets horizontally and flush to form a square
- The bottoms of the pallets face outwards
- Screw each corner with 3 brackets (top, middle and bottom).
- Line the inner walls with pond liner and staple firmly
A total of 24 plant compartments have been created on the outside, which are also used for growing herbs and vegetables. Use the ruler to measure the bottom size of the compartments. Then use the jigsaw to cut the plywood panels to size and screw them together with the 3.5 x 35 mm screws. Knock out the plant compartments with pond liner. To protect against waterlogging, perforate the film in several places before you fill in the potting soil. Instead of knocking out the compartments with foil, put mini flower boxes made of plastic on the floors.
Tip:
A place with north-south orientation is the ideal location for a raised bed in the garden. Thanks to this location, the planting also benefits from the warming rays of the sun in spring and autumn.
Tips for filling
In order for the self-built raised bed made of wooden pallets to deliver a rich harvest, it depends on the correct filling. We have summarized the most important key data for you below:
- First layer: branches, twigs, remains of pruning
- Second layer: chopped, half-rotted plant remains
- Third layer: mature compost
- Fourth layer: garden soil, leaf soil or humus
This composition makes it clear that the material gets finer from the bottom up. It is important to note that the layers are as equally thick as possible at 20 to 25 cm.
Mobile raised bed for terrace and balcony

Anyone who enjoys gardening on the terrace or balcony does not have to do without the comfort of a raised bed. Since this variant lacks direct access to the ground, good drainage is particularly important. The classic layering of soil is mostly dispensed with. Commercial plant soil is used as a filling to keep the weight within tolerable limits. A stable substructure is nevertheless indispensable. How to build a mobile raised bed yourself:
material and tool requirements
- 1 euro pallet
- 1 wooden panel, 1,200 mm x 800 mm x 6 mm as floor
- 3 stacking frames
- 4 wheels with fastening material (ideally 2 mobile and 2 fixed)
- Garden fleece or pond liner
- scissors or cutters
- Spax screws
- Cordless screwdriver or drill
You can purchase ready-made wooden stacking frames for Euro pallets. With dimensions of 1,200 mm x 800 mm x 200 mm, 3 frames are enough for a mobile raised bed with a back-friendly height of 85 cm. Thanks to galvanized steel hinges, each frame is foldable and can therefore be transported flat and space-saving. Since the hinges protrude in the lower area, they can be placed on the wooden pallet and in one another without any additional accessories.
building instructions
In the first step of the assembly, place the wooden panel on the 5 boards of the Euro pallet to screw it to the floor with the Spax screws. Then drill small holes in various places so that excess irrigation water can drain off and no waterlogging forms. Here's how to proceed:
- Screw the 4 wheels to the underside of the wooden pallet
- Turn the wooden pallet over again and block the wheels with small wooden wedges
- Place the stacking frames on the Euro pallet
- Cover the inner walls with garden fleece or pond liner and staple firmly
To protect the base plate from moisture, there are 2 options to choose from: a coat of weatherproof wood stain or covering with perforated foil. If the mobile raised bed is not in a rain-protected location, the outer walls should also be impregnated with wood stain.
Cover for an early start to the season - ideas collection
If you extend your new raised bed with a cover, the gardening season starts as early as February and March. You can sow early lettuce, lettuce and radishes early in the year, provided the seed is protected from frost and moisture. At the same time, the time window for cultivation is extended to September and October if an attachment is available. Winter vegetables such as kale or leeks thrive in raised beds and enrich the menu with fresh vitamins when nothing grows outdoors. Get inspired by the following ideas for a raised bed cover:
Wooden frame windows
Disused glass windows with wooden frames harmonize perfectly with a raised bed made of wooden pallets. Look around at flea markets or ask at the recycling center or demolition company. Old house windows can be found in these places for little money. If you screw the windows to the frame of the raised bed with hinges, you can open and close the cover at any time without any problems.
double wall plate
A 4 to 6 mm thick double-walled sheet can be transformed into a protective cover for your raised bed in just a few simple steps. Lay the edges of the board between wooden slats, which you screw together to form a frame. Connect the cover and raised bed with hinges. Alternatively, simply nail 3 old leather straps to open and close the double bridge cover. 2 leather straps serve as a hinge replacement, 1 strap as a handle. A knotted stone acts as a counterweight on the leather strap handle so that strong winds do not lift the record.
foil tunnel
Your vegetable plants will thrive in the raised bed under a foil tunnel, well protected from the weather. The construction is very easy with round bars made of spring steel, over which you pull a weatherproof greenhouse film. Loose brackets for foil tunnels are available in hardware stores, which already have the appropriate loops for secure attachment. This option of a raised bed cover scores with the advantage of a flexible height design, so that you can also prefer higher-growing plants under the protection in spring.
 Home editorial office
Learn more about planting beds

Creating a flower bed: 9 tips for planning & designing
The transformation of a "naked" garden area into a lush sea of flowers doesn't just begin with the planting. Site conditions must first be checked and suitable plants selected. If you want to design a particularly beautiful bed, you can also add a pinch of creativity when laying it out.

The bed on the balcony - you have to pay attention to these things
Especially in spring, many people want to be active in their own garden. But not everyone is lucky enough to have the necessary property. Space is scarce and expensive, especially in urban areas. For this reason, the balcony is becoming a popular alternative for all hobby gardeners.

Building a raised bed: which stones are suitable?
A raised bed made of stones not only brings practical advantages because plants grow earlier and produce longer yields - it can also be an eye-catcher in the garden. Depending on the type of stone, however, there are significant differences.

11 Bed borders: what are the options?
There are many ways to border a garden bed. There are beautiful design borders, natural borders or those that are almost invisible. The following article briefly introduces the various bezel ideas.

Bed edging made of plants: Which ones are suitable as a bed border?
A bed border made of plants is above all temporary fads. With green vibrancy, numerous species and varieties give your ornamental and vegetable beds a picturesque setting. Let yourself be inspired by a colorful array of suitable plants with the potential for the perfect bed border.
Everblooming Bed - Plants that bloom all year round
Fantastic abundance of flowers on a seemingly endless journey through the seasons, this is how an ever-blooming bed presents itself. In order for this wishful thinking to become reality, a creative combination of perennials, bulb flowers and flowering shrubs is required. Immerse yourself in our design suggestions with plants that bloom all year round.