


Table of contents
- The right material
- substructure
- Tips for substructure
- Laying in a bed of grit or gravel
- Laying on mineral concrete or concrete slab
- Lay polygonal panels
- Step 1: Prepare Plates
- Step 2: Lay the curbs
- Step 3: Insert natural stone slabs
- tips
- Grout polygonal panels
- theses
- sealing
What could be more stylish than a terrace or a garage entrance made of natural stone slabs? Above all, the irregularly shaped slabs of porphyry, granite or limestone create a wonderfully natural ambience. When laying these polygonal panels, however, one or the other must be observed. With our tips, however, even inexperienced do-it-yourselfers can easily lay the irregularly shaped panels with a little skill.
The right material
Depending on where you want to lay the polygonal panels, you have to pay attention to the right material. Outside, the stone must be frost-resistant.
- Sandstone: relatively abrasion-resistant and frost-resistant, but is attacked by road salt
- Quartzite: frost and abrasion resistant
- Granite: resistant to frost and road salt, abrasion-resistant
- Limestone: less abrasion-resistant, sensitive to acids and salts (conditionally suitable for outdoor use)
- Porphyry: very resistant, ideal for garage entrances and patios
- Marble: not frost-resistant, therefore not suitable for laying outdoors
substructure
Before laying the polygonal panels, a suitable substructure must be created. For larger areas such as terraces or garage entrances, polygonal slabs should not be laid in a gravel bed or grit. A natural stone surface in the garden needs a weather-resistant foundation. If the surface is to be driven over by a car, it must be particularly stable. There are various options for substructure. Which variant you should choose depends primarily on the subsoil and the load to which you are subjecting the surface:
- Layer of gravel and sand plus concrete slab (most stable solution)
- Mineral mixture or KFT (combined frost-proof base layer), grain size 0 – 32 mm
- Grit or gravel bed (only for smaller areas and pure sidewalks)
For the foundation, the soil is excavated to the appropriate depth and then filled with a layer of gravel and sand or mineral concrete. The gravel bed must be compacted with a vibrating plate so that no cavities form. An additional 15 centimeter thick concrete slab is then poured onto the gravel bed. After the concrete has dried well, you can start laying the slabs. Alternatively, mineral concrete (KFT) can also be filled in as a substructure. After compacting, the layer should be at least 20 centimeters high. An additional layer of concrete is not necessary in this case.
Tips for substructure
- To be on the safe side, the substructure and thus the excavation should reach down to frost depth. Information about the frost depth in your residential area can be obtained from the local building authority.
- When laying polygonal panels, it is important that the substructure has a slope of about 1.5 to 2% is placed away from buildings so that the water does not lead to the house or garage becomes.
- So that the substructure is stable, soil should always be removed. Excavation is also necessary if the path or terrace is set higher than ground level.
- In practice, a layer of KFT has proven itself well for terraces and walkways. The mineral mixture is easy to compact, very frost-resistant and has good load-bearing capacity. A layer of 20 is already suitable for occasional driving on by car. For heavier loads, a 30 centimeter thick base course is recommended.
- You create the most stable and durable subsoil with a foundation of a gravel bed plus concrete slab.
- It is advisable to paint a concrete slab with a primer before laying it. Once the primer has dried, apply a layer of liquid patio waterproofing. Where the terrace or the path borders the house or a wall, a band-shaped seal makes sense.
Laying in a bed of grit or gravel
A lot of experience is required when laying polygonal slabs. The work should therefore preferably be carried out by a specialist or experienced do-it-yourselfer. In general, polygonal slabs can be laid in the gravel bed, but in most cases this is not advisable. Because there is a risk that the plates will shift and tilt. Nevertheless, this method of laying garden paths has proven itself.
- Dig the soil down to frost depth and fill with fine gravel or grit.
- Possibly fill the gaps with sand to achieve better load-bearing capacity.
- Slightly compact the gravel bed for larger areas with a vibrating machine.
- Put the plates on and tap them down with a rubber mallet. Make sure that the overall surface is level.
- Fill joints with chippings or coarse sand.
Tip:
It is important that only large and heavy slabs are laid as stepping stones, which are at least three centimeters thick. With polygonal slabs in the gravel bed, there is a great risk of weeds settling in the joints. The roots can, over time, lift the slabs in some places, increasing the risk of tripping.
Laying on mineral concrete or concrete slab
In all other cases, laying the polygonal panels with a frost-resistant substructure is necessary.
Tool
- folding rule
- setting bar
- level
- rubber mallet
- joint iron
- mortar pail (or bucket)
- trowel
- comb spatula
- Pouring cup with spout
- sponge
- guideline
- Cartridge syringe for silicone cartridges
Personal protective equipment
- working gloves
- knee pad
- safety goggles
machinery
- vibrating plate
- Agitator (drills with agitator attachment are too weak for the tough mortar)
- Angle grinder or diamond saw
material
- Polygonal plates in appropriate quantity
- Mineral concrete or mineral mixture grain size 0-32 mm (as a combined frost-proof base layer)
- alternatively: gravel, sand and concrete
- bedding mortar
- Trass cement for grouting
- Cement residue remover
- possibly boundary stones
- natural stone silicone
Lay polygonal panels
Various work steps are necessary to lay the polygonal panels. We will show you the steps in detail:
Step 1: Prepare Plates
It has proven useful to distribute the irregular natural stone slabs dry on the subfloor before final laying in the mortar bed. In this way, you can define a successful pattern without any time pressure and, in an emergency, completely rearrange it if something doesn't fit. Before applying the mortar, the substrate should be clean and slightly damp. Loose stones or dust will prevent a good bond with the mortar. Therefore, sweep the concrete slab thoroughly beforehand.
- First, sort the slabs by size and color.
- If you want the surface to have a straight finish, look for larger rectangular polygonal panels. These are perfect for the corners. All panels with long, straight edges are suitable for the side border. If such plates are not available in sufficient numbers, you may have to shape individual stones with an angle grinder or a diamond saw.
- If necessary, stick a piece of masking tape on each of the stones and number them consecutively.
- Once all the larger slabs are in place, pick smaller pieces to fill wider gaps. If necessary, remaining plates must be smashed for this purpose.
- Clean the plates with a sponge and clean water. Dirt and dust on the back of the natural stones prevent the mortar from adhering.
- In the case of polygonal slabs made of basalt, the back should also be roughened with a claw board and cleaned under running water. A contact slurry as a bonding agent makes laying easier.
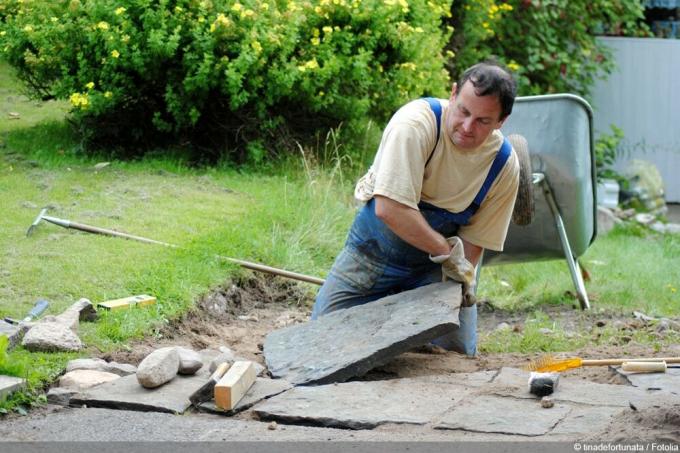
Step 2: Lay the curbs
If the terrace or the path is to have a straight end, the curbs are laid first. These are placed in a foundation of lean concrete and tapped in to the appropriate depth with a rubber mallet. To do this, stretch a guide line over the entire length of the edge to ensure that the stones run in a straight line and at the same height.
- If you have planned an additional edging made of other stones, both these and those first row of polygonal slabs with straight edges laid in a bed of lean concrete so that they do not overlap postpone.
- Start by laying the curbs on the house wall or another boundary so that gaps that are too wide do not appear here later.
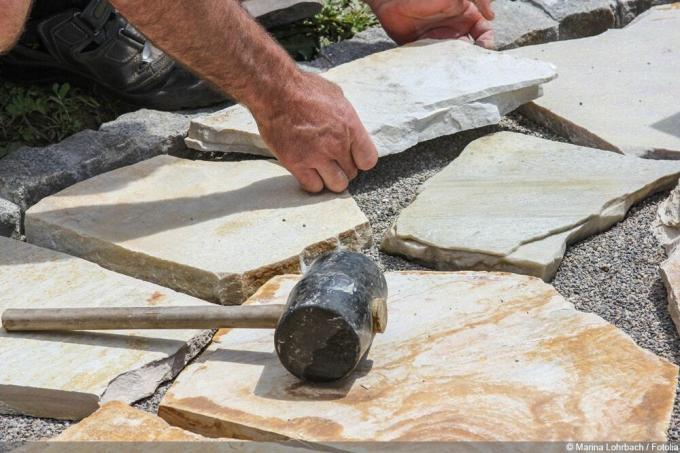
Step 3: Insert natural stone slabs
Starting from the end, lay the remaining stones. To do this, apply a layer of bedding mortar about 5 centimeters thick to the mineral concrete or the concrete slab and straighten the mortar with a wooden board or a leveling board. Carefully press the pre-sorted stones into the earth-moist mortar bed. Be sure to pay attention to the height and the joint width. The typical joint width for polygonal panels is around 3 to 5 centimetres. The stones are then tapped with a rubber mallet. You should constantly use a spirit level to ensure that the surface is level and that there is a necessary slope away from the house. If there are larger joints, these are immediately filled with smaller fragments.
tips
- If the substructure consists of a concrete slab, this should be moistened before applying the mortar so that the mortar adheres better. Laying is done damp on damp (not wet). This means that both the substrate and the polygonal panels should be slightly damp when laying.
- Only as much mortar is applied as is required to lay about two to three tiles.
- Only mix small amounts of mortar freshly. Since this is applied very viscously (thick bed process), it hardens very quickly. Remains that have already dried in the cement tub should no longer be used. For beginners, we recommend mixing half a bag at a time.
- If the slabs are of different thicknesses, always start with the thinner slabs to ensure an even surface.
- When tapping in larger slabs with a rubber mallet, preferably use a protective board so that the natural stone does not crack or split.
- When the natural stone slabs are pressed in and tapped in, the gaps fill up more or less with bedding mortar, depending on the thickness of the natural stone and the pressure you exert. This should be removed promptly with a joint iron.
- Protect the freshly laid surface from rain if necessary. A large foil is suitable for this, which is weighed down with stones or wooden slats to prevent it from flying away.
- Do not step on the freshly laid polygonal slabs until the mortar has hardened well. Otherwise the plates will shift and you will get an irregular surface.
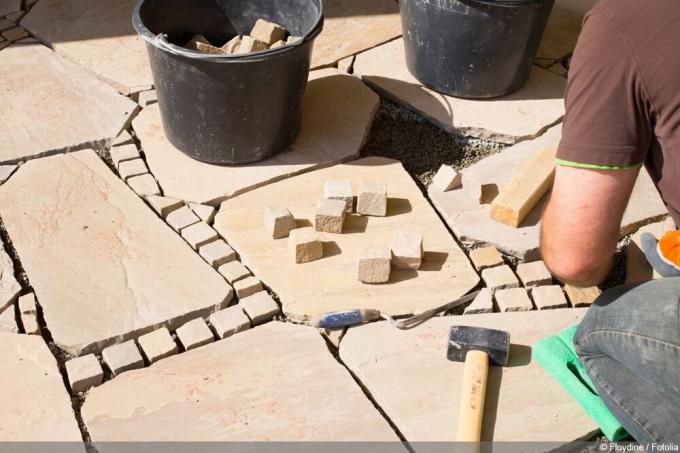
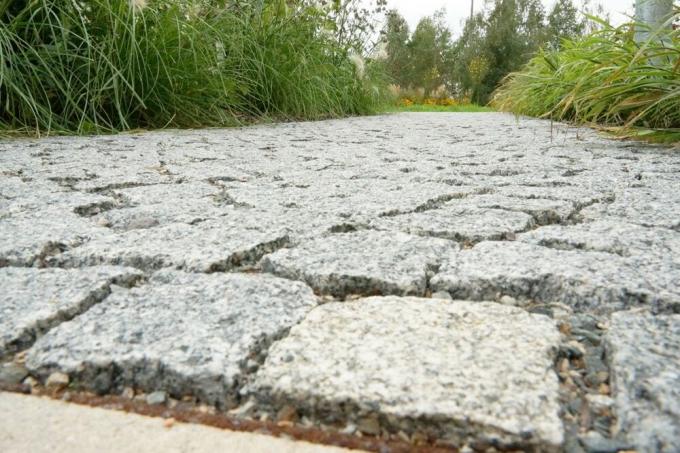
Grout polygonal panels
To grout the natural stone slabs you need trass cement, which is either poured into the joints with a trowel or poured into the gaps in liquid form. Pointing may only be done when the bedding mortar has fully hardened. You are on the safe side if you wait a day after laying before you start grouting.
- Be careful not to soil the tiles unnecessarily when pouring the joints, as cleaning them later can be problematic or even impossible. If some of the grout gets spilled, it should be wiped off immediately with a damp cloth or sponge.
- The consistency of the mortar for paving joints must be liquid so that it can be easily poured into the joints. In order for it to harden well, it must not be too watery.
- Before the actual grouting, the gaps and the stones must be moistened with water. A brush (wallpaper brush) or a sponge is suitable for this.
- The liquid trass cement is particularly easy to fill with pinpoint accuracy using a cup with a handle and spout.
- Proceed step by step when grouting. After pouring, the grout is washed off and smoothed with a damp sponge to a level slightly below the polygonal panels. Be sure to wash off any residue from the plates with a clean sponge.
- The side of the house or a backsplash is not filled with grout. At the very end, after the joint compound has hardened, an expansion joint is introduced between the other stones with natural stone silicone.
theses
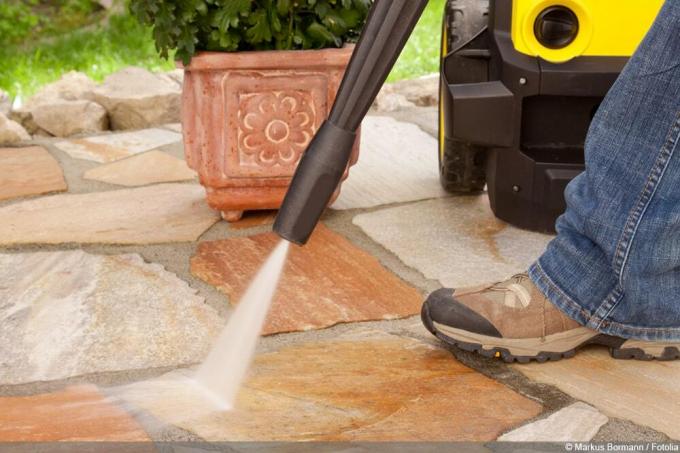
After the grout has hardened, the entire laying surface is thoroughly washed with water. Cement Haze Remover is needed to get rid of the gray haze. Observe the instructions on the packaging and wear appropriate protective clothing if necessary.
Tip:
The cement film remover must match the natural stone laid, otherwise its surface can be attacked. Limestone and the joints, for example, do not tolerate any acidic agents.
sealing
In order to permanently protect the new natural stone terrace against the effects of the weather and moss growth, a seal can be applied after cleaning and drying.
 garden editorial
 I write about everything that interests me in my garden.
Learn more about building garden paths - guide

Substructure for polygonal panels: 17 important tips
Polygonal tiles are a popular choice, especially for garden walkways. But how are they to be laid and what substructure is required? Our guide will show you step by step.

Lay quarry stone slabs without concrete and mortar
Quarry stone slabs give every terrace a touch of naturalness and often form a natural counterpoint to the restrained aesthetics of modern architecture. But how do you actually move them correctly? We explain how to properly lay natural stone slabs without concrete and mortar.

Washed concrete as a garden path | Instructions in 7 steps
Garden paths are essential, especially in larger gardens. Practically, they are also relatively easy to put on and lay yourself - for example with optically appealing aggregate concrete. You can read here how to build a garden path from exposed aggregate concrete slabs in seven individual steps.
Paving: ideas for the terrace and garden
In creative garden design, paved areas take on functional and style-defining tasks at the same time. The options range from a high-heeled access path to an ornamental stone garden picture. This colorful potpourri of ideas would like to inspire you to tastefully stage your terrace and garden with imaginative paving.

Pointing paving stones - filling joints in garden paths
A garden path made of paving stones not only looks good, it also ensures that you can walk through the garden with dry feet in bad weather.

Combat pear rust: Sprays and home remedies for pear rust
pear grating. Even the name is a nightmare for owners of pear trees, because this stubborn fungal disease can weaken pears over the years and does not decrease in intensity. Nevertheless, there are some ways and means to prevent the infestation.