table of contents
- What is needed?
- Instructions for propagating roses with potatoes
- Step 1: remove cuttings
- Step 2: prepare the potato
- Step 3: dig in rose potato
- Step 4: simulate the greenhouse
- Step 5: care and duration
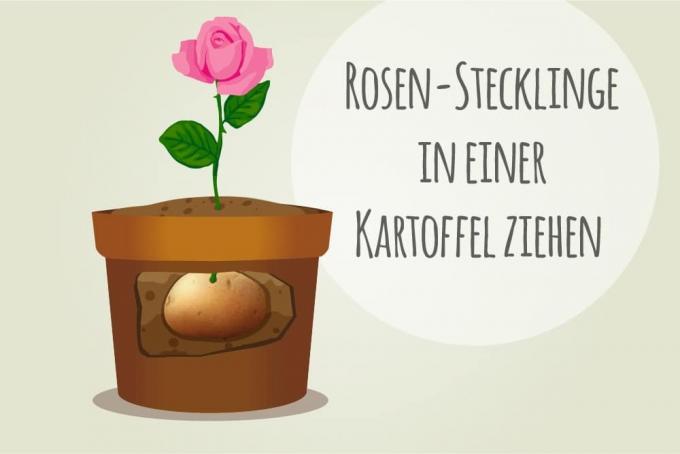
Hard to believe, but true: roses can be grown from potatoes! You can find out how this works in our clear instructions on how to multiply roses with potatoes!
An insider tip among hobby gardeners is the propagation of roses with the help of potatoes. This may sound a little strange, but it is extremely effective! Because the nightshade family are very nutrient-rich, which also benefits rose cuttings. In combination, this results in a rose potato, from which, ideally, a beautiful rose bush grows. You don't need a green thumb for this, because our instructions will guide you step-by-step through this process!
What is needed?
First and foremost, this will of course be one of the first potato and on the other one Rose stems needed. This method also has the advantage that no special equipment is required. Because most hobby gardeners have everything they need at home anyway:
- sterile, sharp secateurs
- large raw potato
- plant pot
- loose, humus-rich soil
- small shovel
- plastic bottle
Note: The flower pot and substrate are only required if the rose potatoes are not to be buried in the bed.
Instructions for propagating roses with potatoes
First of all, it should be ensured that all utensils are available and that the secateurs are disinfected. Because cutting off creates a wound, which in turn makes it easier for bacteria and pests to penetrate the plant. Then the roses can be pulled from potatoes as follows:
Step 1: remove cuttings
The cuttings can be taken from a beautiful bouquet of flowers as well as from the self-planted rose bush in the garden. It is important that the mother plant and the cuttings are healthy. To obtain the cuttings, it is best to proceed as follows:
- Cut off about 7-10 cm long rose stems
- Remove leaves
- Head the rose around 3 cm below the flower
- Cut the stem crosswise
- preferably at a 45 degree angle
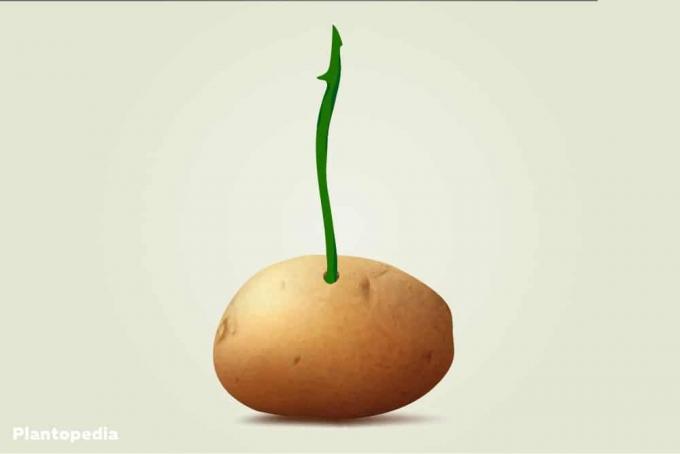
 Step 2: prepare the potato
The potato serves as a base for the cutting and should therefore be slightly larger. Here, too, it is important that only undamaged and healthy specimens are used. It is therefore advisable to check them for any damage before preparing them for reproduction as follows:
- Hold the potato horizontally
- Drill the hole in the middle
- so deep that the inner center is reached
- so big that the rose stem fits into it
- Carefully press the rose stem into the hole
- it should be anchored as well as possible
Step 3: dig in rose potato
As long as it is ensured that the rose stem has sufficient hold, the rose potato can be buried. To do this, it can either be used directly in the flowerbed or in a flower pot. However, the method with the pot is usually more popular and is designed as follows:
- Cover the bottom of the pot with substrate
- about 5 cm is sufficient
- Place the rose potato on the ground
- Fill the pot with substrate
- about ¾ the height of the pot is sufficient

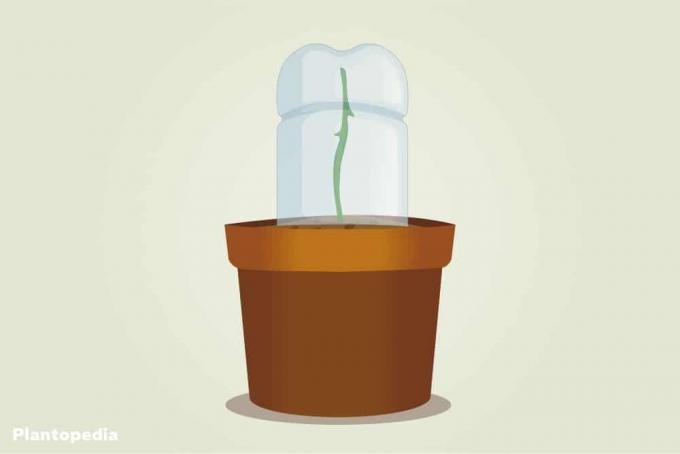
Step 4: simulate the greenhouse
In the flower pot it is possible to simulate a kind of greenhouse and thus create better conditions for the cutting. The practical thing here is that it is already a conventional one plastic bottle can cause this effect. This is first carefully cleaned and then prepared and attached as follows:
- Take off the cover
- cut off the bottom of the bottle
- Put the bottle over the cutting
- Put the bottle in the ground
- so deep that it remains firmly in place
Step 5: care and duration
If everything goes well, the potato will now provide the rose cuttings with nutrients and moisture. Ideally, the first roots will develop after a short time, with a period of around 10 days being considered normal. To test whether the cutting is already rooted, simply pull it gently. If resistance is noticeable, the first roots have already formed and the chances of success of the propagation have increased considerably. This turns out even better if the cutting is properly cared for:
- Place the vessel in a sunny place
- however, avoid direct sun
- Always keep the soil moist
- do not pour into the bottle when pouring
- but in the earth around the bottle