table of contents
- The right structure
- The material
- The tool
- The instruction
- Step 1 - determine the altitude
- Step 2 - suitcase
- Step 3 - Install in layers
- Step 4 - making the slope
- Step 5 - The fine subgrade
- frequently asked Questions
Pavement is a long-lasting and uncomplicated building material for terraces, garden paths and parking spaces. With the right substructure, the flatness and height of the pavement are maintained in the long term. Our guide shows how to do it.
In a nutshell
- Pavement with a frost-proof substructure remains level even in frosty conditions
- as a result of the compaction, the substructure does not settle later
- Typical materials for building the base course are mineral concrete, KFT or what is known as a pre-screen
The right structure
In order for your plaster to be able to withstand even changing environmental conditions such as moisture, dryness, heat and frost, it depends on the correct structure. The substructure, which forms the basis underneath the actual paving, is of elementary importance. It should meet the following requirements:
- safe drainage of rainwater and waterlogging (due to freezing of standing moisture in the ground)
- Transfer of loads from the pavement and its use into the grown subsoil
- Dimensional stability without settlement under load and changing environmental conditions
In order to implement these requirements correctly, the existing floor is usually replaced with a suitable material. This is installed to a depth of around 80 centimeters and founded on solid, stable soil. Although this base course is already being laid, there is still a fine subgrade on the top, which then ultimately creates the real level for the subsequent paving.
Note: The depth of 80 centimeters for the substructure leads to a soil zone that is normally no longer reached by frost in Germany. Raising and lowering caused by freezing and thawing soil moisture and its effects on the pavement are safely prevented.

The material
So that the sub-structure under the pavement can really do what it should, you have to select the right building materials. It must:
- be compressible
- do not generate any capillary action
- Drain water into the subsoil
You can achieve this primarily with a quarry, i.e. gravel. From a technical point of view, there are different "types", which differ in their properties, but which are all suitable for installation under pavement:
- gravel
- KFT (combined frost protection and base layer)
- "Prescreen" (heterogeneous gravel before screening into individual grain sizes)
- Mineral concrete (crushed stone mix that gains strength only by compacting)
You also need fine split which you then use to create the fine subgrade, i.e. the actual laying layer, for your pavement.
Note: The exact grain size of the quarry used, i.e. the size of the individual stones, is less relevant for paving. Make sure, however, that the materials are specified by the manufacturer, i.e. the quarry or building material dealer, as being capable of being compacted.
The tool
With just a few tools and little use of machines, it is possible to provide your pavement with a technically perfect substructure.
- Shovel, spade, pickaxe
- optional: mini excavator (for large paved areas)
- Wheelbarrow, bucket, etc.
- Garden rake
- Vibrating plate, motor-driven
- Setting bar
- Spirit level
- Folding rule, tape measure
Note: Other equipment and vehicles for the treatment of your excavation and the delivery of the necessary rock material is not listed here. Depending on your own options, a company can be commissioned or delivery can be made free of charge.
The instruction
Now you start to build up the substructure for receiving the plaster step by step:
Step 1 - determine the altitude
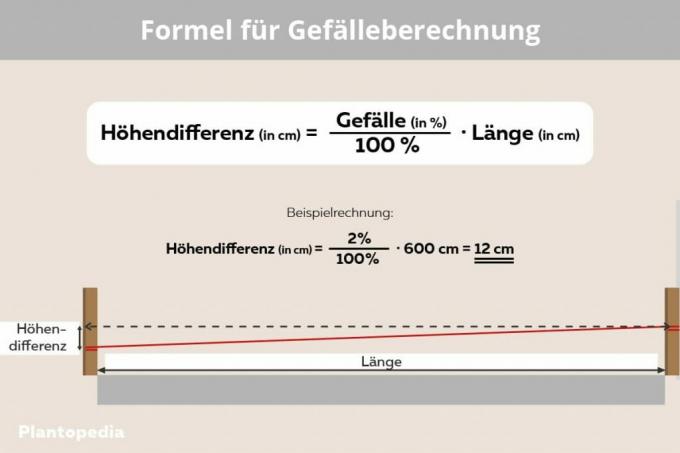
Before you start the actual work, you should determine the later upper edge of your paving and its substructure. Each paving area should have a Incline of around 1 to 2 percent, ideally leading away from buildings. Once you have decided on the high point, use the following calculation method to determine the height of the substructure starting from the upper edge of the pavement:

- Upper edge of pavement
- Thick paving
- 2 centimeters for fine subgrade
- = Upper edge of the base course
Ideally, you should mark the height on a house wall or a knocked-in wooden slat together with the information about how much deeper the upper edge of the base course should be from this marking.
Step 2 - suitcase
As a first practical step, you create the excavation, i.e. the pit, for the frost-proof and stable substructure of the pavement:

- Mark the outer edges of the paved area
- Add 80 centimeters on all sides
- Turf etc. cut off and remove
- Topsoil (humus layer, usually approx. 20 to 30 centimeters thick) and continue to use in the garden
- Loosen and dispose of the soil underneath
- Excavation depth up to 80 centimeters below ground level
Note: The excavation depth does not depend on the height of the subsequent covering! The depth reached in relation to the surrounding terrain is always decisive.
Step 3 - Install in layers
Now, layer by layer, the core of the substructure is created in the created pit:

- Bring in crushed stone, KFT or the like and just pave it with a rake
- Maximum height of 30 centimeters per layer
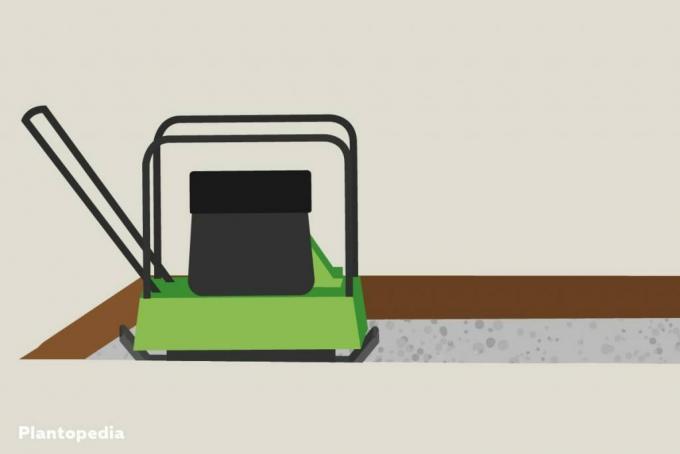
- Compress the material evenly and evenly with the vibrating plate until no more movement can be detected when the vibrating plate is passed over it
- Slope the structure upwards at a 45 ° angle
- Place the excavation above embankments up to the top of the ground
Step 4 - making the slope
When you reach the top of the ballast structure, the time has come to shape your pavement later:

- Put in the last layer of gravel and level
- Remove the gravel from the determined high point of the substructure with a lath and spirit level
- Ratio: With a gradient of 2 percent per meter away from the high point = gain 2 centimeters in depth
- Compress the last layer and check the height
- possibly. Apply a new layer on the slope at the target height
Tip: Fix your spirit level with adhesive tape on the staff. Place one side of the spirit level underneath so that the staff has the correct slope (e.g. B. with a length of a spirit level of 1 m and a slope of 2% on one side 2 centimeters). Now you can check the inclination directly when pulling it off.
Step 5 - The fine subgrade
Finally, with a fine subgrade made of fine chippings, you ensure a real level surface on which you can lay the paving stones immediately:

- Pour fine chippings on compacted gravel and remove approx. Spread 2 centimeters thick
- Level off with a straight lath to level out any unevenness
- Check the slope with a spirit level
Done - you have made it, the substructure of your plaster is in place. Now nothing stands in the way of the actual paving work.
frequently asked Questions
Instead of crushed stone and other mineral fragments, gravel is repeatedly brought into play as foundation material. However, since the individual pebbles are round, they can only be condensed to a limited extent. Gravel is therefore only possible as an additive to other substances, but ideally even to be avoided.
Execution without fine subgrade is theoretically possible under paving. However, it usually fails because the coarse components of the frost-proof substructure do not allow the level of evenness that would be necessary for the subsequent paving.
If coverings are laid on natural soil, they rise and fall with the changes in the soil. Natural soil contains water that shrinks and increases and also freezes. Since all of this does not appear uniformly flat, your paving will sooner or later become a mogul slope without a corresponding substructure.


