

table of contents
- Location
- Substrate
- to water
- Fertilize
- Cut
- Overwinter
- Repot
Friends of the Mediterranean garden design advocate the pot culture of olive trees, because there are various advantages associated with it. The mobility of a bucket allows you to enjoy the magic of the evergreen Olea europaea with its rustic, gnarled trunk, even north of the Alps. This green guide explains in detail how to get one Olive tree hold properly in the pot. The care information extends from A-Z from the ideal location to impeccable watering and fertilization to skillful cutting and the best possible wintering.
Location
from spring to autumn
An olive tree is not suitable for permanent residence in living and working rooms, entrance halls or temperature-controlled winter gardens. The Mediterranean ornamental and fruit tree should benefit from the unfiltered sunshine and fresh air as long as it does not freeze. If the meteorologists forecast in spring that temperatures will continuously exceed 10 degrees by day and night, the open-air season begins for the olive tree. The following conditions are very convenient for an Olea europaea in a pot:
- Full sun to sunny location with at least 6 hours of sunshine per day
- Preferably on a south-facing balcony or terrace or in front of a warm south-facing wall
- Ideally a location protected from rain and wind

The pronounced preference for direct sunlight does not imply that neat olive leaves are immune to sunburn. The evergreen foliage reacts to an abrupt change from the dark winter quarters to the blazing sun with yellowish-brown, dark-rimmed spots. You can avoid this damage by giving an olive tree in a pot a 10-day acclimatization phase in a partially shaded, protected location. Then the container plant is perfectly prepared for full sun conditions with temperatures of up to 40 ° C.
Substrate
Tips for composition
If you keep an olive tree in the pot properly, the substrate will be key. Because the limited capacity of a bucket significantly restricts deep-reaching and extensive root growth. This shortcoming should be compensated for by the quality of the plant soil so that the native icon of the Mediterranean meets the high expectations. You should ignore conventional potting soil with a high proportion of peat. Back for keeping olive trees in pots Special substrates from the specialist trade into the focus, because they are precisely tailored to the special requirements of deep-rooters. As an alternative to purchasing expensive special olive tree soil, you can mix the substrate yourself. The following components should be included:
- Ripe, medium-grain compost or bark humus (from your own garden or specialist retailer)
- Loamy garden soil, loose and humic
- Coconut or wood fibers as a substitute for peat
- Bentonite, lava granulate, vermiculite or expanded clay
- Garden or algae lime
- Sand or fine-grain chippings
The right mixing ratio is a lively discussion among olive gardeners. In the course of cultivation, you will develop your very own substrate recipe based on your experience. The following composition has emerged as suitable for beginners:
- Compost or bark humus - 4 parts
- normal garden soil - 4 parts
- Coconut or wood fiber (not peat) - 2 parts
- Bentonite, lava granules or other clay mineral - 1 part
- Lime - 1 part
- Sand - 1 part
The optimal pH of olive tree soil is between 7 and 8. Acid citrus potting soil is therefore unsuitable. A widespread mistake generalizes olive and lemon trees as Mediterranean plants with a claim to acidic soil conditions. In fact, an Olea europaea in the pot calls for one calcareous Earth for vital and healthy growth. If in doubt, simply measure the pH of the substrate mixture. Test sets are available for a few euros in garden centers and hardware stores. The application is usually based on dye reactions and does not require any chemical expertise.

to water
with a sure instinct - this is how it works
Keeping pots requires more watering than on planted olive trees. The sunnier and warmer the location, the faster the substrate dries out. Although the Mediterranean wood can cope with short-term drought extremely well, the earth should not dry out completely. The right water supply aims at a substrate that is alternately moist and that dries up by at least a third in the meantime. How to properly water an olive tree in the pot:
- The best time is early in the morning when the cool root ball can handle cold tap water
- Before watering, use a finger test to determine whether the soil has dried in the upper third
- Let normal, lime-containing water run from the spout onto the root ball
When it comes to the water supply, act according to the rule of thumb: seldom water the olive, but then abundantly and penetrate. After each watering, wait until the soil has dried noticeably again. If you are a newcomer to care and do not want to rely on your instinct, you can use a moisture meter. This is a simple measuring stick that is inserted into the substrate. After a short time you can read on a scale whether the earth is wet, semi-dry or dry.
Fertilize
Tips for the perfect nutrient supply
One of the uncomplicated measures for caring for an olive in a pot is the supply of nutrients. How to fertilize an olive tree with horticultural expertise:
- Add a liquid fertilizer to the irrigation water from April to September
- Recommended sodium-phosphorus-potassium formulation (NPK) 20 + 5 + 15
- Dosage and administration according to the manufacturer's instructions
It is important to note that you do not pour water enriched with fertilizer onto the dried soil. Before and after, water with clear water so that the salt concentration does not cause any damage to the roots.
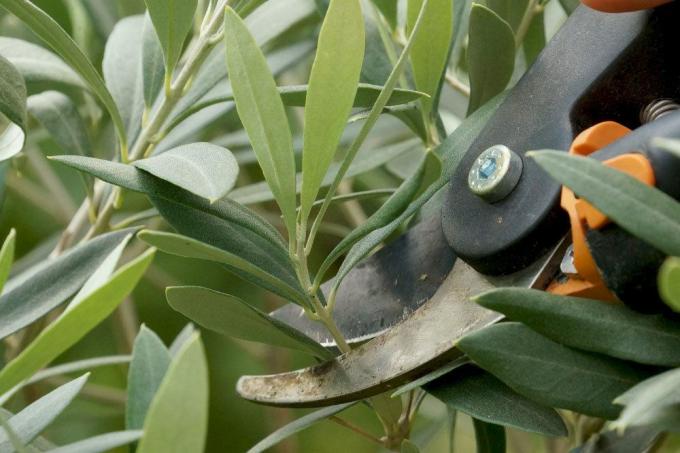
Cut
when and how to get it right
When the winter dormant growth is coming to an end, the time window opens up for a care and maintenance pruning. A pair of garden shears or rose shears is sufficient for a young olive tree. In order to cut branches with a diameter of more than 3 centimeters on an older specimen, we recommend a handy folding saw. Between the beginning of February and the beginning of the fresh shoot, dedicate yourself to this pruning:
- Cut off dead branches and bare tips of shoots
- Cut back any branches protruding from the crown shape
- Apply the scissors at a distance of 3-5 millimeters from a leaf bud
- Cut out shoots growing inside the crown
- Thin out the weaker one of two branches that are close to each other
Olive gardeners often complain of one in many Mediterranean gardens north of the Alps balding crown. Since olive trees grow primarily at the branch tips and create new leaves, the crown inside is visibly aging. In this case, the skilled nurse sees you Taper cut before. By shortening all branches by half, but at least a third, you encourage the olive tree to sprout again from dormant eyes at the base. When pruning, make sure that at least 2 vegetation points remain on the shoot. You optimize the growth prognosis by repotting the olive tree in fresh substrate beforehand.
Overwinter
Framework conditions and maintenance in a nutshell
Do not place an olive tree in the pot until the nighttime temperatures approach -10 ° C. The longer the plant stays outdoors, the better it can cope with wintering behind glass in the Central European climate. In regions with mild winter conditions, such as wine-growing areas or on the Lower Rhine, most of the pot olives stay on the balcony and terrace until just before Christmas. In order to choose the ideal date, a minimum-maximum thermometer placed nearby provides precise information. How to properly overwinter an Olea europaea:
- Ideal winter quarters: light to sunny with a cool 0 ° C to 5 ° C
- Do not fertilize between the beginning of October and the end of March
- Water sparingly with normal tap water
- Ventilate regularly
A combination of lots of light and low temperatures offers an olive tree the best possible framework conditions. An unheated winter garden, a bright, cool stairwell or the light-flooded, frost-free garage are well suited as winter quarters. However, if there is a lack of light, the olive sheds its evergreen leaves. But that is no cause for concern. The crown will sprout again in spring as soon as the tree can take its original place on the balcony or terrace again. By hanging a plant or daylight lamp above the crown and turning it on for at least 8 hours a day, you can prevent leaf shedding.
Repot
Step-by-step instructions
You should repot your olive at intervals of 2 to 3 years. This premise also applies if the tree has not yet fully rooted its pot. At least a change to fresh substrate is on the maintenance program after this time. As long as there is at least 2 finger-widths of space between the root ball and the edge of the vessel, you can use the previous pot again after thoroughly cleaning it. When buying a new bucket, please make sure that there are one or more openings in the base as Drainage. How to skillfully repot an olive tree:
- The best time is in the spring before clearing out between February and May
- Spread out an old blanket, curtain or foil
- Lay the olive tree on its side, grasp the root neck and slowly puff
- Use a long knife to loosen the stuck root ball from the wall of the pot
- Shake off old substrate or remove with your fingers
- Spread out a drainage made of chippings, pebbles or potsherds on the bottom of the bucket
- Cover the drainage with an air- and water-permeable fleece to protect it from clogging

Use a folding rule to measure in advance how much potting soil needs to be filled in so that the root disc is 3 to 4 centimeters below the edge of the pot. Fill in the substrate, then press it down with both hands to avoid air holes. Now position the root ball in the middle of the earth. While stabilizing the trunk with one hand, pour in the substrate with the other hand. Shake the plexus every now and then so that the soil spreads into all the spaces. In the last step, press the substrate on again and then pour through it until the first drops run out of the opening in the bottom. In the following 8 to 10 days, a repotted olive tree remains in the partially shaded location to regenerate.