
table of contents
- Sow herbs
- Seeds
- time
- Substrate
- Light and dark germs
- Sowing herbs: instructions
- Prick out the young plants
- Separation is not necessary
- Sowing in coconut substrate: instructions
- Make your own seed pots
Herbs have become indispensable in the kitchen. They only give food the right flavor. Various types of herb pots are available in stores all year round. They are usually quite expensive and do not last very long on the windowsill. It is cheaper to grow your own in a pot from seeds. It's very easy and especially the herbs can withstand a lot. They can even be planted later in the garden.
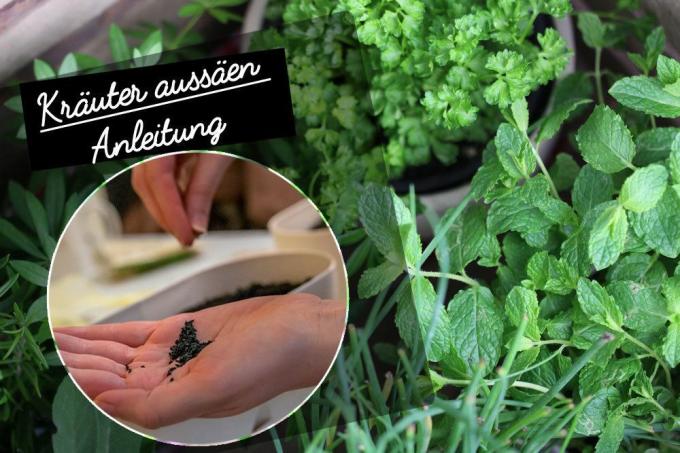
Sow herbs
Herbs from the garden or from the windowsill are a must for many. You can easily sow the herbs yourself. You can find out how growing from seeds in pots works in the following instructions.
Seeds
With every sowing, whether outdoors or in a pot, the quality of the seed is always decisive for success. It is important that the seeds still have a certain ability to germinate. A germ guarantee is indicated on the seed bags, i.e. the year of harvest and until when the seeds can be kept. The older it is, the worse it will germinate later.
Furthermore, it should be ensured that the seeds of the herbs are in a germ protection pack. Here it is protected from air and moisture. At the same time a long germination capacity is guaranteed.
tip: You can also harvest the seeds of the herbs yourself. The seeds should be removed just before the fruit clusters open. These are then dried and packed airtight and light-tight. It is ready for use the following year.
time
In the open field, i.e. in the garden, herbs should be sown from April to late summer, depending on the variety. The situation is different when growing young plants in the house. Here the seeds can be sown all year round. Some hobby gardeners advise against sowing the herbs from November to January, with the Reason that during these months the growth is weaker because of higher temperatures and also sunlight is missing. However, these factors could also be positively influenced during this time when sowing indoors. However, the best time to sow herb seeds in the pot is from late February to early March. But then it is important that the young plants have a place either on the windowsill or in the greenhouse.
Substrate
The seeds should never be sown in normal potting soil. This contains too many nutrients and salts such as nitrogen, phosphorus and potassium. These are detrimental to the development of the roots of the seedlings. Special potting soil should be used here. This is
- very fine crumbly
- dark in color
- low in nutrients
- largely weed-free
- does not contain any coarse components
- Due to the structure, it does not compress as much when pouring
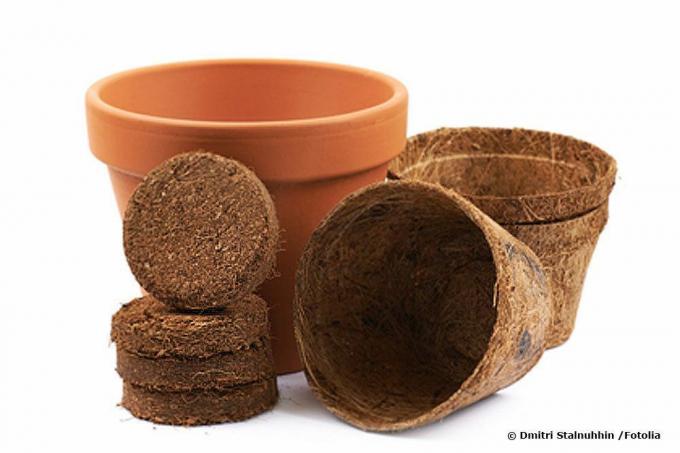
tip: Alternatively, so-called coconut source tablets can also be used to sow herb seeds. These are not only very environmentally friendly, but also easy to use.
Light and dark germs
When sowing, always pay attention to whether the herbs are light or dark germs. A note can always be found on the seed bag.
Light germs
- Savory
- Dill and
- basil
Dark germ
- parsley
- Chives and
- Borage
The only difference between the two is that
- the seeds of light germs are only lightly pressed on the surface of the earth, not covered
- Dark germs, on the other hand, receive a complete layer of soil as a cover
- The rule of thumb here is: at least as high as the seed is thick
tip: Hard-shelled seeds should be pre-soaked in warm water at least one night before sowing. This will make germination easier.
Sowing herbs: instructions
The cultivation can be done either in pots or in commercially available small greenhouses for the windowsill. There is also the possibility of building a “mini greenhouse” yourself. A few more remarks on this later. Sowing is usually quite easy. The procedure is as follows:
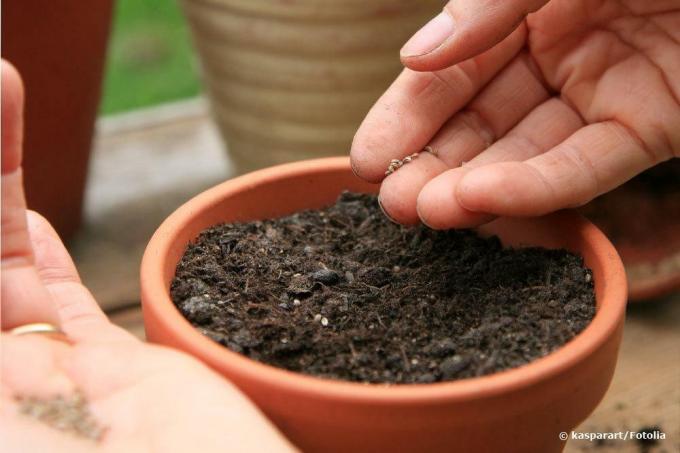
- Fill the planter to the brim with potting soil
- then distribute the soil evenly and press lightly
- Distribute the seeds evenly at intervals (not too close)
- Press light germs only lightly on the surface of the earth
- Cover the dark germinator thinly with soil
- Press lightly with the back of your hand or a tablet
- Carefully moisten the seeds
- it is best to use a spray bottle for this
- Avoid waterlogging (mold formation)
- Cover the pot or other planter with a hood
- Foil or a plastic bag is suitable as a cover
- however, regular ventilation must then also be provided
- to do this, always briefly remove the cover
- Put the vessels in a warm place
- the optimal germination temperature is between 20 ° C and 25 ° C
- do not stand on the windowsill above the heater
- With heating air, seeds and later seedlings dry out quickly
- Check soil moisture regularly
The first seedlings appear after 8 to 14 days. However, it should be noted that the germination time of the individual types of herbs can be quite different. Information on this can also be found on the seed sachets. It should also be noted that the germination time also depends on the prevailing conditions. So maybe it can also lengthen it a little. The seedlings now need
- more light
- but no blazing sun
- a place at the south window is therefore to be avoided
- The cover can now be slowly removed completely
- now you have to pay more attention to moisture
- but avoid waterlogging
- Rotate pots every two to three days for even growth
tip: Basil, rosemary, dill, cress, parsley, peppermint, chives and thyme can be grown on the windowsill particularly well from sowing to harvest.
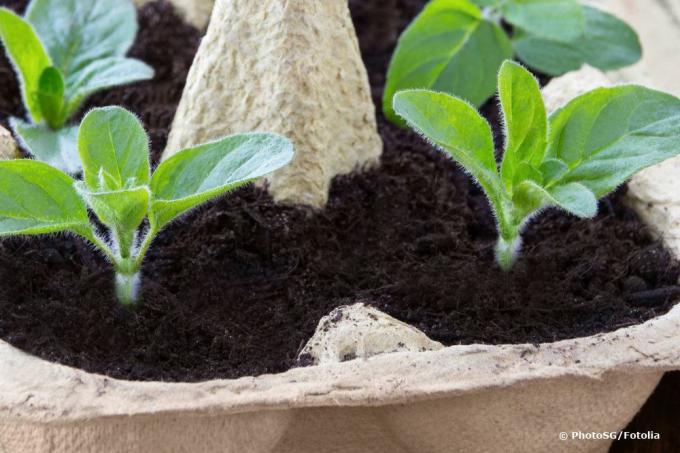
Prick out the young plants
When the first leaflets appear and the seedlings have reached a height of between 8 and 10 cm, it is time to separate the plants. The roots of the individual plants now need enough space for good development. This is the only way for the herbs to grow properly. Pricking out the seedlings is not particularly difficult, but you must proceed with caution:
- Now use normal potting soil as a plant substrate
- Fill the appropriate number of pots with it
- use pricking cutlery as an aid
- Carefully place the pricking wood under the seedlings
- raise everything at the root
- Place individually in prepared pots
- Do not damage the roots in the process
- Seedlings now develop proper root balls
- Water well and check the moisture regularly
- Avoid waterlogging
From this point on, the small plants need regular nutrients in the form of fertilizer for optimal growth. The main requirements are nitrogen, phosphorus for root formation and potassium to strengthen the tissue and promote resistance.
tip: Only healthy herbs develop a full aroma.
Separation is not necessary
The pricking out of young plants can be omitted if special sowing containers are used during sowing. Alternatively, coconut source tablets or pots made from peat can also be used. In this way, seedlings in “peat pots” can remain in them when they are transplanted. The structure of these growing pots made of peat decomposes by itself over time. However, when using them, it should always be borne in mind that these are not very environmentally friendly, as they are for theirs Production peat has to be mined, which in turn leads to the drainage of the remaining raised bogs over time. The consequence is expressed in the constant climate change.
A better alternative here is sowing herb seeds in coconut pellets. This is a purely organic product. This substrate consists of one hundred percent renewable raw materials, namely coconut fibers from the coconut shell. Sowing the herbs is also quite easy here.
Sowing in coconut substrate: instructions
Coconut pellets are commercially available. It is very easy to use. When water is added, they double their volume and are then prepared for sowing.
- put several tablets in a nursery pot
- Tabs must be next to each other
- then pour warm water over it
- Allow tablets to swell for at least 5 to 10 minutes
- Pour excess water out of the pot
- Tablets are enclosed in a fine mesh
- just carefully cut it open at the top
- now press the seeds lightly into the soil
- also here attention whether light or dark germs
- in the case of dark germs, spread some coconut substrate on top
- Set up growing pots in a bright place
- water regularly, do not let it dry out
If the seedlings have grown so well that the nursery pot becomes too small, repotting in a larger pot with normal potting soil is necessary. Further maintenance measures then as already described.
Make your own seed pots
There are various ways of making your own growing pots. There are special devices for this in the trade. Pots can then be made from old newspaper. With these pots, the seedlings can then also be repotted if they are of the appropriate size.
In addition, it has proven to be extremely practical when the nursery pots are divided into small compartments. In this way, a seed can be placed in each department. As a precaution, however, two to three should be sown. The weaker seedlings are then removed later, so that in the end only the strongest remain. This eliminates the need for pricking.
You can easily create a small “mini greenhouse” yourself. For this are needed
- an egg wrapper and
- Cling film
The lid is then simply cut open and replaced with cling film. Then potting soil is poured in and the herb sowing can begin.
tip: Yoghurt pots, cut-off plastic bottles or milk cartons can also be used as growing pots.
Herbs grown in pots can then either be put into the garden transplanted are or will continue to be cared for on the windowsill. You should then get a light to partially shaded place depending on the variety.