
Young tomato plants are pricked out and transplanted in spring, and planted out a few weeks later. We give important tips on how to implement it successfully.

Tomatoes are pricked and planted between sowing and harvesting. We give you instructions for both planting measures and explain which soil is suitable.
contents
-
Prick tomatoes
- When should you prick tomatoes?
- Which soil is suitable for pricking tomatoes?
- Instructions: Prick tomatoes properly
-
Plant out tomatoes
- When to plant tomatoes
- Planting out tomatoes: planting distance and procedure
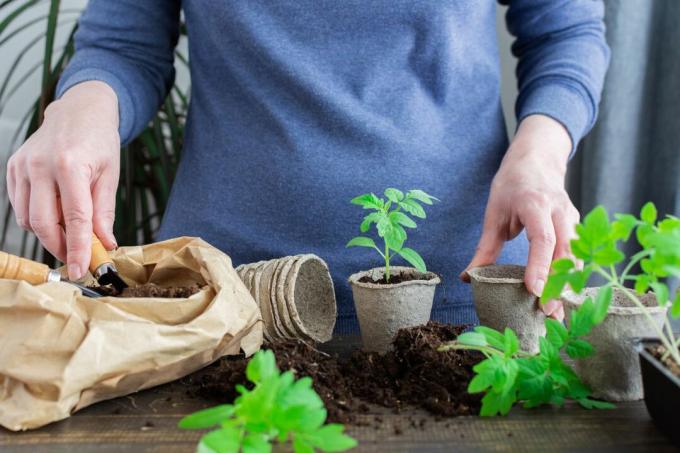
Prick tomatoes
When pricking the tomato plants are transferred to a larger pot. Because tomatoes are heavy eaters, they need a nutrient-rich soil after germination. This stimulates the growth of the plants and also prevents deficiency symptoms. More space also helps the tomatoes develop a good root system. It is best to take some time to prick and be patient, because you should work very carefully.
When should you prick tomatoes?
Just three to ten days after Sowing tomatoes the first seedlings appear. These are left to grow in the seed pot for some time until the first or second pair of real leaves has formed. The two oval cotyledons are not taken into account here, only the typical jagged or lobed tomato leaves. Now the young plants begin to grow and need nutrients for the first time because the supply from the seed has been used up.
Which soil is suitable for pricking tomatoes?
The ideal soil for pricking tomatoes is already pre-fertilized, so it provides essential nutrients. In addition, it should be permeable, loose and humus and be able to store water well. Our Plantura organic tomato & vegetable soil combines all of these properties and does without peat that is harmful to the climate.
Instructions: Prick tomatoes properly
First the plants are carefully lifted out of the earth. This works best with a pricking stick, wooden popsicle stick, or spoon. It is particularly important that neither the leaves nor the roots of the tomato seedlings are damaged. Then you put them in a larger pot with a diameter of 8 to 12 centimeters and with nutrient-rich potting soil. It is important that you only grip the seedlings by the leaves, never by the stalk. The vital channels for water are too easily squeezed and your tomato seedlings will soon dry out in the new pot. In the fresh soil, the little plants should disappear into the soil at least until the cotyledons begin. They can also be used up to the roots of the real leaves, but then the cotyledons should be removed. Then press the soil lightly and water well. In this way, the soil is washed directly to the roots, which makes it easier for the roots to grow.
Should the cotyledons be removed when pricking out? The cotyledons should be clipped off when the tomato seedlings are set deeper in the soil to prevent rot.
Prick tomatoes at a glance:
- About 2 - 3 weeks after sowing, the plants are pricked out as soon as the first real leaves are visible.
- Lift young plants out of the ground with a prick stick or spoon handle, only grasp the cotyledons.
- Place tomato plants in nutrient-rich soil in pots with a diameter of 8-12 cm.
- The plants should disappear into the soil until the real leaves begin.
- Fill in the soil, press lightly all around, water well and place pots in a light, warm location.
Plant out tomatoes
In the new pot and in nutrient-rich soil, the tomato plants quickly begin to shoot up. Before they are planted out, it is particularly important to harden the plants outdoors, so that even cooler nights do not suddenly become fatal for the young plants later. If the days in April are already warm and sunny, it is also possible to put the plants outside on a daily basis. In this way they get used to the stronger solar radiation outside, become more robust and continue to grow immediately after planting out. However, too much sun can lead to sunburn in sensitive young plants - just like us. The leaves become thin, lose their green color and appear semi-translucent. Shading is therefore particularly important for the young tomatoes on sunny days. Even if the temperatures get too cool or the weather is very humid, the plants have to be brought back into the house.
Tip: If the lower leaves of the young plants have turned yellow before they are planted out, both a lack of light and an insufficient supply of nutrients can be the cause. If there is no lack of light due to a sunny location, you should fertilize your tomato plants carefully. An organic liquid fertilizer is the best choice here, as it is applied together with the irrigation water and can also remedy acute nutrient deficiencies.
When to plant tomatoes
Tomatoes are sensitive to frost and are therefore only put outdoors in pots and beds after the ice saints from mid-May. The temperatures in the greenhouse are warmer, so that the tomato plants can be planted in early May.

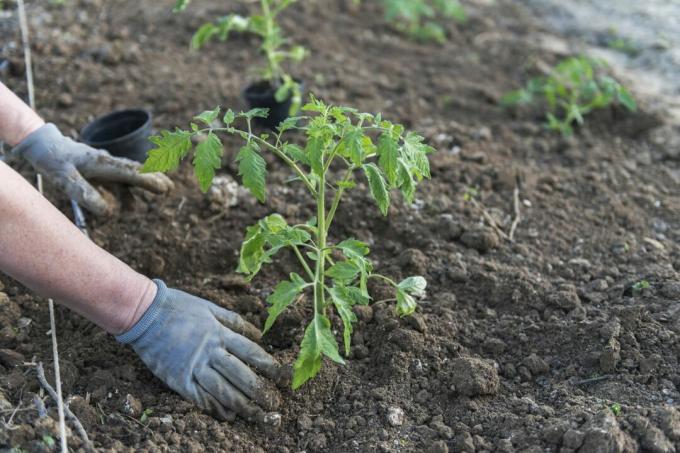
Planting out tomatoes: planting distance and procedure
Proper plant spacing for tomatoes is essential to keep the plants healthy. A distance of around 50 to 80 centimeters between the plants and 80 to 100 centimeters between individual rows is recommended. Particularly vigorous wild tomatoes or wide cocktail tomatoes with several shoots naturally need more space than slim, tall beefsteak tomatoes. In this way the air can circulate between the plants, there is no moisture in the leaves and fungal diseases have little chance of striking.
For the young plant, dig as deep a hole as possible in the bed or greenhouse. Alternatively, prepare a large pot with a volume of at least 10 liters for the tomato plants and initially only cover a few centimeters of the bottom of the pot with high-quality potting soil. Suitable substrates must meet the same criteria as when pricking out. Free the plant from the old pot by gently pressing all around and carefully removing the plant. Now place the tomato plant in the new pot or planting hole. As with pricking, the plants should disappear deep into the ground so that only about a third of the length peeks out. Carefully pinch off the lower leaves that would otherwise disappear underground. New roots emerge underground along the stem and later facilitate the absorption of nutrients and water. Tomatoes are heavy eaters, which means they need quite a large amount of nutrients. For an ideal supply of nutrients, compost or a predominantly organic long-term fertilizer such as ours is mixed when planting Plantura organic tomato fertilizer, in the excavation. The nutrients are released slowly and gently over a period of weeks, so that with just one additional application of fertilizer, after about three months, you only need to re-fertilize once.
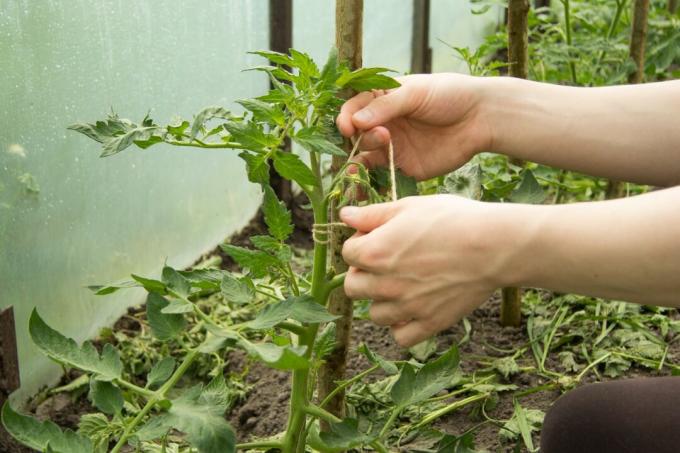
Now fill the pot or the planting hole with soil and press it down lightly. Now it just has to be watered properly. In the case of particularly tall plants, a support, a wooden stick or cords that are tied to a scaffold are recommended. With beefsteak tomatoes, plant sticks have to bear a relatively high weight and should therefore be sufficiently robust. Sturdy bamboo sticks, hazelnut twigs or metal spiral sticks are best. The latter have the advantage that the tomatoes have to be tied up less often due to the spiral shape. You wrap the cords around the entire length of the stem and thus guide the plant upwards. Tie the plant loosely to a wooden stick with a cord. Upright plants make harvesting easier and reduce the risk of the plant or its fruit becoming infected with pathogens through contact with the soil.
tip: It is also possible, Tomatoes in the raised bed to plant.
Planting out tomatoes in a nutshell:
- Plant out in the bed or in the pot only from mid-May, in the greenhouse from the beginning of May.
- Keep a distance of 50 - 80 cm between the plants and 80 - 100 cm between the rows.
- Dig a deep hole in the ground so that 2/3 of the plants disappear into it.
- Add compost or mainly organic long-term fertilizers to excavated soil.
- Water well and support plants.
We have here so that nothing goes wrong after the tomatoes have been planted out 5 common mistakes when growing tomatoes summarized for you and give tips on how to avoid them.