On the 31st October is Halloween again - time for the pumpkin: Here you will find instructions, ideas and the best varieties for your Halloween pumpkin.

Autumn time is pumpkin time: But the delicious pumpkin is not only used on our plates in autumn - it is also in great demand as a decoration. Especially around Halloween the pumpkin is a must in many households and is not only used in soup, but also in eerily beautiful jack-o'-lanterns. But how do you make such a lantern and which pumpkins are actually suitable for it? We'll show you what you need to know about the topic of “pumpkin carving”.
contents
- Halloween pumpkin carving: tools and materials
- Carving Halloween Pumpkin: Instructions
- Carving Halloween pumpkins: making jack-o-lanterns durable
- The best types of pumpkin to carve for Halloween: overview
- Carving Halloween pumpkins: beautiful and unusual ideas
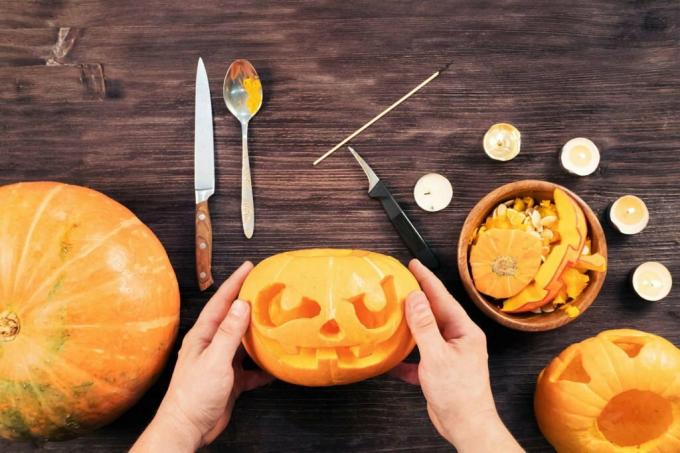
Halloween pumpkin carving: tools and materials
You will need the following materials and tools so that you can start carving pumpkin right away:
- pumpkin
- Sharp knife
- Large spoon or ice cream scoop
- Water soluble pen
- Alternatively: needle, cookie cutter, gouge, drill
Carving Halloween Pumpkin: Instructions
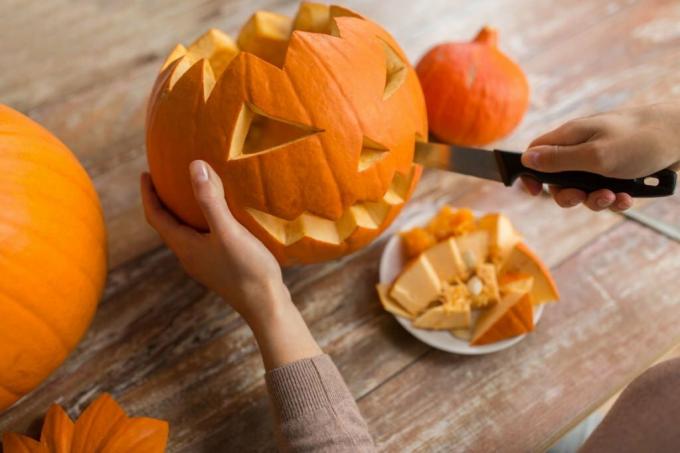
Choosing the right pumpkin is essential for a successful carving. In order for the pumpkin to be easy to process, it should already be ripe - this is the only way to remove the flesh easily. The size also plays a decisive role: not only do large jack-o-lanterns look more decorative They are also the best way to loosen the pulp and the outer skin is easier to work with. Pumpkins with injuries, on the other hand, are mostly unsuitable for carving because they start to rot faster.
Once you have found a suitable pumpkin, you can cut the lid out of the pumpkin with a large, sharp knife. It is best to make the cut at an angle towards the center, because through the enlarged one Surface later decreases the risk of the lid sliding inwards or falling into the pumpkin can. You can leave the pumpkin stem on the lid, after all it is not only extremely decorative, but can also be used later as a handle to open the lid. Any protruding pulp, on the other hand, should be removed.
Now it's time to hollow out: This work works best with an ice cream scoop or the classic, large spoon. Remove the pulp and seeds until there is only a 2 cm thick edge at the end. With pumpkins from the supermarket, you can now process the pulp into a delicious dish and don't have to throw it away. With ornamental gourds or pumpkins from your own cultivation, however, caution is advised, because they can contain poisonous bitter substances. For this reason, pumpkins that taste bitter should not be consumed under any circumstances, but should be disposed of as a precaution. You can find out more about this in our article about poisonous pumpkins.
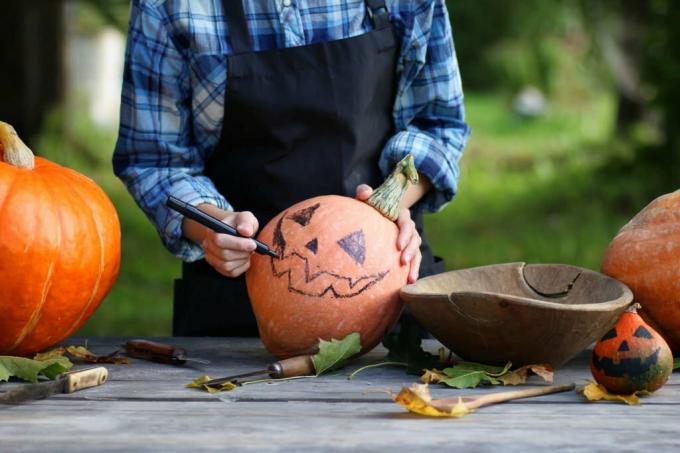
Now we're finally getting to the exciting part and start carving. The best thing to do is not just carve wildly, but instead draw the desired pattern with a water-soluble pen. If the lines match, you can simply trace them with a sharp knife or cutter. With some pumpkins, however, the skin is so thick and hard that you can hardly cut a straight line with a knife. A simple trick can help here: First poke holes along the lines in the shell with a needle before you cut out the parts and the cutting will be made much easier. But not only a knife is ideal as a carving tool: creativity can be given free rein when carving a pumpkin. For example, metal cookie cutters can be used to create atmospheric pumpkin lights with patterns. To carve a pattern into the pumpkin without cutting through the skin, a gouge is best, small dots, on the other hand, can easily be carved into the pumpkin with a drill and a little sensitivity.
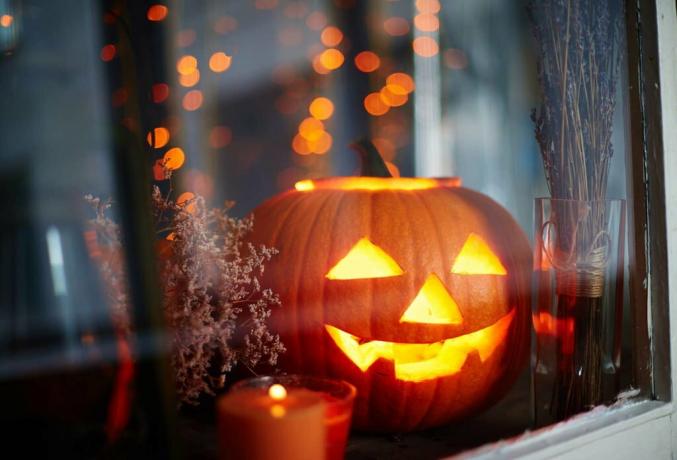
Now all you have to do is put your pumpkin in the desired location and equip it with a candle and the Halloween decoration is ready. If you prefer to do without a candle because of the risk of fire, you can of course still make your pumpkin glow: There are now LED candles that even imitate the flickering of real fire and thus still create an authentic ambience care for. But a chain of lights inside the pumpkin also provides the necessary light and gives the pumpkin a completely new, almost magical expression.
Carving Halloween pumpkins: quick guide at a glance
- Cut the lid out of the pumpkin with a sharp knife. Make the cut diagonally towards the middle.
- Remove excess pulp from the lid, but do not cut off the stem.
- Hollow out the pumpkin with a spoon or ice cream scoop, leaving only a 2 cm thick rim.
- Draw the motif on the pumpkin with a water-soluble pen.
- Cut out contours with a sharp knife or cutter.
- Decorate the pumpkin with a candle or a chain of lights and place it in the desired location - done.
Carving Halloween pumpkins: making jack-o-lanterns durable
Jack-o-lanterns are beautiful and enchant every fall. Unfortunately, however, they are quite an entertaining pleasure - mold in particular often causes problems for the lanterns and lets them spoil after a few weeks. A whole series of tips and tricks are circulating on the Internet, which should make the pretty lanterns more durable. Hairspray in particular is considered a miracle weapon against the mold fight, but its use is generally not advisable: Not only is The effects of this home remedy are extremely controversial, but hairspray is also still highly flammable and can if used incorrectly (e.g. B. too short drying time) set the pumpkin on fire. Only drying prevents the pumpkin from becoming infected with mold at some point. However, only slow drying in a warm, dry room (preferably a few weeks before carving) leads to this Desired result: If you are impatient and want to dry your pumpkin in the oven, you will only receive a shriveled pumpkin as a Result. But even without extra procedures, the pumpkin will keep for a long time if it is displayed in a cool but dry place.
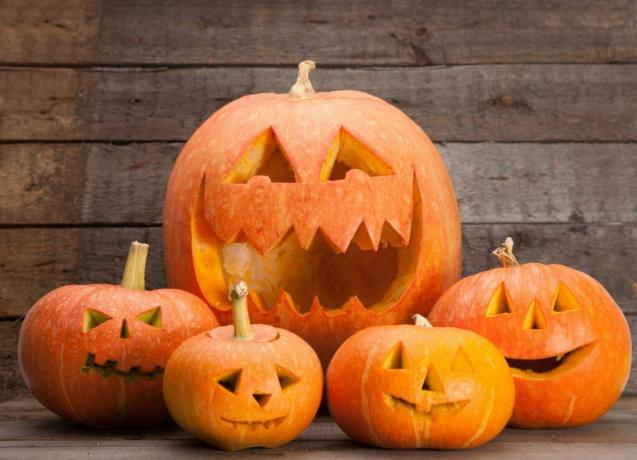
The best types of pumpkin to carve for Halloween: overview
Below are the best varieties of pumpkin that are ideal for carving your Halloween decorations:
Big max: This is a giant pumpkin with hard-skinned, orange fruits. These are ideal for carving lanterns. Even small children can help with handicrafts, for example scooping out the pulp.
Harvest Princess F1: This variety can be described as a classic Halloween pumpkin, but in a mini format. This variety should be emphasized as a combination with a large pumpkin or for smaller areas, such as a side table.
Jack O’Lantern: Visually, this variety is also one of the classic Halloween pumpkins. It can be easily hollowed out and offers enough space for larger carvings. An extra plus point: It also tastes great as a soup!
St. Martin's Lantern Gourd: As the name suggests, this is the ideal hollow out strain for Halloween lanterns. The fruits are oval shaped and brightly orange in color. This pumpkin is also extremely tasty and impresses with its firmer pulp.
Pumpkin mix: This mixture consists of small decorative pumpkins that are ideal for decoration. Carving is out of the question due to its size, but this variety is ideal for painting faces or spider webs. This is also a great opportunity for small children to participate in the Halloween decoration.
Tom Fox: Tom Fox is arguably the most classic Halloween pumpkin. The fruits grow in a wide variety of shapes and can weigh as much as 8 kg! Especially large and creepy faces can be carved into the pumpkin quite easily.
In case you have a bigger one Overview of the pumpkin varieties want to see, you can find the variety article here.
Carving Halloween pumpkins: beautiful and unusual ideas
We all know the typical Halloween pumpkin with the triangles as eyes and nose and the open mouth. But how about a few more unusual ideas: For example, try giving your pumpkin a different facial expression. How about, for example, a crying pumpkin or a pumpkin that is frightened? Funny grimaces are also currently in vogue in pumpkin carving and make the jack-o-lanterns no longer look terrible, but terribly funny. Just try out different facial expressions and create your very own Halloween face.

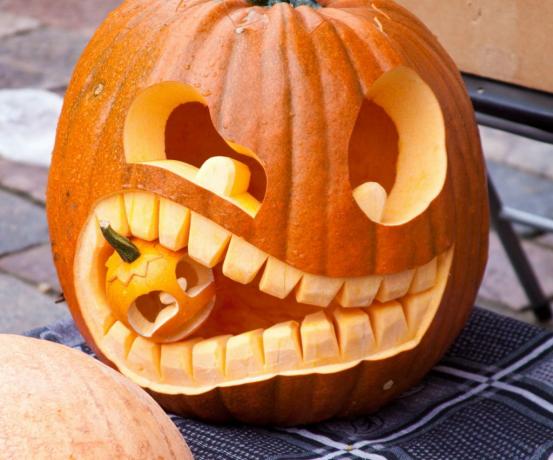
To take the grimaces even further, try combining the pumpkin with other materials. Wire can be used wonderfully as glasses or braces, for example. Black pipe cleaners turn into creepy spider legs. With the right decoration, the pumpkin becomes a real eye-catcher. It gets particularly scary when you combine two pumpkin carvings: To do this, you carve a large pumpkin with an open mouth and a small one that screams. Now you put the little pumpkin in the mouth of the big one: the creepy pumpkin monster and its victim are done.
If you have had enough of grimaces, but still want a pumpkin as a Halloween decoration, you can try a completely different motif. No matter whether spider, witch or cat: With a template from the Internet, almost all motifs can be transferred to a pumpkin and carved out. But patterns that are not quite as creepy as, for example, owls or a fairy look great on a pumpkin. What is particularly nice about these motifs is that you can easily leave them in the garden even after Halloween without them looking cheesy.
But pumpkin carving also has something for friends of classic elegance: How about patterns and flowers instead of grimaces and motifs? You can also easily make a beautiful lantern out of a pumpkin, which with its tendril pattern or dotted optics no longer looks like Halloween, but rather a noble autumn decoration. Or you can forego the carving and use some color to give your pumpkins that certain something - the possibilities are limitless. Just try out a bit and let your creativity run free.
You can find more inspiration on our Pinterest page:
Halloween: carving a pumpkin