
A herb snail looks good and offers optimal conditions for various herbs. We show how to properly build and apply a herb spiral.
Much like its big brother, that Raised bed, the herb snail is one of the Garden trends the last few years. The "normal" herb garden has been a must in every home garden for hundreds of years, after all, it supplies the kitchen with aromatic spices. With the herb spiral, however, it becomes even easier to plant delicious herbs in your own garden: With its height, it ensures Back-friendly work and at the same time offers space for many different herbs with different Location requirements. You can find out here how easy it is to build such a herbal spiral.
contents
- Materials for a herb snail
- Build the basic structure of the herb snail
- Filling the herb snail: how and with what?
- Create herb snail: planting plan
- Benefits of herb snails
Growing a true variety of spices in the smallest of spaces? This only works with the herb snail. The small spiral has long since found its way into many gardens and makes work in the herb bed easier. The herb snail is as versatile as the herbs that live in it. Whether made of stone, metal or concrete - there are a thousand variations for a herb spiral, which not only shines with great plants, but also with its appearance. Plastic kits are also recommended, as these can be assembled quickly and easily, even by laypeople.

Materials for a herb snail
Building a herb snail is child's play and you don't need much to do it. Basically you only need:
- Kit for a herb spiral (plastic)
- Raised bed basic filling
- Herbal soil
- Different herbs
Build the basic structure of the herb snail
Before setting up the herb spiral, you must first find the right place. Since most herbs are real sun worshipers and love warmth and light, a location in full sun is recommended. The snail should open to the south. This is the only way to guarantee that all herbs have a suitable climatic zone.
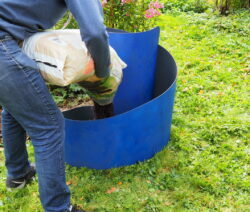
Once the right place has been found, the herb snail can already be set up. Fortunately, thanks to the plastic modular system, this work is child's play: First, unroll the plastic and bring it into a snail shape. You will find pre-drilled holes in the front section of the herb spiral and at the very end. Align the spiral of herbs so that the holes are on top of each other and fix the whole thing with screws and nuts. It is important here that the end of the herb snail does not have an acute angle, but a curvature - so turn the end in such a way that the outside is attached to the outside.

Summary building herb snail:
- Set up the herb spiral in full sun
- The spiral should open to the south
- Unroll the kit and screw in the rear end a little
- Connect the spiral to itself with screws at the pre-drilled holes
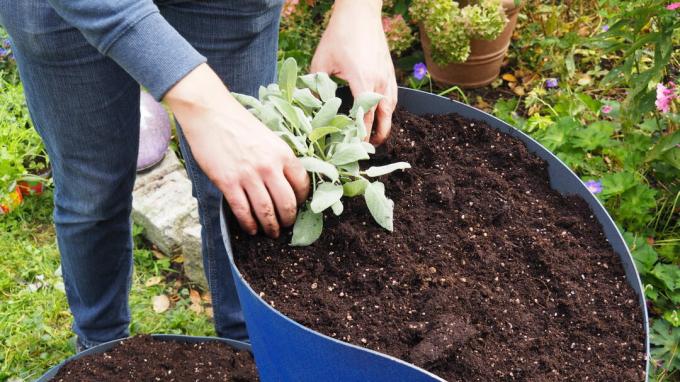
Filling the herb snail: how and with what?
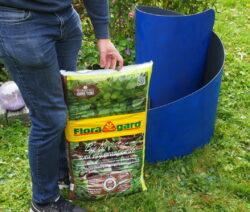
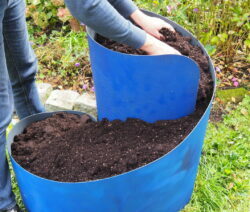
So that the herbs are supplied according to their needs, the herb spiral should not be filled with any soil. Instead, the best practice is to use two different layers of soil. First, a layer of raised bed basic filling is poured into the spiral about 50 cm high (the height may drop slightly towards the end). The special mix of bark mulch and wood chips ensures that the drainage capacity is improved and that there is no waterlogging in the bed. The rest of the spiral is now filled with herbal soil, which offers perfect conditions for the new plants. The nutrient content and pH value are matched to the young herbs, which makes it easier for the plants to start a new life.
Summary of filling the herb snail:
- Fill in the soil in two layers
- 50 cm raised bed basic filling for good drainage
- Top up the rest with herbal soil
Create herb snail: planting plan
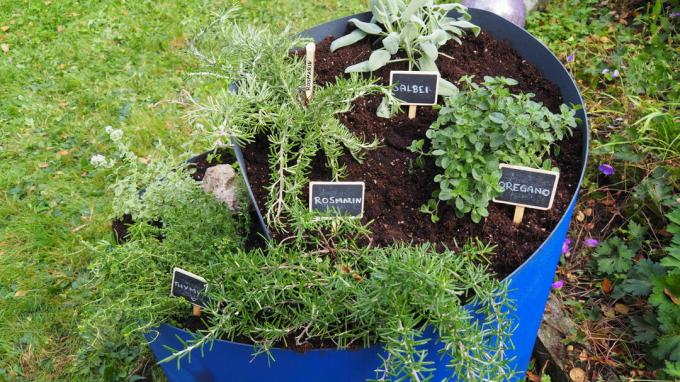
You can finally plant - but which plant belongs where? In fact, there is a very clear order in the herb spiral that ensures optimal growth. The herb spiral can be roughly divided into three climatic zones: There is an upper, a middle and a lower area. In the upper area it is not only the sunniest and warmest, but also the risk of waterlogging is lowest. Mediterranean herbs like rosemary (Rosmarinus officinalis), thyme (Thymus) and oregano (Origanum vulgare). In the middle area, on the other hand, it is neither particularly dry nor particularly humid, which is why basil (Ocimum basilicum) and sage (Salvia) feel very comfortable here. The water from the two upper areas flows downwards through the spiral shape, so that this is where it is most humid. That is why they are especially happy about this place Lemon balm (Melissa officinalis), but also chives (Allium schoenoprasum), peppermint (Mentha x piperita) and our parsley (Petroselinum crispum).
Summary planting herb snail:
- A herbal spiral can be divided into different climatic zones
- Mediterranean herbs grow best at the top
- In the middle area, basil and sage feel good
- Herbs grow at the bottom that need a little more water
Benefits of herb snails
If you think of the advantages of a herb spiral, the first thing that comes to mind is of course that it is easy on the back to work. Especially the upper area with the Mediterranean herbs allows gardening while standing. But the herb spiral has other advantages: Thanks to the special shape of the snail, significantly more herbs can be grown in a smaller space - perfect for small gardens. In addition, different wet zones are created for the different herbs, as the water runs off better downwards through the incline. The tip of the herb spiral is dry and offers space for plants that are sensitive to moisture, while the lower areas are suitable for herbs that can tolerate a little more moisture.
The last two advantages also lie in the diversity of herb snails. In this way, the plants can protect each other from annoying pests: thyme and rosemary are terrifying with their scent Nudibranchs off, while sage against Aphids helps and marjoram Ants drives out. But while pests seek the distance, the herb spiral is a real one Bee paradise. The flowers of the aromatic herbs beckon Bees, Butterflies and other beneficial insects and help them to find new food.
Advantages of a herb snail:
- Back-friendly work (partly)
- More herbs in a small space
- Different moisture zones
- Pests are kept away
- Beneficial organisms are attracted
Here's how to do a classic Create a herb bed can.
A general guide to the Planting herbs can be found in our special article.