
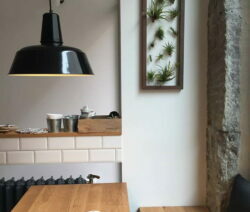
Conjure up small, green oases on gray walls! Tillandsias do not need soil and are ideal for greening the walls of your home or office.
Hardly any color can lift the mood like a rich, cheerful green. Unfortunately, boring white or gray dominates on most house walls. However, there is a remedy that can bring green life to your walls at home or in the office without much effort. The magic word is tillandsia. These are so-called air plants that originally come from the south of the USA and South America. Over time, these plants have adapted to a wide variety of habitats. Tillandsias are not particularly picky about their growing substrate. They usually grow on trees or cacti, but they also settle on rocks, house roofs or even telephone poles. Due to their robust way of life, they are particularly suitable as lively wall decoration. And the plants are also easy to care for: they only need to be sprayed with water two to three times a week.

What you need for this naturally green wall decoration made of tillandsia and instructions on how to get the plants on the wall can be found here:
Materials needed:
- 25-30 nails
- 10 screws
- fishing line
- hardwax oil
- 2 wooden picture frames with a smooth surface
Required tool:
- hammer
- cordless screwdriver
- brush or paint roller
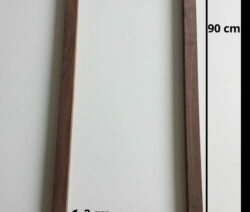
1. Buy picture frames or make them yourself
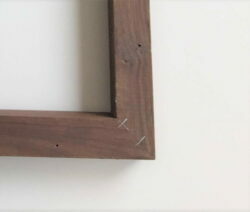
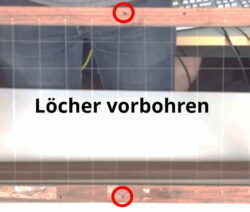
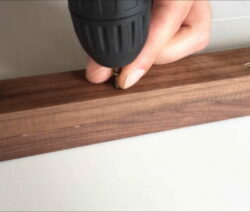
Our picture frames have the dimensions 90x30x2cm with a flat surface so that you can later screw them together flush. Of course, the frames can also easily be made by yourself. To do this, two wooden slats must be cut to 90cm and 30cm in length for a frame. Then cut the ends at a 45° angle and smooth the surfaces with sandpaper. Now the frame can be assembled. For this we stapled the 45° edges together. Holes for the screws should now be pre-drilled so that no cracks form when the two frames are joined together. Three holes should suffice on each of the long sides and two holes on the short sides. The holes of the frame, which will later form the back, are completely drilled through. The holes in the front frame, on the other hand, are only lightly drilled.
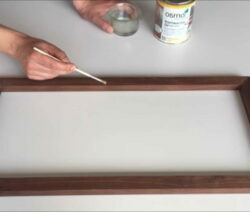
2. Coat the frame with hardwax oil
In the next step, the two picture frames must be prepared for frequent spraying with water. To do this, they are coated with hard wax oil and then left to dry overnight. This should be repeated twice more so that the frames are really water resistant.
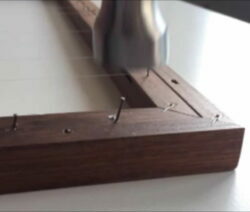
3. Attach holder for tillandsia
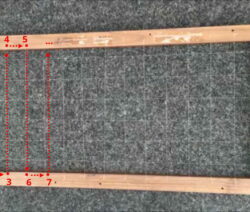
For the net on which the tillandsia will later grow, nails approx. installed at 5 cm intervals. Caution! Do not hammer in the nails completely, but approx. Leave 1cm sticking out so that the fishing line can be attached to it.
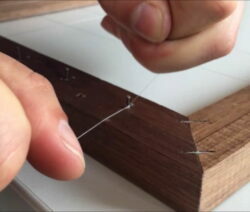
4. Open up the holding net for tillandsia
For the mounting net, tie the fishing line to one of the nails in the corner with a knot. This can be done with a laid Webleinstek (see video: https://www.youtube.com/watch? v=FgEqqlRjWE0 ) are additionally secured. Then fasten the fishing line to the opposite nail again with a laid rope. Now knot the fishing line on the next side nail with a laid rope and then continue on the opposite side. This is repeated until the fishing line is stretched across the entire edge. Now the same thing is done again on the edge that has not yet been covered. Here you should make sure that the fishing line is alternately threaded over and under the already stretched fishing line (similar to a tennis racket). This gives the plants better support later. The nails can then be hammered in completely.

5. screw the frame together
Now the two frames can be screwed together. To do this, the two frames are placed on top of each other. It should be noted that the fishing line net should now lie between the two frames. Now attach the screws to the pre-drilled holes and screw the two frames together.
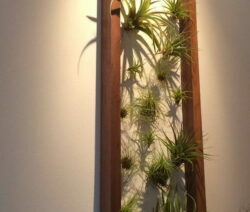
6. Hang frames and insert plants
Hang the finished frame on the desired wall with a dowel and screw (alternatively nails). Now the tillandsia can be used. Simply clamp the plants between the fishing lines.

7. Enjoy wall decoration
The plants need a little water every two to three days. To do this, simply spray the tillandsia with a spray bottle. Then there is nothing else to do but enjoy the little plants.

...and receive concentrated plant knowledge and inspiration directly in your e-mail inbox every Sunday!