
table of contents
- background knowledge
- material
- template
- Instructions for laying
- Laying a pattern
- frequently asked Questions
Terrace tiles are relatively easy to lay yourself with a little patience. There are essentially three methods for doing this. Which one you choose depends not least on your personal requirements. Good planning is important, in which you should also decide on a certain pattern. It is important to remember that different laying patterns each have their own effect.
In a nutshell
- A sensible substructure is required to lay terrace slabs
- A split bed is best suited for this
- Always pay attention to a good water drainage
- Depending on the selected panels, different patterns can be laid
background knowledge
So that panels can be laid on a terrace and last as long as possible, a substructure is essential. It should also be taken into account that water penetrating beneath the plate layer must always run off well. Therefore, the incorporation of a drainage system is often an important part of the substructure. In principle there are three different methods of laying.
Laying on a gravel bed: The substructure here consists of a layer of fine chippings about five centimeters thick. One also speaks of an unbound construction method. The split bed variant is the most common and also the simplest method for laying slabs. Since craft laypeople can also cope with it very well, we will concentrate exclusively on this method later in our instructions.

Laying on a mortar bed: This method, known as bonded construction, offers the advantage that each individual panel is fixed by the mortar and therefore cannot slip. It requires very quick work.

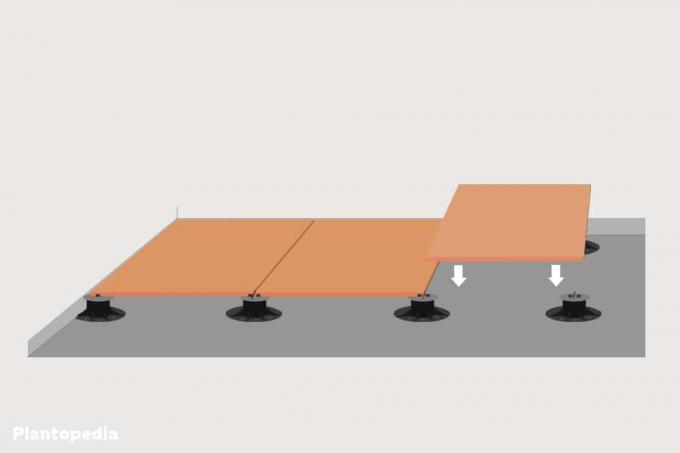
Laying on pedestals or Panel storage: With this installation variant, the slabs rest on pedestals or slab bearings at some distance from the floor. These are special plastic feet in the shape of a frame, in which mainly larger plate models are placed.
A bed made of gravel is recommended for all variants. The gravel ensures that water can seep away quickly and easily. To prevent unwanted accumulation of water, you can also place so-called drainage mats on the gravel layer. However, this is only absolutely necessary when laying on a bed of mortar. The basics of laying slabs on a terrace also include the A boundary must be attached to the outer edges - at least when there is no fixation by mortar he follows. The limitation prevents the individual stone or concrete slabs from slipping later.
Note: You always have to lay so-called natural stone slabs on a mortar basis. Grouting is also essential for them.
material
In addition to the actual terrace slabs, gravel and gravel, a number of tools and aids are required that make the work considerably easier. This includes:
- Vibrators or stompers
- Rubber mallet
- Spirit level
- Solder or Mason's cord
- Joint crosses or Spacers
- long board
- Plate holder
- possibly cutoff grinder
- Vat or cement mixer
Tip: You should definitely use a color-fast rubber mallet, so do not give off any paint, otherwise there is a great risk that the panels will be discolored.
template
Before starting the laying work, you should definitely think about whether and which pattern should be laid. You cannot create every pattern with every type of panel. In the case of natural stone slabs, for example, a geometric pattern is completely excluded. The following patterns are very popular for the following types of panels.
Concrete pavement
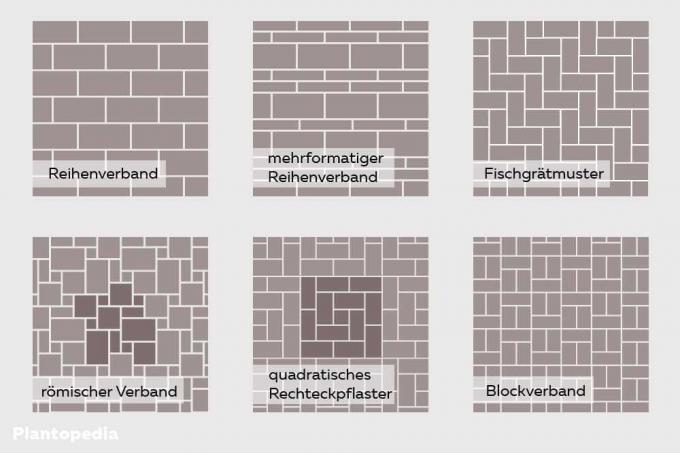
- Row connection: Laying is staggered, there is no continuous joint
- Multi-format row connection: also staggered installation without a continuous joint, but with different tile formats
- Herringbone pattern: Laying at an angle until a herringbone pattern is actually created
- Roman association: different panel formats are laid in a repetitive combination
- Square rectangular pavement: Slabs are laid in different groups so that a new rectangle is created over and over again
- Block connection: three terrace slabs each form a block
Natural and porcelain stoneware tiles
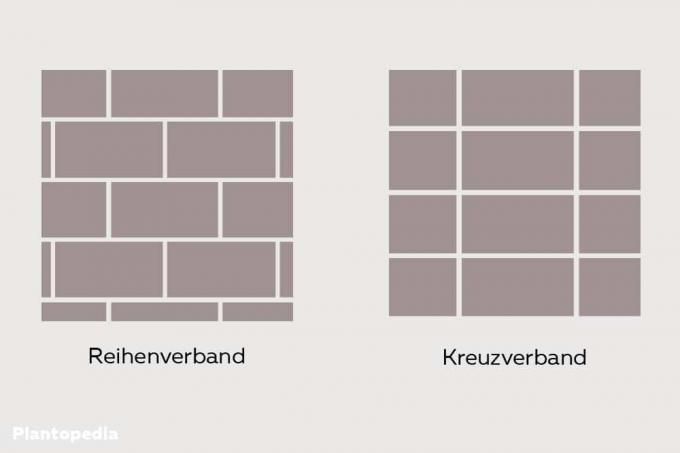
- Row connection: staggered laying so that there is no continuous joint
- Cross bond: laying on the edge so that continuous joints are always created
Note: Laying the tiles on the terrace in a cross bond requires particularly precise work. After practically every single panel, you have to check whether the joints actually run in a straight line.
Stone pavement
Here the shape of the individual paving stones determines the laying pattern. A classic row association is always possible. So that there is not too much unrest in the end, it is advisable to always keep an eye on the escape. If possible, there should be a straight joint between each row of stones. Line emerge that leads away from the viewer.
Instructions for laying
Before you start laying the terrace slabs, you should clarify how many slabs you need for the area and to what extent it is necessary to shorten individual slabs. A decision about the choice of pattern must be made. It is ideal if you draw a somewhat true-to-scale plan before starting work, showing the number of whole and shortened stones as well as the template. It should be noted that there should be a gap of three to five millimeters between two panels.
Excavate terrace
In a first step, a pit is dug, the dimensions of which must correspond to the future terrace. The excavation depth should be 20 to 30 centimeters. You should always keep in mind that the pit has to accommodate both a layer of gravel and a layer of chippings. The edges of the pit should be cut as straight as possible with a spade. The use of a spirit level and a mason's cord is recommended here. It is advisable to compact or compress the bottom of the pit with a tamper. to smooth out. However, you shouldn't use too much force. It is of enormous importance for water drainage that the soil is still permeable.
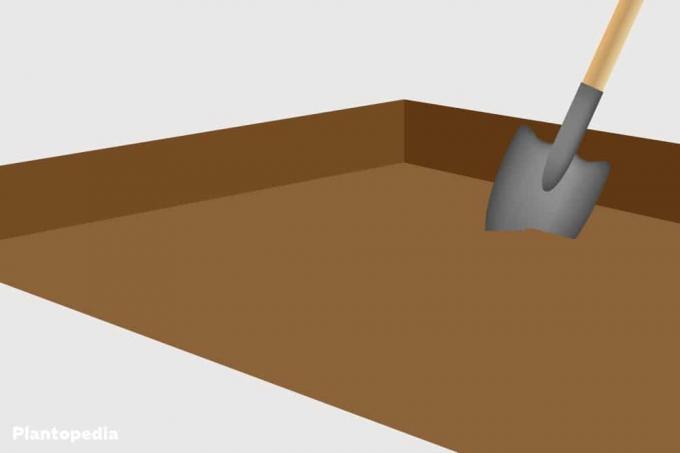
Place and fix curb stones
Before you start filling the pit, you should put the curb stones on its sides. They later ensure that the entire panel structure can no longer slip. As a result, you have to fix the edges firmly so that they run absolutely straight if possible. The fixation is best done with an earth-bonded lean concrete. Ready-made mixes can be purchased at hardware stores. It is important to follow the mixing instructions for the respective product exactly. The lean concrete is then applied continuously to the left and right of the curb stones arranged in a row with a trowel. Later on, it should have something of a support function. However, it takes a few days for the concrete to harden completely. You can only continue working once this has hardened.

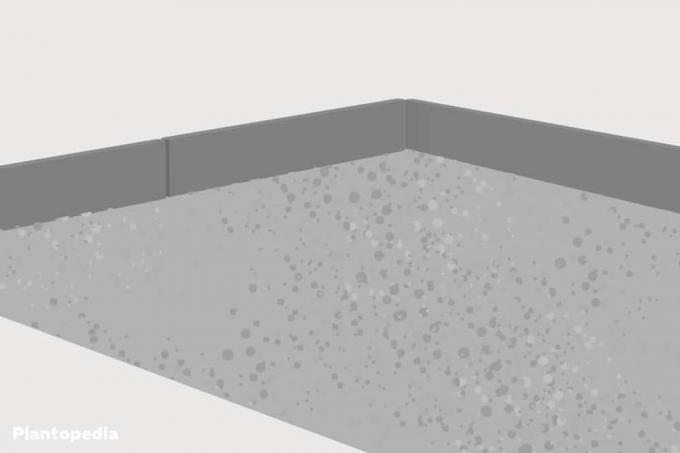
Bring in gravel
The gravel is not only used as part of the base course or the substructure of the terrace, but also ensures that water can drain off relatively easily and then seep into the ground. If the water should freeze in winter, the relatively large gaps allow between the individual stones that it can expand when it freezes without affecting the entire structure underneath suffers. It is best to use broken gravel, which is made up of various stone or Grain sizes composed. It is much more resilient than the widespread round gravel. However, you have to expect higher costs for this. The layer of gravel should be around ten centimeters thick. Subsequent compaction of the layer is possible, but does not have to be done.
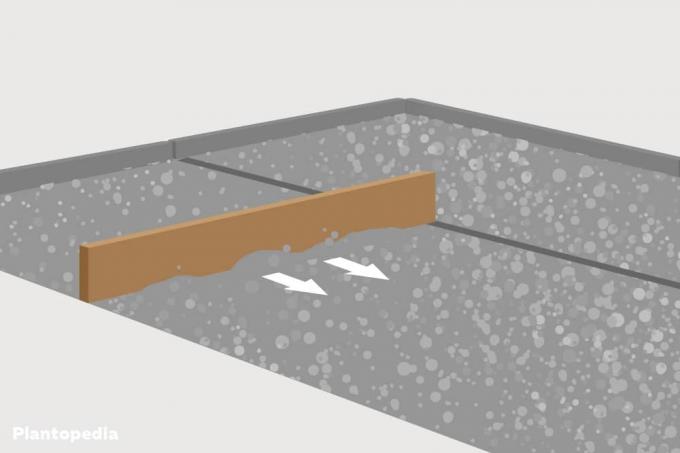
Bring in gravel bed
Now the actual base layer for the terrace slabs is introduced - namely the gravel bed. It is best not to use pure stone chippings, but a mixture made up of chippings and crushed sand. The advantage of this mix is that the sand acts as a special connection between the stone chips. The entire bed therefore stays in shape for the long term. As a result, individual terrace slabs sink less often. Grain sizes of 1/3 or 2/5 have proven to be the ideal grain size. The gravel bed should be around ten centimeters thick. After the material has been brought into the pit, it must be smoothed as evenly as possible with a long board. The aim is to remove all unevenness from the surface of the layer and to create a really smooth, even surface.
Note: The gravel bed should not be stepped on afterwards in order not to damage the smooth surface.
Lay the panels
Of course, there are also various methods of laying the terrace slabs. These often depend on what type of panels are used and what pattern is to be laid with them. With all methods, however, the following applies: You always lay towards the house and not away from it. The last row you move is therefore the row closest to the house. It starts in one of the two corners that are, so to speak, opposite the house. In this corner you put the first plate.
The plate is initially placed relatively loosely and then carefully tapped with a rubber mallet. Then you simply connect with the next terrace slabs in the row. The joint spacing of three to five millimeters must be taken into account. It is therefore helpful to use so-called joint crosses or Joint spacers to work. Every two meters, a spirit level and a mason's cord are used to check whether the panels are actually in a straight row. If individual panels have to be cut, it is best to use a cut-off saw with a diamond cutting disc.

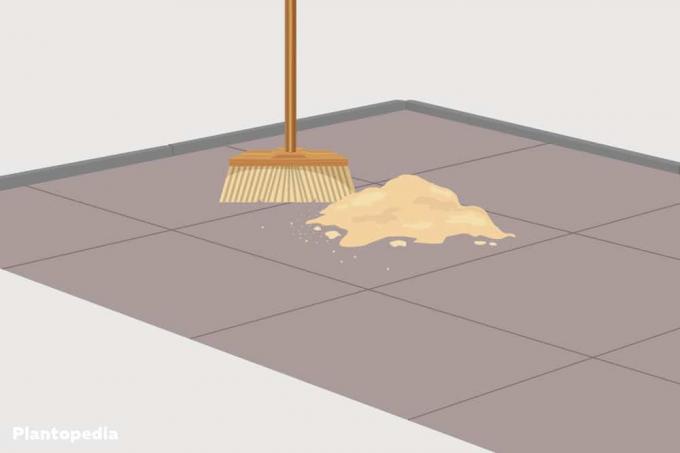
Fill in the joints
Finally, you need the Put, i.e. the gaps between the plates. It is best to use coarse quartz sand for this. First, simply tip this onto the terrace and sweep it into the joints with a broom. It is advisable not to apply too much quartz sand in each case, otherwise there is a risk that all the joints will be filled, but that there will still be a lot of sand left on the terrace. It should be clear that grouting requires a lot of sweeping. Once you have filled all the joints and removed the excess sand, the entire terrace area is carefully watered. An actual joint closure is only possible through the water. Incidentally, the terrace can be entered immediately.
Laying a pattern
As already indicated, the work steps described above also apply if you want to lay a plate pattern. When creating a pattern, however, there are a few more important points that need to be taken into account. The most important point of all is undoubtedly that one is aware of the pattern shape and has internalized it to a certain extent. A plan drawing prepared in advance is definitely helpful here.
Tip: You should make the plan drawing on squared paper and then, if possible, use a copier to enlarge it to DIN A3 format. Since in most cases a basic pattern is simply repeated, several of them should be drawn in the plan - not least to be clear about the connections.
Laying a pattern with terrace slabs requires the greatest precision and very careful work. Even if you simply lay the tiles row by row offset, you must make sure that the tile edges are absolutely centered. Even the smallest deviation usually leads to a considerable restlessness in the overall picture, which can considerably spoil the joy of being on the terrace. Since some patterns require terrace slabs of different sizes, there is usually no way around cutting them to size. Here, too, something like precision work is urgently recommended. It is also advisable to only cut as many panels as you need for the next step.
frequently asked Questions
Unfortunately, there is no clear answer to this. The duration depends on the size of the area, the experience of the installer and the template. Usually, however, you have to allow two to three days for a medium-sized area.
Unfortunately, there is no way around wet laying, i.e. fixing the natural stone slabs with mortar or an adhesive. Otherwise the risk would be far too great that the unevenly shaped individual panels slip over time and thus ruin the terrace.
To do this, you stretch several, exactly horizontal masonry cords over the entire terrace area. The cords must have a height that the board fits flush underneath. The cords serve as something like guide strips and thus inevitably determine how much grit has to be removed.