table of contents
- Reet as a noise barrier
- materials
- tool
- Pour the foundations
- Soundproof wall: set up posts
- Complete the construction of the noise barrier
- Reinforce sound insulation
- frequently asked Questions
Noise from the street, neighbors and other sources disturbs when you are in the garden. A soundproof wall built by yourself is effective against this problem. You can find out how to build a garden noise protection wall here.
In a nutshell
- Soundproof wall made of thatch
- absorbs sound
- low cost and labor
- expandable as required
- Point foundations necessary
Reet as a noise barrier
If you are looking for a soundproofing wall for your garden that can be easily adjusted to the desired length, certain materials are much better. Structured concrete walls are often drawn or reinforced wire baskets are filled with soil and planted, which, however, causes a lot of work and costs. If, instead, you prefer individual elements that can be set up like a privacy screen in the garden, you should use thatch as the main material. Reet is made from reed (Phragmites australis) and offers excellent soundproofing properties due to the uneven surface. A large part of the noise is absorbed by the wall, which significantly reduces the volume. But these are not the only properties that the elements offer:
- weatherproof
- UV-resistant
- durable
- natural look
- renewable raw material

materials
Reet is available in the form of fence elements, from which you can build individual soundproof walls or entire fences at low cost. For the instructions presented below, it is a soundproofing wall with the dimensions 200 x 200 cm. These are attached using posts and point foundations, which makes it easier to attach additional noise barriers. For a 200 x 200 cm noise barrier you will need the following materials:
- 1 x thatched board (pressed) in the dimensions 200 x 200 cm
- 2 x wooden posts with the dimensions 200 x 10 x 10 cm
- 3 x wooden strips in the dimensions 200 x 5 x 2 cm
- 2 x U-post bases for 10 x 10 cm wooden posts
- 350 kg of precast concrete for 2 point foundations with the dimensions 30 x 30 x 80 cm or 30 cm in diameter and 80 cm in depth
- 8 x concrete screws with a length of 5 to 10 cm (diameter depends on post base hole size)
- 8 x rustproof stainless steel screws with a length of 3 cm (diameter depends on the post base hole size)
- 12 x self-tapping M5 stainless steel screws with a length of 5 cm
- Stainless steel binding wire
- 1 x plastic or stainless steel rain gutter with a length of 200 cm (as rain protection)

Note: Pressed thatched panels are available in thicknesses of 2 to 6 cm. 2 cm is completely sufficient for roads with light traffic, while you should definitely choose thicker elements for more noise.
tool
In addition to the materials, you of course also need the right tools to build the soundproof wall. Most of the tools are required for the point foundations and the fixation of the post bases. This saves you a lot of work if you already have a foundation in the desired location. Unfortunately, classic ground sockets that are knocked into the ground are not suitable for the noise barrier because it is too high. The following list provides you with the necessary tools for the project:
- drilling machine
- Cordless screwdriver
- Snakewood drill bit (choose a suitable diameter for stainless steel screws)
- Concrete drill bit (choose a suitable diameter for concrete screws)
- Auger 30 cm in diameter
- shovel
- spade
- wheelbarrow
- large bucket for mixing the concrete
- Hand-held concrete mixer
- Wire cutter
- Smoothing trowel
- gloves
- pencil
- Tape measure or folding rule
Note: Equipment such as the cement mixer or the earth auger can be rented for a corresponding fee. Hardware stores offer the devices for four to 24 hours or a whole week.
Pour the foundations
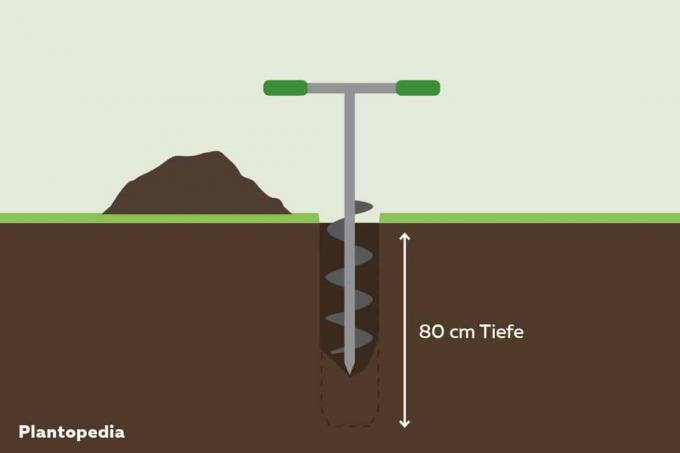
As already mentioned above, a point foundation for each post is necessary for the placement of the soundproof wall. Since the wall together with the sleeves is a little higher than 200 centimeters, you must make use of the foundations, otherwise it will fall over or blow away. The point foundations can be implemented without any problems, even if you have not yet poured any concrete. First dig out the holes for the foundations:
- select the desired place
- Mark the distance between the two posts (e.g. through stones)
- Distance: 200 cm
- Dig holes for the foundations
- use auger for this
- Place the tip of the auger directly on the marking
- Dig a hole at a depth of 80 cm
- if desired, dig a round lock into a square with a spade
- Thoroughly remove soil

Now the holes for the point foundations are ready. Make sure that the centers of both holes are 200 centimeters apart. This allows the post bases to be mounted in the middle of the point foundations, leaving you with five centimeters on each side. This overhang can be used to attach additional noise protection elements. Now the foundations are poured:
- mix the concrete according to the manufacturer's instructions
- use a large bucket and cement mixer for this
- the concrete should be viscous
- do not mix for too long
- Always mix concrete directly for one hole
- then fill the entire hole with concrete
- level with a smoothing trowel
- repeat on second hole
- finally let it dry
- Do not load during the drying time
- Drying time is usually 28 days to full load capacity
- Cover the foundations with a rain tarpaulin if necessary

Tip: Feel free to put a little more concrete in the holes so that there is enough material in them. Depending on the mix, concrete can sink, which leads to unevenness and requires repairs.
Soundproof wall: set up posts
Once the foundations have dried, you can start building the noise barrier. Fortunately, the effort for the soundproofing wall is significantly less than for the point foundations. Even several elements can be implemented quickly and effectively, which means that you can enjoy functioning noise protection in the garden within a short time. The first part of the manual deals with the assembly of the posts:
- Place the post base in the middle of the point foundations
- Measure the distance
- Align the post bases so that each side of the post points to the other post
- mark the holes on the concrete
- Remove the post base
- Equip the drill with a concrete drill
- Drill holes in the concrete of the selected screw length
- Guide the drill as smoothly as possible
- then place the post base again and screw it tight
- Place the post in the post base
- Fix the post 1 to 2 cm above the ground (e.g. over wooden slats)
- this protects the posts from rising soil moisture
- use a pencil to draw holes for holes on the posts
- Remove the posts from the sleeves
- Drill holes 3 cm deep into the wood
- Put the posts back into the sleeves
- screw tight
- Remove wooden slats or spacers

Complete the construction of the noise barrier
Now the posts are up. Check again whether the distance from the center of the post to the center of the post is 200 centimeters. After that, you can move on to the rest of the project and complete the noise barrier:
- the 3 wooden slats are now mounted
- serve as cross braces to attach the thatched elements
- are installed at 3 different heights
- the first directly above the post base
- the second at a height of 100 cm
- the third at a height of 195 cm
- can be installed in the direction of the garden or the property line
- Place battens from the center of the post (5 cm) to the other center of the post
- fix with self-tapping screws
- now roll out thatch element
- Place between the posts on the cross braces
- Reet element must not touch the ground
- Fix the reed element to the cross braces and posts with the binding wire
- ideally use binding wire every 20 cm on each wooden element
- Pay particular attention to a good hold on the upper cross strut
- Check that the thatched element is seated properly
- Touch up individual areas as required
- Finally, attach rain protection
- to do this, put the rain gutter upside down on the top of the thatched mats
- also fix with wire
- the rain gutter enables rainwater to run off as a roof alternative
- your soundproofing wall is ready

Reinforce sound insulation
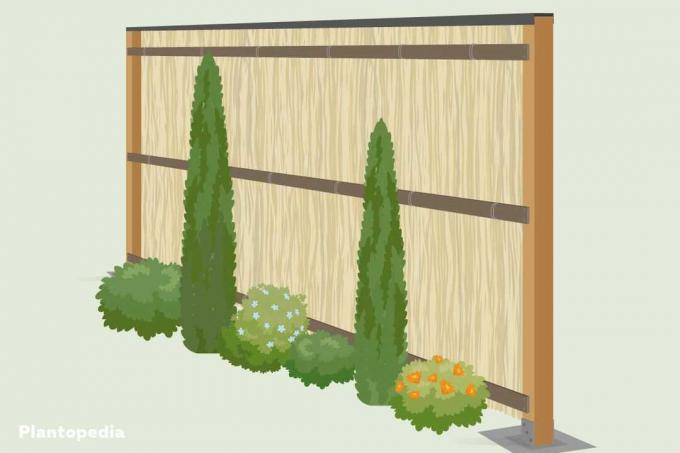
As soon as the noise barrier is in place, you can still adjust it to strengthen the sound insulation. What is meant by this? Sound can be prevented much more effectively if it hits a porous or uneven surface. That said, you can use a variety of different methods to reinforce the soundproof wall from the garden or street side if there is still enough space available. The following variants are suitable for this purpose:
- Planting (Climbing plants)
- thin gabions
- Hedges or bushes
- second noise barrier at a distance of 10 cm from the first

Note: If you are up for Climbing plants decide, you also put a wire mesh around the thatched elements. This gives the plants sufficient support to green the noise barrier.
frequently asked Questions
Most noise barriers do not require a permit up to a height of 180 or 200 centimeters. Nevertheless, you should check the legal requirements of your community for the construction of noise barriers or fences before construction, as these can differ significantly from place to place. Furthermore, development plans must be observed.
Yes. If you want to place the soundproofing on your property line to the neighbor, you have to check the neighbor law. The border distance to the neighboring property, which can be different in each federal state, is particularly important. Placement on the property line, on the other hand, is only possible if you and your neighbor agree.
Reet is an extremely robust material that only needs to be replaced after a period of 20 to 40 years. This is only possible if the sound insulation is protected from moisture from above and below. For this reason, as described in the instructions, you should not attach the individual elements directly to the ground and equip them with a rain cover at the top.
If you need to replace the noise protection in the future, you can dispose of the used reed on the compost. All you have to do is remove the wire and preferably chop up the stalks before composting. If they are crushed, they rot more easily. The wire used can also be disposed of without any problems.
Since you want to set up the soundproof walls outdoors, you should use weather-resistant wood. Robinia, larch and Douglas fir are ideal for this purpose. If you want to invest a little more in the wood, use teak, balau or azobé.


