
table of contents
- Well construction in the garden
- Permits
- fees
- Well in the water protection area
- Drill the ramming well yourself
- 1. Pre-drilling
- 2. Casing the borehole
- 3. Splash around
- 4. Mount the handle pump
- 5. Commissioning the pump
Many property owners want a fountain in the garden. The great interest in having one's own well is mostly of a financial nature, no wonder given the rising prices for drinking water and wastewater. However, some official requirements must be observed when building a well.
Well construction in the garden
If you want to drill a well on your own property, you must first check whether there is groundwater at an accessible depth. In addition, some permits are required. Even if the groundwater under the property is owned by the property owner, well construction is not permitted without official approval. The reason for this is that if the groundwater is polluted, there is a danger to the general public.
Permits
For the approval of the installation of a domestic well is the Lower water authority
responsible. In most federal states, this authority can be found at the district administration. Don't worry, the approval process is not very complicated. You should follow these steps:- Ask your water supplier about the depth of the groundwater table. A groundwater table depth of 6 meters is a benchmark for average-sized residential properties. On larger properties, having your own well pays for itself even if the groundwater level is lower.
- Check with the land registry office whether foreign water rights are affected.
- Report the well construction to the lower water authority of your district.
- Have them checked whether your property is located within a water protection zone. In this case, the application is more extensive. You need express permission from the water authority to drill the well.

fees
In most cases, the approval process is free of charge; the fee rates are regulated by the federal states and municipalities. However, if your property is in a water protection or floodplain area, permits can be very costly. Let the authorities advise you.
Well in the water protection area
If your property is located in a water protection area, drilling a well is not automatically excluded. An informal notification of the well construction to the lower water authority is not sufficient in this case and the approval process is, however, quite time-consuming. Failure to do so can result in severe penalties and fines of up to EUR 50,000.
If your property is located in the water protection area, you will need the following documents:
- Application to build a well
- Precise information on the property (address, parcel, ownership structure)
- Confirmation of possible contaminated sites
- Your planning documents for well construction with details of the extraction point and the planned extraction quantity
- The different types of fountains
Ramming wells are the most popular wells in your own garden. They can be installed by yourself with a little craftsmanship and muscle power.
Shaft wells require more extensive excavation than drilled wells. During the excavation, concrete rings are lowered into the earth. Shaft wells are built by specialist companies.
Drill the ramming well yourself
If the groundwater is no more than 8 to 10 meters below the surface of the earth, the property owners usually decide to build a ramming well. The ramming well is inexpensive compared to other types of wells, but a lot of muscle power is required. A ramming well is basically a metal pipe with a filter that is driven into the ground.
To build a ramming well you need:
- Well construction set (this set includes impact head, pipes, sleeves, ram filter and instructions)
- Hand-driven or motor-driven earth auger
- Gravel pump (Plunscher)
- Tripod
- Handle pump
- Well head
- Flushing socket
- Sealing material, e.g. B. hemp
- Pipe wrench
- Sledgehammer
- Wire brush
- spade
When all the materials are in place, construction can begin. We have put together instructions for you:
1. Pre-drilling
First, dig a hole in the intended place with a spade. Wells are often placed on the edge of the property. Now place the drill bit and drill clockwise with the hand-operated auger. Whenever you move the auger up, soil is carried to the surface. Drill until you reach the water-bearing layer. The drill can be extended using tubular rods. Drill individual sections two to three meters each. After that, the drill must be pulled out and cleaned.

Note: Under no circumstances should you hit the auger with a sledgehammer. If you encounter stones or other obstacles, it is advisable to drill another hole some distance away.
2. Casing the borehole
By the time you get to the groundwater, you've already done the hardest part. The lower part of the borehole collapses again and again. For this reason, the borehole must now be cased. Now connect the pipes for this. The threads must be carefully sealed. To do this, use Fermit as a sealant and hemp. The hemp must not be pushed out when screwing together. Unscrew the impact head. Then bring the well rod into the hole in the ground. Hammer the pile filter about 2 meters into the water layer. Insert the flushing socket, then flush the pipe with water. Do not install the well head until you have checked that the water drains through the filter. You continue to work with the gravel pump.
3. Splash around
At the beginning the water level in the borehole is still low. Flood the hole with water from the garden hose. Now the gravel pump comes into play. You set up the tripod over the borehole and lower the gravel pump. Then keep bringing the gravel pump down and up again. This is how the pump fills with the ground. This process is known as splashing around. When the gravel pump is full, it is pulled up and emptied. This process is repeated until the water is about two meters high.
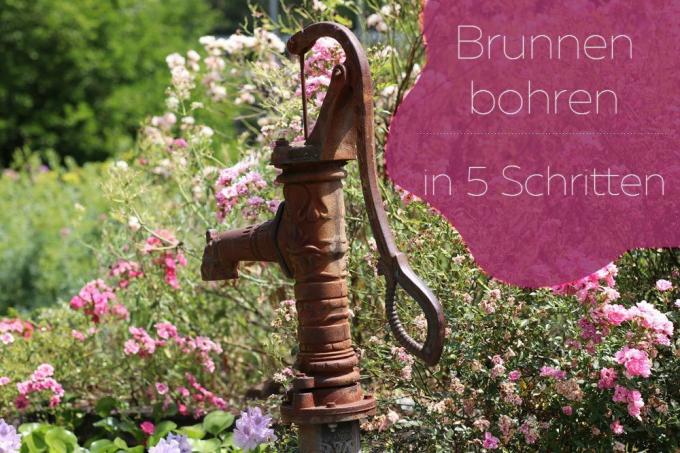
4. Mount the handle pump
Now you can attach the handle pump. For this you also need a foundation. It is also possible to use an electrically operated pump. Seal the borehole with clay.
Note: The pH value of the water decides whether plastic or galvanized pipes are more suitable. The guideline is to use plastic pipes with a pH value below 7 and galvanized pipes with a pH value above 7. Galvanized pipes are cheaper than plastic pipes.
5. Commissioning the pump
Now the motto is: "Water march", but very slowly!
Pump the first water. You should take a break after every 100 liters. The slow pumping prevents the filter from clogging. If you have an electric pump, turn it on and off briefly to keep it from clogging.


