
table of contents
- A worm = a pest?
- Do not fight earthworms
- Echytra in potting soil
- Getting rid of worms in the potting soil
- Replace the bucket earth
- "Bake" the substrate
- Heat in the microwave
- Insert nematodes
- Let the bucket dry
If there are worms in the potting soil, this does not necessarily mean that they are pests. Because if it is earthworms that have got into the earth, then they loosen up the substrate. But there are also other, small worms that have nested in the potting soil of the indoor plants. In the following article we will explain how you can fight this.
A worm = a pest?
As a rule, the long brown or white creatures are not pests, nor are they very useful for the garden soil. In a flower pot, however, the food that the potting soil offers is rather small. Then it may well happen that the plant is affected by a large population, as the curling animals eat it in search of food.
Do not fight earthworms
Earthworms are rarely found in the potting soil of indoor plants. But every now and then this can still happen. Above all, these loosen the garden soil and are not pests that could attack the plants, but rather
useful. Still, not everyone likes earthworms in the flower pot on the windowsill. Then it helps to water the earth and remove the worms that come up and release them back into the open. It is important that the plant can dry off well afterwards. the
Earthworms can get lost in the bucket soil as follows:
- Bucket was placed outdoors in summer
- for example in a meadow or a garden bed
- Earthworms crawl in from below via the drainage hole
- no special potting soil was used but garden soil
- Earthworms are in the garden soil
- so get into the pot
Always raise the bucket a little higher in the garden or place it on the terrace or balcony, then the earthworms usually do not get into the bucket soil.
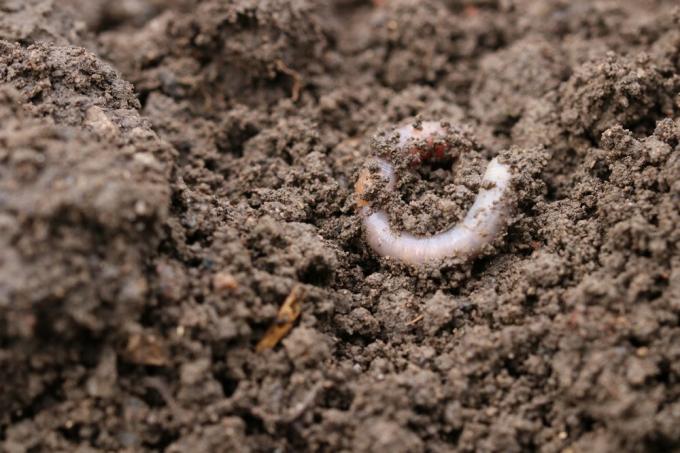
Echytra in potting soil
Echytraes are small, white worms that are between five and thirty millimeters long and appear transparent. These worms are even bred for fish feed. Echytra are not harmful to the plant, but it is not a nice picture when the substrate in the bucket is populated by small worms that move on the surface of the earth. If the echytrae are disturbing, they can be gently removed by simply pouring out the potting soil in the garden bed and the plant receives new substrate. As a rule, the echytrae do not get into the bucket soil from the outside, but are brought from the specialist trade in the sealed soil bag and put in the bucket.
Getting rid of worms in the potting soil
Replace the bucket earth
As soon as worms are discovered in the bucket, one of the first measures can be to replace the bucket soil. This first aid is very effective if the exchange is done correctly. You should therefore proceed as follows:
- Carefully remove the plant from the pot
- Shake off roots and wash off if necessary
- do not leave any old potting soil on the roots
- Pour out the pot
- can also be in the garden
- alternatively treat old potting soil in the oven or microwave
- clean the bucket well inside and out
- disinfect if necessary
- use pure alcohol from a pharmacy for this purpose
- Prepare the bucket with drainage and substrate again
- Put the houseplant back in place
If you replace the potting soil due to worm infestation, you can also get a new one if necessary. Use larger pots to give the houseplant more space and keep doing this at the same time to repot.

"Bake" the substrate
Even if it sounds strange, but depending on the quality, ready-made soil purchased from specialist gardeners can already contain small worms that end up in the tub with the houseplants. It is therefore helpful to put the soil you bought into the oven before using it. How to remove any uninvited guests in the substrate before planting the houseplant. When baking, you should proceed as follows:
- Place parchment paper on a baking sheet
- Distribute earth
- Heat to 220 ° Celsius
- Leave in the oven for about 20 minutes
Since the substrate dries quickly, the oven should not be left out of sight to prevent a possible fire from developing. After baking, take the baking sheet and earth out of the oven and let the substrate cool down well. Only when it has gotten cold, put it in the bucket and water it well.
Heat in the microwave
If only a small part of the substrate has to be freed from worms, for example for a small pot, then this can also be heated in the microwave. To do this, put the slightly damp substrate in a cotton bag and knot it. Then you have to put it in the microwave for about five minutes at 900 watts. Then let the bag cool down, put the substrate in the tub, water it well and plant the plant as usual. Heating can also damage nutrients, so you should fertilize the houseplant immediately.
Insert nematodes
If it is not real worms, but maggots that are up to mischief in the earth, then pests later develop from this and you should therefore fight them. Even if maggots and worms have nothing in common biologically, they can easily be confused by a layperson. You can use nematodes against the maggots. These are the following:
- Nematodes available from specialist gardeners
- are given with the irrigation water
- natural fight
- Roundworms that feed on the maggots
The advantage of the nematodes is that although they are also worms, they remain underground. As soon as all pests have been fought, the roundworms also die again, as they can no longer find any food.
Let the bucket dry
Sometimes it helps to just let the potting soil dry out. A worm does not tolerate drought and dies. But in this case it must be ensured that the plant can withstand a certain dry period. Therefore, letting the potting compost dry off is not suitable for every plant.
